IMPORTANT: Install ONLY the plug-ins that are
required!
Not all plug-ins work with the current Eclipse and Java
versions and installing them can cause installation and operational problems for
other plug-ins. See the instructions in your class year's
instructions as to which plug-ins are required.
Quick Links to Install Instructions
- Java JDK (aka "SDK") -- Do this
FIRST!
- Eclipse -- "for Java Developers" edition,
NOT the "EE" version!
- UML Lab -- you will need to get a license
key from the instructor
- Subclipse -- Mac and Linux installations may
need additional installations.
- WindowBuilder -- Note that some instructions may indicate that this plugin is included with Eclipse but as of 1/7/18, it was unbundled from Eclipse and must be installed separately.
- CodeTogether -- Enables remote collaboration on a shared Eclipse instance.
In general, the best way to install plug-ins is to use the Eclipse Marketplace:
- From the main Eclipse menu, go to
Help/Eclipse Marketplace...
- Search for the desired plugin and click the "
Install" button.
Installation Tips:
- Eclipse doesn't always upgrade from previous versions very well, leading to unexplainable problems.
- Try doing a completely fresh Eclipse install and then install only the minimum number of plugins needed.
- Always restart Eclipse after installing or uninstalling a plugin.
- Sometimes unseen security or other failures can cause corrupted installs of plugins.
- Try running Eclipse with elevated privileges, e.g. "as administrator" in Windows, when installing or uninstalling a plugin.
Install the latest Java JDK
Please see the
Comp310 Java Resources page.
Install Eclipse
If you already have Eclipse installed, follow the directions on the Eclipse home page to upgrade to the latest version. There are also instructions there on how to set Eclipse to always upgrade to the latest version.
If you are running a 32-bit operating system, please contact the
staff immediately BEFORE installing anything!
(Recommendation: upgrade to a 64-bit operation system as a 32-bit system
will only cause one problem after another.)
- Go to http://eclipse.org and
click the link for "Download"
- Download the installer for the latest version of Eclipse and run it.
- Windows users: The installer must be run "as
Administrator", so download the installer, then right-click the
downloaded file and select "Run as Administrator"
- When the Eclipse installer asks, the version you want is called "Eclipse IDE for Java Developers",
not Eclipse IDE for Java
EE Developers.
- The installation instructions willv vary depending on the computer's
operating system so just follow the on-screen directions.
Notes:
- On Mac OS X machines:
- Be sure you know if you are running the 64-bit JDK
- JDK 1.7 issues:
- The Mac OS may not include the latest Java JDK or JRE,
e.g. 1.8.
Install it directly from the Java download site.
- On a Mac, in Applications/Utilities, is a Java preferences app.
Use this to set the latest installed Java JRE to be the default JRE.
- (Mac or Linux) Eclipse may not fully recognize that the new JDK and JRE is
installed.
- This may result in build errors referencing missing
components or incorrect build paths.
- In the Eclipse Preferences/Java, set/check the following:
- Compiler/Compiler compliance level = 1.8 (or
whatever the latest installed JRE is)
- Installed JREs = jre8 (or whatever the latest
installed JRE is)
- If not correct, click the "Search..." button, which
should find it.
- Add the jre8 (or later) and remove any other ones.
- If you already have a project created you can simply delete
the project and make a new one once the above changes are made,
or
- Go the Project properties (hightlight the src
folder and go to Project/Preferences) and set the following:
- Java Build Path/Libraries = JavaSE-1.8
- If not set, click "Add Library" and select "JRE
System Library" and click "Next".
- "jre8" (or later) should be the "Workspace default JRE".
Select it and click "Finish".
- Apple docs on Eclipse on a Mac:
http://developer.apple.com/tools/eclipse.html
- On Linux machine
- Ubuntu users must install the regular JDK, not the one that came
with Ubuntu! Please contact the staff for assistance.
Note:
Particularly if you have upgraded Eclipse from an earlier version, e.g. Kepler
to Luna, you may need to increase the amount of memory allocated to Eclipse in
order to gid rid of "Out of Memory" or "GC
Overhead Limit Exceeded" errors. If you are encounter
these errors, please see these directions.
Keep Eclipse Updated! -- Periodically, run
Help/Check For Updates from the Eclipse main menu.
Windows users: You may need to run Eclipse "as
administrator" in order to perform updates (except Subclipse -- see below), depending on how Eclipse was
installed.
Checking the JVM that is running Eclipse
Eclipse itself is a Java program and is thus run by a specific JVM. The JVM that runs the Eclipse app is NOT necessarily the same as the JVM to which it is compiling and running developer code! Having a difference in the JVM running Eclipse vs. the JVM to which Eclipse is compiling and running developer code, especially if the former is an older version, the can lead to strange, seemingly unrelated problems both during compilation and running of developer code as well as in the operation of some Eclipse plugins. WindowBuilder, for instance, is well-known for being very sensitive to a discrepancy in JVM versions.
The discrepancy in JVM versions between the one running Eclipse itself vs. the one to which it is compiling and running developer code is often caused by having an older JVM version installed when Eclipse was installed. When Eclipse installs, it typically ties itself to be run by the default JVM at the time of the Eclipse install. This means that a discrepancy in JVMs will occur is a later version of the JVM is installed later. The problem can still occur even if the later version of the JVM is installed before Eclipse if the older JVM remains the default JVM.
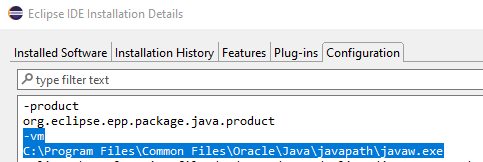
To check the JVM version under which the Eclipse app is running:
- Open The "About Eclipse" dialog and click the "Installation Details" button.
- In the "Installation Details" window, click the "Configuration" tab.
- In the very long configuration listing, typically closer to the top, look for a line that says "
-vm"
- The next line is the JVM that runs Eclipse
- Windows: The latest JDK installations update the "javapath" symlink under "C:\Program Files\Common Files\Oracle\Java" to point to the latest JVM installed. This helps keep Eclipse in Windows running on the latest JVM.
- Mac:

- "
libjvm.dylib" may be called "libjli.dylib" in newer JDKs.
Forcing a Specific JVM to Run Eclipse
Sometimes between the operating system and Eclipse, signals
get crossed and Eclipse uses the wrong JVM (Java Virtual Machine, aka Java
Run-time Engine/JRE) when it runs. This can cause a multitude of
confusing problems such as the inability to run some plug-ins (e.g. "incorrect
version number in plug-in class file" error). Here are some
directions on how to manually configure Eclipse's initialization file to force
it to use the proper JVM:
http://wiki.eclipse.org/Eclipse.ini
In a nutshell (see the above link for details and official instructions!), one needs to configure the -vm option in the eclipse.ini file:
- Find the Eclipse installation folder:
- Windows: A typical installation folder is
C:\Users\[username]\eclipse\java-[release name]\eclipse
- Mac: Find the Eclipse app in Finder and right-click it. Select "
Show package contents" and browse down to Contents/Eclipse
- Open the
eclipse.ini file with a text editor.
- Find the
-vm entry
- If the entry exists, replace the next line with the location of the latest installed JVM (
bin folder)
- If the entry does not exist, add it, making sure that it is BEFORE the
-vmargs entry! Then add the next line which is the location of the latest installed JVM
Typical JVM installation locations:
- Windows:
- If Eclipse's configuration window (see above) says that
-vm is set to "C:\Program Files\Common Files\Oracle\Java\javapath\javaw.exe", then a -vm entry in the eclipse.ini file may not be needed.
- Otherwise, a typical JVM location is
C:\Program Files\Java\jdk-[release]\bin
- Mac:
/Library/Java/JavaVirtualMachines/jdk-[release]/Contents/Home/bin
- Note: the dynamic link library that use to run Eclipse may be called "
libjvm.dylib" or "libjli.dylib" (newer JDKs).
REMEMBER: The configuration of what JVM runs the Eclipse app is a separate setting than the JVM to which developer code is compiled (the "compliance level" of the compiler) and the JRE used to run developer code (installed JRE). These settings can be found under "Preferences/Java".
Updating Eclipse
One should regularly update Eclipse to make
sure that you have the latest versions for Eclipse and all the plugins.
To manage update sites:
If you followed the directions below to install your plugins,
the update sites should already be in Eclipse. To add new update
sites or to check that you have the ones for the installed plugins,
- In Eclipse, go to Windows/Preferences
- Expand the Install/Update node and select "Available Software Sites"
- You can add, remove, enable/disable and edit update sites here.
To manually perform an update:
- Go to Help/Check for Updates
- Eclipse will run through all its update sites looking for updates
To perform a major release update on Eclipse:
RECOMMENDED: Force Eclipse to always update to the latest major release:
https://download.eclipse.org/releases/latest/
Or, you can explicitly add the update site for the new
release (see above), whose name depends on the release, but is typically something on the
order of
https://download.eclipse.org/releases/[release
name]/
e.g. https://download.eclipse.org/releases/2021-06/
Once you add the update site for the new release, you can
manually run the update as described above. On Windows machines, updating
Eclipse itself will may require running Eclipse as an administrator
(symptom: You get are unable to select the update due to "insufficient access
privileges" or the like.)
For more information, see
the documentation:
FAQ How do I upgrade Eclipse?
Install Eclipse Plug-ins
Window Users: Note that updates to Eclipse itself may require that
Eclipse be "run as administrator". Note that when Eclipse restarts
after an installation, it is still running as as administrator. To
return to normal operation, exit Eclipse completely and then run it again as
normal.
"UML Lab" Diagramming Tool
UML Lab Home page:
http://www.uml-lab.com/en/uml-lab/
UML Lab is a commercial UML diagramming tool for Eclipse that
supports round-trip engineering, i.e. creating diagrams from code and creating
code from diagrams.
Rice owns a license key for the full UML Lab functionality.
The course staff will tell you how to obtain this key. The only
restriction for the key is that it must be installed while on-campus and one
must periodically (~ every 2 weeks) bring UML Lab up while on campus so it can
renew its license.
A free but reduced functionality "Student Version" is available via their academic
program:
http://www.uml-lab.com/en/uml-lab/academic/. This version is
has no limitations with regards to being on-campus.
Installation:
- Have your license key in hand
before you start the install!
- If you wish to use the free, but reduced functionality, Student Version, go on-line and apply
for one. This process may take several days or more.
- Your course instructor may have free "floating licenses" available
for you to use. Ask before you start the install to make
sure you can obtain one.
- You must be
ON CAMPUS (i.e. connected to the Rice wired or wireless
network) to install a floating license! (See
notes below)
- From Marketplace (recommended):
- In Eclipse, go to Help/Eclipse Marketplace...
- Search for "UML Lab"
- Select and install "UML Lab Modeling IDE" (not the "Class Diagram Editor"!)
- Unless directed otherwise by the course staff, take the default installation options.
- Check off any license agreements and click "Finish".
- Restart Eclipse.
- The first time you use UML Lab, you will be asked to input the license
key.
- In general, the license key will be available in Canvas. Please check the software installation and configuration instructions for the specific course year.
- If you have already been running UML Lab , e.g. in trial mode, you
may enter your license into the UML Lab Preferences. Chose "Preferences/UML
Lab/Product License" in the Eclipse menu:"
- Select "Floating
License"
- Paste the entire license key into the "Host
URL"
input field. This will automatically parse the license
key and properly distribute its pieces over the
URL Host,
Contingent and Password fields.
- Be sure that Keep license on exit
is set to its default value, No.
- Confirm your input by clicking "OK".
- BEFORE YOU DO ANYTHING IN UML LAB, BE SURE TO SET THE PREFERENCES CORRECTLY!
UML Lab runs slightly differently than the
other UML diagramming tools. Be sure to check out the
Using UML Lab page.
UML Lab Floating License Notes:
- You must be connected to the Rice network to install the license key.
- The license key works by periodically confirming with the manufacturer's
central license server that the product is being used on-campus.
- When you close Eclipse, UML Lab will tell you how long you may use the
the product off-campus before you must use it again on-campus, when the
license key will be re-verified. This time period is about a week.
Subclipse Subversion Source Control -- NOT NEEDED IF USING GIT!!
Subclipse Home page:
https://github.com/subclipse/subclipse/wiki
Subclipse provides Subversion source control capabilitiees for
Eclipse to enable multi-developer access to a common, versioned source code
repository. It is also used as the assignment turn-in mechanism in the
course.
Subversion home page:
http://subversion.apache.org/
Installation:
Windows Users: Do not use "Run as
administrator" to install Subclipse (see below)
- Go to the Subclipse home page and check what the latest version of the
plug is. Be sure to install the latest version for your system.
- From Marketplace (recommended):
- In Eclipse, go to Help/Eclipse Marketplace...
- Search for "Subclipse"
- Select and install "Subclipse"
- Manually (only if necessary):
- In Eclipse, go to Help/Install New Software
- In the "Work with" text field, type the URL for
the latest version and then click "Add":
- As of 01/09/2017, the latest version is
https://dl.bintray.com/subclipse/releases/subclipse/latest/
- The "Add Site" dialog will ask you for a
name. Type in something useful, such as "Subclipse". Click "Ok".
- In the main box in the center of the "Install"
dialog, check off
-
Core SVNKit Library (required)
-
Optional JNA Library (recommended)
-
Subclipse (note that this
automatically selects installing the SVNKit, which Mac and Linux users
may need)
-
Subclipse - JavaHL Windows Binaries
(Windows users
only)
-
Subclipse - Maven Integration
(Only if you intend to use Maven in other work -- not used in this
class)
- Click "Next".
- The next screen is a review of what is going to be
installed. Click on "Next".
- Accept the license agreement on the next screen and then
click on "Finish".
- Disregard any warnings about installing unsigned software
and allow the software to install.
-
Restart Eclipse when the installation is finished.
NOTE: As of 1/7/18, almost all Mac and Linux installations have required the use of the SVNKit to operate properly.
In addition, a number of Windows machines have also needed it. If you are having problems with the JavaHL driver not being recognized, please follow the directions below to switch to the SVNKit driver.
Linux and Mac Issues:
Linux and Macs have some known problems with recognizing
and/or interoperating with the JavaHL component of Subclipse. JavaHL is a
system-dependent Subversion client that either comes with Subclipse (usually
only for Windows installations) or is already installed in the operationg system
(typical of Macs and Linux). This is often caused by the
latest stable SVN client version for that OS platform being incompatible with
the latest Subclipse version.
The first thing to try
if the above installation does not work, is the following work-around, which
uses a pure-Java SVN client called "SVNKit":
- In the Eclipse Preferences, under Team/SVN, for the "SVN Interface",
select the
"SVNKit (Pure Java)"
option.
- We have seen issues where Mac users have included the "JavaHL Windows
Binaries" in their download and install. This can cause
Subclipse to default to the Windows JavaHL client, which not surprisingly,
will not work on a Mac. Just go and change the client to be
SVNKit instead, which should be a droplist choice for the client. If
it does not appear as a choice, completely uninstall Subclipse (see below)
and try installing again with the correct choices.
Windows Issues:
If Subclipse was installed using "Run as administrator", the
SVN operations may not be possible because no SVN client is available.
See Preferences/Team/SVN to see what the "default SVN client" is set to and what
options are available. The correct client for Windows is the JavaHL
client.
The problem does not seem to appear if Subclipse is installed
without "Run as administrator".
To fix the problem, uninstall all of Subclipse(see below) and
reinstall it.
Uninstalling Subclipse:
Sometimes, you need to completely uninstall Subclipse and
start over. To uninstall Subclipse, go to Help/Installation Details.
There are many pieces to Subclipse, which
need to be uninstalled one by one, though you do not need to restart Eclipse
between each uninstall, only after the last one. Uninstall the following,
the details of which will depend on what you initially installed:
- Anything that is called "Subclipse ...", e.g.
- Anything that is called "Subversion ..."
- Anything called "SVNKit ..."
- JNA Library
- Maven SCM handler for Subclipse
Once everything is uninstalled, restart Eclipse (not as
administrator) and reinstall Subclipse.
If you are still having trouble even after configuring to
use the
SVNKit, contact a staff member immediately. Do NOT proceed further
unless cleared by a staff person!
If no SVNKit is available, try the following solutions:
Mac OS X
If neither the regular installation above nor the SVNKit
installation above works, you can try the following as a last resort:
Information about JavaHL on Mac OS X:
https://github.com/subclipse/subclipse/wiki/JavaHL-on-OSX
Linux
Information on JavaHL on Linux:
https://github.com/subclipse/subclipse/wiki/JavaHL-on-Linux
How to Use Subclipse
Eclipse WindowBuilder
As of 9/2019, WindowBuilder is not currently bundled with Eclipse, so it needs to be will need to be explicitly installed.
WindowsBuilder is not included in the Java EE version of
Eclipse, so if you must use the EE version (NOT recommended!) then you must
manually install WindowBuilder.
WindowBuilder home page:
http://www.eclipse.org/windowbuilder/
WindowBuilder is a (free!) What-You-See-Is-What-You-Get
("WYSIWG") editor for creating graphical user interfaces ("GUI"'s) in Java.
The use of a an automated GUI builder such as WindowBuilder greatly simplifies
and speeds up the development of GUI-based applications.
Installation:
- From Marketplace (recommended):
- In Eclipse, go to Help/Eclipse Marketplace...
- Search for "WindowBuilder"
- Select and install "WindowBuilder"
- Manually (only if necessary):
- For manual download information for the latest version, go to http://www.eclipse.org/windowbuilder/download.php
- In Eclipse, go to Help/Install New Software
- In the "Work with" text
field, type in the "Update Site" link found in the above site that corresponds to your version
of Eclipse.
Click "Add".
- The "Add Site" dialog will
ask you for a name. Type in something useful, such as "WindowBuilder".
Click "Ok".
- In the main box in the center of the "Install"
dialog, check off at least the following components:
- Swing Designer
- WindowBuilder Engine
- Check off any license agreements and click "Finish".
- Restart Eclipse.
How to Use WindowBuilder
CodeTogether
CodeTogether home page: https://www.codetogether.com/
CodeTogether is a tool that enables a "host" to share an Eclipse session with multiple remote users where everyone in the session can
- Simultaneously edit the same code file on the host's machine, where everyone can see everyone elses cursor and edits.
- Simultaneously switch to different files on the host's machine and have that file automatically switch on everyone else's view.
- Switch to and edit a file on the host's machine without disturbing other users' views though they will simultaneously see any edits being made.
Installation:
- From Marketplace (recommended):
- In Eclipse, go to Help/Eclipse Marketplace...
- Search for "CodeTogether"
- Select and install "CodeTogether"
- Directly from developer:
- Follow directions at https://www.codetogether.com/download/
For detailed installation directions, see https://www.codetogether.com/docs/codetogether-for-eclipse-installation/
How to use CodeTogether
None of the following plugins are needed by COMP 310 or COMP 504, though they may be needed for other classes:
Eclipse Web Tools Platform ("WTP")
This plugin is useful for those who wish to do web development
using Eclipse. In particular, one of the few free WYSIWYG ("What You
See Is What You Get") HTML editors is available here.
WTP Home Page:
http://www.eclipse.org/webtools/
Update site:
http://download.eclipse.org/webtools/repository/[eclipse_version]/
e.g. http://download.eclipse.org/webtools/repository/neon/
To get just the "Web Page Editor":
- Add the appropriate site above to Eclipse's "Available Software Sites"
and open the update site in the "Install New Software" dialog in Eclipse.
- Expand the "Web Tools Platform" item
- Select "JSF Tools - Web Page Editor"
- Finish the installation of the plugin.
Google Plugin for Eclipse (Google App Engine)
This plugin is only needed if you are doing Google App Engine
development in Eclipse, particularly in Java. This tool
includes the Google App Engine SDK and local emulator plus deployment tools.
Note that as of 8/15/16, the Google Plugin above only
supports Java development for Google App Engine, not Python, Php or Go.
To develop in these languages, you need install the stand-alone SDKs for those
languages.
Google Plugin for Eclipse home page:
https://developers.google.com/eclipse/
Update site: https://dl.google.com/eclipse/plugin/[version]
e.g. https://dl.google.com/eclipse/plugin/4.6 (check for the latest
version in the home page first)
PyDev
This plugin is used for Python development in Eclipse.
PyDev home page:
http://pydev.org
Update site: http://pydev.org/updates/
© 2020 by Stephen Wong