|
|
Comp201: Principles of Object-Oriented Programming I
Spring 2006 -- Shape Calculator, part
1
|
Making a Simple Window Frame
In the immortal words of Elmer
Fudd, "befwar we can make wabbit fwicasee, we must fwirst catch a wabbit!"
(or if you'd rather, genuine
Elmer Fudd quotes). So, before we make an application that uses a GUI, we
must first figure out how to make a GUI.
Put all the following classes in a
package called shapeCalc.
The Controller
The main function of a Java
program serves only to start the object system up and is not really a part of
the overall functioning of the system. It's job is simply to create the first
object.
So, what we will do here is to create a special class called ShapeCalcController
whose sole purpose is to start the system up.
- Go ahead now and create ShapeCalcController
with
- a no-parameter constructor
- Just so that you know that it is running properly, put some "stub"
code in the constructor such as a System.out.println
that says that the constructor was run. We'll remove this stub code
later.
- a main method, which
always has the following signature: public
static void main(String[] args)
- The body of the main
method should simply instantiate ShapeCalcController.
There is no need to assign the newly created object to variable, all
you are doing is bringing it into existence. It will do the rest.
- Compile and run your program by right-clicking the ShapeCalcController
class in DrJava and selecting "Run
Document's Main Method".
Later in this course the controller class will become a much more important
piece of a "Model-View-Controller"
design pattern. But for now, we will simply use it to instantiate our main window
frame.
The Frame
A "frame" is the basic window object in Java. But as supplied by
Sun, a frame has no buttons, or text fields or labels or other GUI components
to make it useful.. We will make a "custom" frame by subclassing Sun's
frame, JFrame.
- Copy the code for AFrame
from the lecture notes, placing the code in your shapeCalc
package. Be sure to change the package name inside the code to shapeCalc!
- Create a class called ShapeCalc
that extends AFrame. This means
that ShapeCalc will automatically
be able to do all the cool things a JFrame
can do, such as resize, minimize, maximize, move around the screen, etc.
This also means that your frame will end the program when it is closed, as
it inherits this behavior from AFrame.
- In ShapeCalc, define
a 1-parameter constructor that takes a String
for its title. Since AFrame's
constructor takes the title, all that ShapeCalc
needs to do is to call its superclass constructor, handing it the title,
i.e. super(title);
- In ShapeCalc, define
a concrete implementation of the abstract intitialize()
method inherited from AFrame.
Leave the body of this method blank for now--we will add code for various
components later.
- Modify the constructor of ShapeCalcController
such that it instantiates an instance of ShapeCalc
(with a title string), assigning it to a variable, which can be either a local
variable or a field of ShapeCalcController.
- Under what circumstances would it make a difference to use a local variable
vs. a field?
- Simply instantiating a frame doesn't show it on the screen however.
- After instantiating the ShapeCalc,
call its validate() method
(no parameters). This will ensure that all the various components in the
frame are properly positioned and sized. Of course, we don't have any
components in our frame yet, but "real soon now..."
- To actually get our frame to show on the screen, we need to set its
visibility to true. We
do this by calling its setVisible()
method and passing true
as the input parameter.
- Run your ShapeCalcController
again and see that a small but beautiful frame does pop up! You can remove
the println stub code at this
point, now that you have other verification that the program is running properly.
- To get your frame to have a reasonable size and to pop up in the middle
of the screen, write the following in the frame's intitialize()method,
in this order:
- setSize(400, 400); //
This will set the size of the frame to 400x400 pixels.
- setLocationRelativeTo(null);
// This will center the frame on the screen. This must follow the
setSize method because
otherwise the width and height are still 0 and the frame won't center
properly.
Adding Components to the GUI
Ok. So you're bored with your plain little frame that you managed to pop up.
(Old wheezing voice:) "Well, back when I was your age--little whippersnapper--it
took hunderds of lines of code to just to get a plain little window to pop up.
You just don't know how easy you've got it these days with that Java toolkit
stuff and all! In my day, GUI programming built character--a little pain and
suffering is good for the soul!"
Old reminiscing aside, let's add some more graphical components to our frame.
All of the following code is to be added to ShapeCalc.initialize(),
except for import statements:
- First, let's put 2 panels and a label onto the frame.
- Create 3 local variables, ctrlPnl,
displayPnl, areaLbl
of types JPanel,
JPanel and JLabel
respectively.
- You will need to import javax.swing
to do this.
- Initialize areaLbl
by calling the constructor of JLabel
with a the string "Area:"
so that by default, it will show this text.
- A frame is capable of having many "panes" which can be layered
one on top of the other like overhead tranparencies. We will only deal
with one pane in this course, the "content pane" which is the
main, default pane.
- Create a temporary variable of type Container
called cp and set it
equal to getContentPane().
You will need to import the
java.awt package to do this.
- A frame, by default, automatically lays out the components added
to it (to its content pane, actually). Java containers (GUI components
that can contain other GUI components -- does this sound familiar?)
can be set to have any sort of automatic layout mechanism that is
desired. Be default, a frame has a "Border Layout", which
means that the components are arranged along the edges of the frame
or in its center:
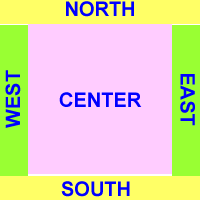
- To add the ctrlPnl
to the top of the frame's edge, we write: cp.add(ctrlPnl,
BorderLayout.NORTH); -- See how the border layout positions
are implemented as static, final fields of the BorderLayout
class?
- Add the displayPnl
to the center and and areaLbl
to the south edge of the frame.
- Run your program. You will not see the panels at the north and center
but you should be able to see the label at the south edge of the frame.
- Now let's add a text field and a button to the north panel (ctrlPnl):
- JPanels are Containers
and by default have a FlowLayout,
which means that any components that are added simply go in one after
another, "flowing" from left to right and wrapping to the next
line if necessary.
- Declare a local variable of type JTextField
called typeTF. If you pass
the JTextfield's constructor
a String, it will start
with that String in it
by default. Hand it the string "Square"
for now.
- Declare a local variable of type JButton
called newBtn. Hand the
JButton's constructor the
String "New..."
which will appear on the face of the button.
- Using the ctrlPnl's add
method, add typeTF and
newBtn to the panel. No
other input parameters are necessary since each component will simply
appear (form left to right) in the order in which it was addd.
- Run your program to verify that the text field and the button now appear
at the top edge of your frame.
- Now let's see if we can get some GUI action! We need to connect an event
"listener" to the button so that when the user clicks on the button,
something happens. Anonymous inner classes will come into their own here.
- Import java.awt.event,
as we will need some classes from that package.
- Call newBtn's addActionListener
method, handing it a new instance of an anonymous inner class derived
from ActionListener.
- ActionListener is
an interface and must implement the method public
void actionPerformed(ActionEvent e). When the button is clicked,
it is this method that will be called by the button.
- For now, just put a System.out.println
in the body of actionPerformed
to verify that the listener actually gets called when the button is
clicked. This is j ust stub code that you will delete later.
- Run your program and click the button. Does does the correct message
get printed out every time you click the button?
- Now let's try something more sophisticated. This is still stub code,
but it is fancier stub code. Let's try to transfer the text from the text
field to the label when the button is clicked.
- A JTextField has a
String getText() method
that will return the text that is currently showing on it.
- A JLabel has a void
setText(String s) method that sets the text of the label to the
supplied string.
- Using the above information, replace your System.out.println
in actionPerformed with
a single line of code that will transfer the text in typeTF
to areaLbl when the newBtn
is clicked.
- You will need to declare both typeTF
and areaLbl as final.
Why?
- Run your program and verify that clicking the button will transfer
whatever text you type in to the textfield to the label.
Congratulations! You've built your first Java GUI program!
On to part 2!
Last Revised
Thursday, 03-Jun-2010 09:50:13 CDT
©2006 Stephen Wong and Dung Nguyen
