COMP 212 Lab 1.5: UML and more Java Syntax
This tutorial covers:
- StarUML: a tool to create class diagrams and other types of diagrams in the Unified Modeling Language (UML).
StarUML
StarUML (SU) is a tool to create UML class diagrams and automatically generate Java "stub code". SU can also reverse engineer Java source/byte code to produce the corresponding UML diagrams.
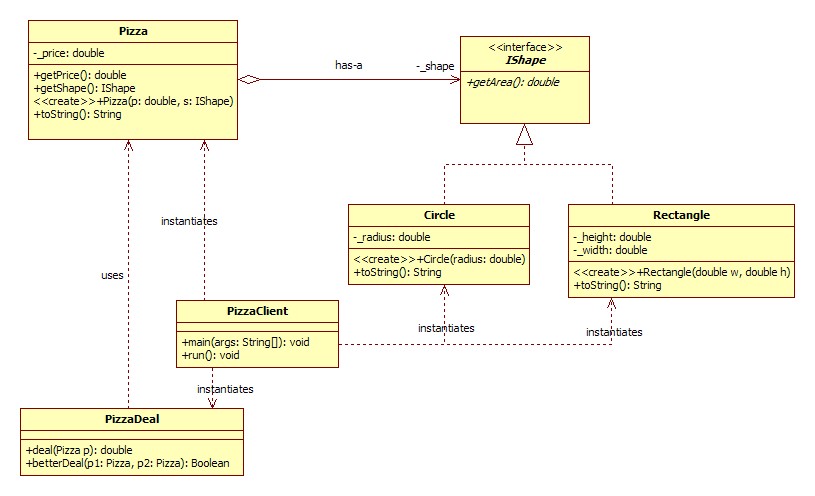
In this lab, we will use SU to design a Pizza program. Perform the following steps to create the UML diagrams shown below. SU will generate code that reflects the class structure, but not the specific actions on any objects. For that, after creating the diagram using SU, you'll edit the resulting stub code to add the rest of the functionality to the code, filling in what each method should do.
- Installation: To begin, we must first install the software we will be using. The package, StarUML, is open source software, licensed under the GPL (GNU Public License), and is freely available for download from its homepage. And here is a direct link to the package itself.
- Once SU is installed, start the program.
- After starting SU, a template box titled "New Project by Approach" may be present: if it is, select "Empty Project" and press "Ok". If the box was not present, go to the "File" menu and choose "New Project".
- Save the project now so you do not lose any progress if some problem arises. From the "File" menu, choose "Save", and select a location to save the project.
- Important! Be sure that the subtitle bar, just above the diagram palette, says "Main (Design Model)". The program will sometimes default to using an "Analysis Model", which we are not interested in for this lab.
- Now to begin actually creating the diagram, from the "Toolbox" which starts by default on the left side of the screen, select the "Class" icon, and left-click somewhere on the diagram window. This should create a new class with a generic name. Rename the class to
Circle by double clicking on the name. Add an "Attribute" (or field) to Circle by right-clicking the object on the diagram, expanding the "Add" menu, and pressing the green "Attribute" button. Specify the data type in the properties box by typing double in "Type".
- Repeat the same process to create a class called
Rectangle with private _width and _height fields of type double. You may notice using the "Model Explorer" on the right is faster to add these, but do however note that adding the classes and interfaces themselves in this toolbox (instead of using the toolbox on the left and clicking on the palette to create the object) will not create the objects in the diagram. If you choose to use the "Model Explorer", the area we will be interested in is visible after expanding the "Design Model" group.
- Create an interface called
IShape
- From the toolbox, choose "Interface" and click somewhere on the palette. Rename the generic name to
IShape. Select the interface by left-clicking the item after it is created.
- On the top toolbar, select the dropdown "Stereotype Display" and change the value to "None". This will change the previous circular shape into a rectangular shape.
- Also on the toolbar, de-select the "Suppress Operations" box. This will allow us to see what operations the interface has in the diagram view.
- Add a
getArea method of type double to the IShape interface. This can be accomplished by right clicking the interface, expanding the add menu, and pressing the red "Operation" button. Enter the name as: getArea. To set the return type, expand IShape in the "Model Explorer", right click the getArea method you just created, and select "Add Parameter". In the "Properties" box, change the parameter’s name to nothing, "", change the "DirectionKind" to "return", and change the "Type" to double.
- Make
Circle and Rectangle implement IShape by selecting the "Realization" arrow from the toolbox, clicking on Circle and dragging the line to IShape. Repeat the same process for Rectangle. This is adding the relationship that Circle and Rectangle will implement the IShape interface.
- Add a class called
Pizza.
- Add a private
_price field of type double.
- Add a public
getPrice operation of type double.
- To make
Pizza reference an IShape, select class Pizza.
- Select the "DirectedAssociation" arrow in the toolbox, click on Pizza, and drag to
IShape. Now select the arrow, and in the "Properties" box on the right, change the name to "has-a", change "End1.Aggregation" to "AGGREGATE", and change the "End2.Name" to _shape. This will automatically add a private field called _shape of type IShape to Pizza.
- Create a Get Routine for
_shape called getShape that returns double. This is the same process as just adding an operation called getShape that returns double.
- Constructors are special pieces of code used to initialize an instance of a class when it comes into existence.
- To add a constructor for Pizza, right click on Pizza, expand the "Add" menu, and select "Operation". From here, add a normal operation as usual, with input parameters double
price and IShape shape.
- Adding an input parameter is just like adding an output parameter for the return type earlier, except you specify the desired parameter name, such as price and shape, and the appropriate data type.
- Add a
Circle constructor with parameter double radius.
- Add a
Rectangle constructor with parameters double width and double height.
- Add a class called
PizzaDeal with two operations:
double deal(Pizza p)Boolean betterDeal(Pizza p1, Pizza p2)
- Add a class called
PizzaClient which will make use of Pizza, PizzaDeal, Circle, and Rectangle to determine the better deal. This class should have a special method with signature:
public static void main(String[] args)
- Add dependencies between different classes by selecting the "Dependency" arrow from the toolbox, selecting a dependent class, and dragging the arrow to the class it is dependent upon. In this example, PizzaClient "depends" on Pizza, PizzaDeal, Circle, and Rectangle. You can enter a label for a dependency by changing the "Name" property in the Properties box. Dependencies have no effect on code generation.
- Feel free to make other modifications to your diagram. You can drag your class diagrams around and bend the arrows in many different ways (to make the arrows rectilinear, select an arrow, right click it, expand format, expand Line Style, and select Rectilinear). You just have to experiment with the tool to get to know it.
- In the File menu, select Save. SU uses a single project file for all the information, so you should have only 1 file generated currently.
- It will be useful to export diagrams to other formats, such as images. You can do this by selecting "Export Diagram" on the File menu and choosing an appropriate file type.
- To generate the Java stub code, go to "Tools" on the main menu, expand "Java", and select "Generate Code". From this dialog box, select "Design Model", press "Next", press "Select All" to generate stub code for all objects, press "Next". Select a valid output directory, select "Next", accept the defaults to the "Options Setup" (assuring "Generate the Documentation by JavaDoc" and "Generate empty JavaDoc" are checked), press "Next", and finish out the rest of the dialog. You can now edit the generated stub code to add functionality to the application.
- Now define what this program actually does, i.e., write the code to
implement the methods described by your diagram. Use DrJava to add code to the corresponding class .java file. See
lecture 3 class notes for the code you need. Remember that the
IShape getArea() method is abstract and so has no code body. Make sure you add comments to the code as shown in the sample code. The comments are written in "javadoc" style. You will learn more about javadoc in next week's lab.
More information on running StarUML can be found here.
Written by Taylor Johnson (ttj at rice edu) and Dung X. Nguyen (dxnguyen at
rice edu)