Lab 2 - Basic I/O in C
Lab goals:
- Introduce some of the essentials for using the Unix command line.
- Introduce C character input and output functions and how they are used.
- Introduce simple file I/O using the Standard I/O library.
Using SSH Keys to Login to CLEAR
As explained in the last lab, you will be using CLEAR for all of your work in COMP 321. You can continue to login to CLEAR using your password and DUO, if you would like. However, ssh allows the use of a public-private key pair to provide authentication. This is more secure than a password, which can be guessed, and it is also more convenient. It is significantly more difficult to guess a properly generated private key. To authenticate, the system uses the private key to encrypt information, which can then only be decrypted using the public key. The private key cannot be guessed using the public key, so the public key can be freely shared. And if you can decrypt the information with the public key, you know that it came from someone who has the corresponding private key.
If you would like to use ssh keys to login to clear from your laptop without using a password (or using DUO!), do the following in Terminal on a Mac or PowerShell on Windows (do this on your laptop, not on CLEAR):
- Generate a public-private key pair by typing the following
command:
ssh-keygen -t ed25519
- Press Enter to accept the default location for the key pair.
- Press Enter to accept the default passphrase (i.e., no passphrase).
- Press Enter again to confirm the passphrase.
- Copy the public key to CLEAR by typing the following command
(substituting your own NetID for yournetid and substituting
the path to the key file as output by ssh-keygen for key):
ssh-copy-id -i key yournetid@ssh.clear.rice.edu
- Enter your password for CLEAR when prompted.
- Use DUO to complete the authentication
If your system does not have ssh-copy-id, you can
instead do the following:
cat key.pub | ssh yournetid@ssh.clear.rice.edu "cat >> ~/.ssh/authorized_keys"
Note that you must specifiy the
public key if you use this command.
ssh-copy-id makes sure to copy the public key without being
told.
After you do this, you should be able to ssh into CLEAR without typing a password. Test that your SSH keys work by trying to ssh into CLEAR from Terminal or PowerShell:
ssh ssh.clear.rice.edu
If everything is working, you should be logged in to CLEAR without having had to type a password or use DUO.
Similarly, when you connect to CLEAR through VSCode, it will no longer prompt you for a password. However, you may need to edit your ssh config file to make that work. If VSCode continues to ask for a password when you use Remote-SSH to connect, do the following:
- Run the Remote-SSH: Add New SSH Host command in VSCode.
- Type ssh yournetid@ssh.clear.rice.edu as the command, where yournetid is your NetID.
- It will ask which SSH configuration file to
update. Select the first one, which should be somewhere
in your home/user directory. If it doesn't explicitly
ask, there will be a dialog at the bottom with an
Open Config
button, which you should click. - VSCode will open the configuration file which
should have an entry with
Host ssh.clear.rice.edu
in it. There should be fields forHostName
andUser
indented beneath it. - Add an entry that is indented to the same level
as
HostName
andUser
, with the value IdentityFile keyfilename where keyfilename is the full path of the private key file you created with ssh-keygen above.
Now when you run the Remote-SSH: Connect to Host...
command, ssh.clear.rice.edu
should be an option that
will connect without needing to enter any passwords or to
use Duo. (If you need to fix anything, there's also a
Configure SSH Hosts...
option that will let you
edit the configuration file further.)
Unix Command Line Essentials
Many of you may not have ever navigated around a Unix filesystem using the command line before, other than the small amount that you did in Lab 1. Some of this was briefly described in the last lab, but this section of the lab this week will help you acquire a bit more command line skills.
Roughly speaking, a Unix filesystem is a hierarchical
(tree-like) collection of directories (sometimes referred
to as folders
on other types of systems), where each
directory may contain either files, other directories, or
some combination of both. When working on a Unix system,
you are always in
some directory, known as your
current working directory or just your current
directory or working directory. Navigating
the filesystem relies on this abstraction of a current
directory. The pwd command will
print the name of your
working directory. For
our first example of pwd, we will use it right
after logging in.
When you first log in to a Unix system, you are in your
home
directory as your current directory. To see the
full name of your home directory then, just type
pwd
right after logging in to CLEAR. As you move around in the Unix filesystem, you can always use the pwd command to see where you are.
Our next command is ls (mentioned in the previous lab). The ls command will list the contents of a directory. When used with no command-line arguments, ls operates on the current working directory. Let's use ls to look at the contents of the current directory. This will be your home directory if you have just logged in. If you type the shell command
ls
you should see several files listed. Most importantly, you should see your Lab 1 repo directory (that you created last week). This Lab 1 repo directory will be named
lab-1-introduction-to-c-name
where name is your GitHub userid. We cannot say what else may be in your personal home directory, but you will in general also see other names listed from this ls command.
Before describing more on navigating in a Unix
filesystem, we need to understand the notion of a
pathname. In Unix, there are two types of
pathnames, absolute pathnames and relative
pathnames. An absolute pathname refers to the same
location in the file system regardless of what your current
working directory is. Absolute pathnames begin with a
/
(called slash
) character, in
reference to the top of the directory hierarchy, called the
root directory, itself represented by the pathname just
/
. Relative pathnames, on the other hand,
are resolved relative to the current working directory and
do not begin with a /
character.
The fundamental Unix navigation command is cd (also mentioned in the previous lab). The name cd is short for change directory.
Normally, cd takes a pathname argument, such as
cd pathname
for some specified pathname (which, again, may be an absolute pathname or a relative pathname). This command takes you to the directory specified by the pathname; in other words, it changes your current working directory to be the directory specified by that pathname.
If you use cd without a pathname argument, then cd will take you to your home directory.
To get some practice with what you know so far, first type
cd /usr/bin
Then, use the pwd command to confirm that your cd worked correctly and that your current working directory is now /usr/bin. Also, type the ls command (with no arguments) to see what is in the /usr/bin directory.
Next, run the cd command (with no pathname), followed by the pwd command to confirm that you are back to your home directory.
The ls command can also operate on pathnames. Let's use ls to operate on the absolute pathname /usr/bin:
ls /usr/bin
You should see the same files as you saw when you ran cd /usr/bin and ls above. Using ls with a pathname, however, does not change your current working directory as the cd command did above.
Now, we will explore cd with a relative pathname. Assuming you are still in your home directory, you want to get to your Lab 1 repo directory. This means that you should type
cd lab-1-introduction-to-c-name
where name is your GitHub userid. But that is a lot of typing! So, before you attempt to type such a long name, we will give you some tips on Unix command line techniques.
Now that we can navigate a Unix directory structure, we turn to creating and maintaining a directory structure of your own to organize your files for COMP 321. Leaving all of your files in your home directory can get messy, so here is a crash course on setting up a basic directory structure. The first step in organizing your home directory is to create a directory for your COMP 321 work. The mkdir command makes a directory with a name given by the command line argument. Use cd to go to your home directory (if you are not already there), and issue the following command to create your new directory for your COMP 321 work:
     cd
     mkdir comp321
Then use the ls command to verify that your comp321 directory was created.
Our next organizational step will be to create two new directories within your new comp321 directory, one for lab work (which we will call labs) and one for programming assignments (which we will call assignments):
     cd comp321
     mkdir labs
     mkdir assignments
     ls
The ls command at the end there is just used to allow you, as above, to see that your two new directories were created. Note that you could instead have said mkdir labs assignments as a single command instead of two separate commands.
Now, we will move your existing lab repo directories from your home directory to comp321/labs. The Unix command for moving files is mv. This command moves one or more files or directories into the directory specified as the last command line argument. So, our next organization steps will be to change to your home directory, move your existing lab repo directory into comp321/labs, and then verify the result.
Specifically, if lab1dir is the name of your Lab 1 repo directory then run the following three commands:
cdYou might want to use tab completion (described above) to save some typing for the repo directory names. For a final sanity check, try:
mv lab1dir comp321/labs
ls comp321/labs
     cd comp321/labs
     pwd
     ls
Hopefully, everything worked as expected and you an see your two repo directories there. We recommend cloning future lab git repositories directly into your newly created labs directory.
You can mv the directories you created for the Factors assignment into your new comp321/assignments directory in the same way.
The mv command also serves as the
rename
command. Use the rename feature like
this:
mv oldname newname
where oldname is the old (existing) name of the file or directory that you want to rename, and newname is the new name that you want to rename it to be. You need to be careful, though. If newname is the name of a directory that already exists, then this mv command will move oldname into the directory newname rather than renaming oldname to be newname.
As explained in the last lab, in Unix,
..
is a special name used to refer to the
parent directory of the current directory (unless you are
in the root directory, in which case ..
also refers to the current directory, since the parent of
the root directory is the root directory). So,
cd .. will change your current directory to the
parent directory, and ls .. will list the
contents of the parent directory. Similarly,
.
is a special name used to refer to the
current directory itself, which is why typing
./program tells the shell to look for
program (only) in the current directory.
Our final command here is the rm command.
This command can be used to
remove files that you no
longer want. But be careful! The
rm command cannot be undone. The
rm command does not move the files to a
Trash
directory or the like from which they can be
resurrected if you made a mistake. Once a file has been
removed with rm, it is gone forever!
As always, see the man pages for more complete details on any of these commands (e.g., man rm).
Character I/O
As in most programming languages, to do any useful work
in C, you must use I/O to get and return data. The
simplest, most basic form of I/O is character-based I/O,
using the C functions getchar() and
putchar(). These functions are defined by the
header file stdio.h, which is used for all of
C's "Standard I/O" library. The function prototypes for
getchar() and putchar() are as
follows:
    int getchar(void);

    int putchar(int c);
It is useful to remember that characters are really just
8-bit integers. Below is a simple program that prints the
character 'A' three times (in three different
ways), terminating the output with a newline
character ('\n'):
     #include <stdio.h>

     /*
      * Requires:
      *   Nothing.
      *
      * Effects:
      *   Illustrates 3 ways to print the character 'A'.
      */
     int
     main(void)
     {
             putchar('A');      // 'A' as a character literal constant
             putchar(0x41);     // 'A' as a hexadecimal constant
             putchar(65);       // 'A' as a decimal constant
             putchar('\n');     // newline character terminates the line
     }
Here is a simple example program intended to echo characters typed at the terminal:
     #include <stdio.h>

     /*
      * Requires:
      *   Nothing.
      *
      * Effects:
      *   Echo stdin to stdout.
      */
     int
     main(void)
     {
             char c;

             while ((c = getchar()) != EOF)
                     putchar(c);
             /* Returning zero says, "No errors occurred." */
             return (0);
     }
However, this example program has a common but subtle bug that we will explore below.
Key points:
-
To use these I/O functions, you should include
stdio.h, the header file that provides their declarations. -
This program illustrates a construct that is commonly used in C programs but is sometimes confusing to beginners. This
whileloop condition expression combines an assignment together with an inequality test. In effect, the expressionc = getchar()is evaluated first (since it is inside the parentheses), followed by the expressionc != EOFto comparec(i.e., the value returned bygetchar()) against the valueEOF.This combination is possible because the result of the assignment operation in C (i.e.,
=) has a value, just like the result of an addition or subtraction operation has a value. However, care must be taken to ensure that the assignment takes place before the test. Otherwise, the variablecwould be assigned the result of the equality comparisongetchar() != EOF, which has a value either 0 (false) or 1 (true). As with arithmetic expressions, the order of evaluation can be controlled by surrounding the assignment operation, as here, with parentheses, to make it evaluate before the equality comparison. -
getchar()reads one character from the input and returns it. However,getchar()actually has 257 possible different return values: the values 0 through 255, representing one of the 256 possible different characters, andEOF, which is not a character but a special value that is returned to indicate theend of file
(or an error) on the input. (Traditionally,EOFis represented by the value -1.) This is whygetchar()'s return type isintand notchar. Acharcan represent only 256 different values, butgetchar()can return any of 257 different values. -
putchar()outputs one character to the terminal. It returns the valueEOFon any error.
I/O Redirection
In Unix, if a program expects its input from the
keyboard and outputs to the terminal, you can still force
it to instead use a file either for its input or output (or
both) by using I/O redirection on the command line
when you run the program. For example,
putchar() writes its output to what is
referred to as standard output
, and
getchar() reads its input from what is
referred to as standard input
. By default both
standard output and standard input are connected to the
terminal.
Suppose that some program named program uses
putchar() and/or getchar(). You
can run program from the current directory (here
with the command-line arguments arg1,
arg2, and arg3), redirecting the
program's standard input from a file such as
inputfile:
./program arg1 arg2 arg3 < inputfile
The less than sign < indicates the input redirection from the file inputfile (the < and the name inputfile are treated specially by the shell and are not command-line arguments passed to program).
Similarly, you can redirect the program's standard output to a file such as outputfile:
./program arg1 arg2 arg3 > outputfile
The greater than sign > indicates the output redirection to the file outputfile (the > and the name outputfile are treated specially by the shell and are not command-line arguments passed to program).
And, of course, you can combine both of these forms of I/O redirection to redirect both its standard input and its standard output:
./program arg1 arg2 arg3 < inputfile > outputfile
There are other forms of I/O redirection, but these are the main basics.
The Bigger Picture
So far, we have discussed only terminal-based I/O (and
command-line I/O redirection to redirect it to/from files),
but C's Standard I/O library, described by the header file
stdio.h, also directly supports file I/O.
Thus, the Standard I/O library can meet most programs' I/O
needs.
Before we delve into the details of file I/O, let's
first discuss the Standard I/O library's place in an
overall computer system. The figure below represents the
various layers of the Unix I/O stack
, with each
layer utilizing the layer below it:
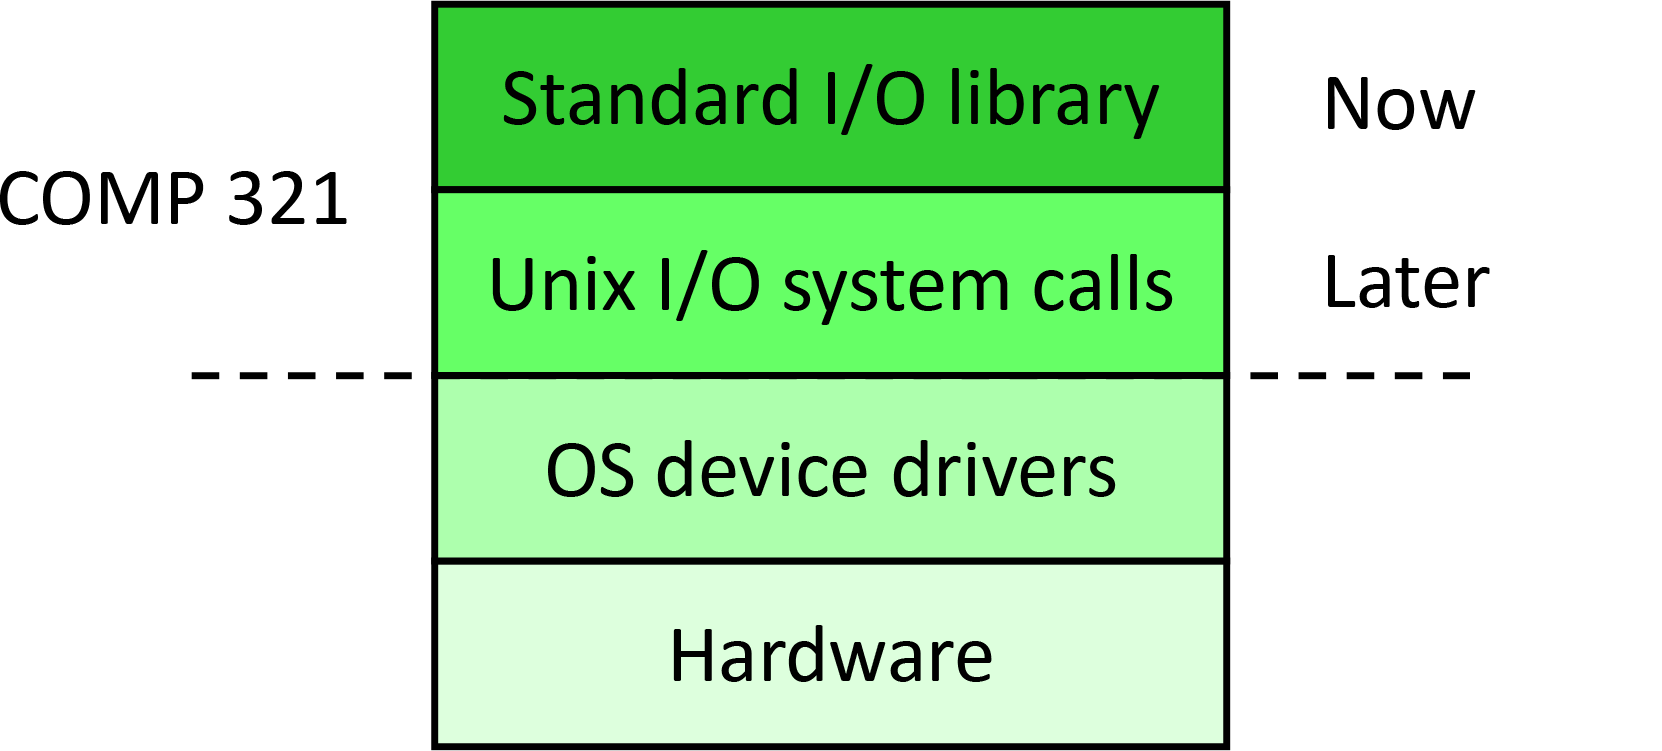
|
Everything above the horizontal dashed line will be discussed in this class, either now or later in the semester. Other classes, such as COMP 421 and ELEC 425, are concerned with things below this line.
The device drivers shown in the figure above are part of the operating system (i.e., part of Unix), and the Standard I/O library is implemented above this. As implied by its name, the Standard I/O library provides a set of I/O functions that are standard across all implementations of C. Moreover, they are not tied to any particular operating system. Thus, if you write a program using only the functions provided by the Standard I/O library, it can be compiled and run on any implementation of C, whether on Red Hat Enterprise Linux or Microsoft Windows or otherwise. Of course, on each of these operating systems, the code implementing the Standard I/O library will be different, but that is not your problem! Any differences in the underlying operating system are effectively hidden from you by this library.
File I/O Using the Standard I/O Library
As in most programming languages, C's terminal I/O is
just a special case of its file I/O. The I/O functions
described above, getchar() and
putchar(), implicitly use the following
files
(commonly also known as streams
)
provided by the Standard I/O library:
- stdin (
standard input,
typically the keyboard) or - stdout (
standard output,
typically the monitor).
There is also one other predefined file
(i.e.,
stream), generally used for outputting error messages:
- stderr (
standard error,
typically the monitor).
For more information, see man stdio.
To use a file (i.e., stream), you must open and
eventually close the file, except that the special files
stdin, stdout, and
stderr are already open and don't need to be
closed (also, other files that you have open are
automatically closed when the entire program terminates).
When you open a file, you should always check if the file
was successfully opened, as the file might, for example,
not exist or have the correct permissions for accessing it.
Here are the prototypes of some useful file manipulation
functions in the Standard I/O library (use the
man
for more information on any of
them):
    FILE *fopen(const char *pathname, const char *mode);

    int fclose(FILE *fp);

    int fgetc(FILE *stream);

    int fputc(int c, FILE *stream);

    int feof(FILE *stream);
The function fopen(const char *pathname, const
char *mode) opens the file identified by the name
pathname for the indicated mode
(e.g., for reading the file ("r"), for writing
the file ("w"), or both ("r+" or
"w+")). It returns a FILE *, which
is a pointer indicating the open stream, or returns
NULL on any error. The function
fclose(FILE *fp) closes the open stream
indicated by the given FILE * pointer.
The function fgetc(stdin) is essentially
equivalent to getchar(), and the function
fputc(c, stdout) is essentially equivalent to
putchar(c). In particular,
fgetc() reads and returns the next character
from the indicated stream (rather than always just from
stdin), and fputc() outputs the
given character to the indicated stream (rather than always
just to stdout).
For each open stream, the Standard I/O library remembers
whether or not reading from that stream has previously
encountered the end-of-file (attempting to read past that
point, not just reading up to that point). The function
feof() tests this internal remembered
end-of-file
indicator for the indicated stream,
returning nonzero (meaning true) if it is set (meaning that
reading from that stream has previously encountered the
end-of-file). The use of feof() is explained
more fully below.
An example:
     #include <stdio.h>

     /*
      * Requires:
      *   Nothing.
      *
      * Effects:
      *   Tries to copy the contents of the file "input.txt" to the file
      *   "output.txt".  Returns 0 if the copy completed successfully.
      *   Otherwise, returns 1.
      */
     int
     main(void)
     {
             FILE *input_file, *output_file;
             int c, error = 0;  /* no error */
             char *input_filename = "input.txt";
             char *output_filename = "output.txt";

             input_file = fopen(input_filename, "r");
             if (input_file == NULL) {
                     fprintf(stderr, "Can't open %s.\n", input_filename);
                     return (1);  /* non-zero for error */
             }
             output_file = fopen(output_filename, "w");
             if (output_file == NULL) {
                     fprintf(stderr, "Can't open %s.\n", output_filename);
                     fclose(input_file);
                     return (1);  /* non-zero for error */
             }
             while ((c = fgetc(input_file)) != EOF)
                     fputc(c, output_file);
             if (!feof(input_file)) {
                     /*
                      * If feof() returns FALSE, then the above while loop
                      * didn't reach the end of file.  The EOF returned by
                      * fgetc() instead meant that an error occurred while
                      * reading from the input file.
                      */
                     fprintf(stderr, "An error occurred reading %s.\n",
                         input_filename);
                     error = 1;  /* non-zero for error */
             }
             fclose(input_file);
             fclose(output_file);
             return (error);
     }
Always declare variables for referencing streams using
the C type FILE *
, not just
FILE
.
Some input functions, like fgetc(), return
the value EOF not only when the end-of-file
has been reached (that is, when you try to read past the
actual end of the file) but also when an error occurs while
reading from the file. The function feof() can
be used to distinguish between these two cases. Its return
value is nonzero (meaning true) if and only if the
end-of-file has been reached (attempting to read past that
point, not just reading up to that point) and
fgetc() (or some other input function on that
stream) has already returned EOF due to that.
Thus, the following usage of feof() would be
incorrect:
     while (!feof(input_file)) {
             c = fgetc(input_file);
             fputc(c, output_file);
     }
This loop would output an extra final character, specifically the character that is represented by the value 255, to the output file. Think about why this is the case.
By default, with the exception of stderr,
Standard I/O streams are buffered
by the Standard
I/O library. Essentially, for input, this means that each
of your program's calls, for example to
fgetc(), doesn't necessarily result in a
corresponding call to a Unix operating system I/O input
function. Likewise, for output, each of your program's
calls, for example to fputc(), don't
necessarily result in a corresponding call to a Unix
operating system I/O output function. Performing all of
these operating system calls would make these Standard I/O
library calls run very slowly!
Instead, depending on whether the stream is a terminal
or a file, the Standard I/O library reads (or writes) an
entire line or a multi-kilobyte buffer at once from the
operating system. The extra characters are stored in a
private internal buffer within the Standard I/O library.
This buffering explains why your echo program above only
echoed the full line of typed characters after you typed
Enter on the keyboard. Another benefit of this
buffering is that input characters can be put back with
ungetc(). This can be useful for writing
parsers that require lookahead. Output stream buffers by
default are flushed when they are full, when the file is
closed, or, for streams open to a terminal, when a newline
character \n
is written to the stream.
The function fflush(FILE *stream) can also be
used anytime to manually force the output buffer of the
indicated stream to be flushed.
There are many other functions in the Standard I/O
library. For example fprintf() is the file
version of printf. See man
stdio, as suggested above. In addition to describing
the standard streams stdin,
stdout, and stderr, this manual
page also has a list of all library functions that are part
of the Standard I/O library. You can also use the
man command on any of those other function names
to find more information on it.
GitHub Repository for This Lab
To set up your private repo for this lab, follow the same steps as for the previous lab and the first assignment. In particular, the first step for any lab or assignment in this class is to use your browser to go to the provided link for the starter code. For this lab, that link is:
https://classroom.github.com/a/1-5-KAvz
If you are not already logged in to GitHub, it will ask you to do so now.
You should then be presented with a web page asking you
to "Accept the assignment". Please click on the green
Accept this assignment
button. GitHub will
then do a bit of work to create a new remote repo for you
for this assignment, based on the starter code we have
provided. This may take only a few seconds, or it may take
a few minutes. Occasionally use your browser to refresh the
view of this web page, until you get a new page saying
You're ready to go!
.
On this You're ready to go!
page, you should also
see a link to your new remote repo. This link will begin
with https://
and will end with your own
GitHub username. Use the mouse on your computer to
copy that entire link (beginning with the
https://
text and ending with your GitHub
username) to the clipboard on your computer. You
will use this link in a moment to clone this
remote repo onto CLEAR as your local repo for this
lab.
Log in to the CLEAR system if you have not already done so. Assuming you have already created a comp321/labs directory as directed in Section 1, first use cd comp321/labs to change into your labs directory, then type the following command:
git clone paste your repo link from the clipboard here.git
In other words, type the words
git clone
followed by a space, then paste the link from your
clipboard (the link you copied above) onto that same
command line, and then type .git
(with no space before it) onto the end of the command line,
completing the command (hit the Enter
key on your
keyboard). You will be prompted for your GitHub username
and password. You must use your GitHub personal access
token as your GitHub password here (e.g., use your
mouse to copy and paste your personal access token here,
from whatever file you saved it in when you generated
during the first lab).
Once the clone operation is complete, you will have a directory named
lab-2-basic-i-o-in-c-name
where name is your GitHub username.
Now, change your current working directory into this new directory by typing
cd lab-2-basic-i-o-in-c-name
where name, again, is your GitHub username.
You are now ready to begin working on the exercises in the README.md file in the repository. You can view it nicely formatted in Github. The file has that name so that Github will display it when you navigate to the repository below the source code listing. You do not need to actually open the file.
Submission
As with all labs in this course, be sure to git push your lab before 11:55 PM tonight to get credit for this lab.
And you should always include in your repo all
files that you created in the lab, other than
those (such as the output of the compiler) generated
automatically from other files. Think of this as including
just the files necessary to backup and to be able to
recreate your work. Do not simply add all
files to your repo; for example, do not simply say
something like git add .
or
git add
*
, and never add any
core
files to your repo. Only
add the actual files that should be in
your repo.