COMP 405
|
Installing Java and
Eclipse Enterprise Editions
|


 |
Having trouble? See the
Java EE Tips and Traps
page!
Step 1: Install the latest Java EE SDK:
- Go to http://www.oracle.com/technetwork/java/javaee/overview/index.html
- Download the latest "SDK with JDK" that is appropriate for your
platform.
If you see the following error during installation, then you probably do not
have the 32-bit Java JRE installed. Ironically, the 64-bit Java EE
installer requires the 32-bit JRE to run. (Ref:
Stackoverflow posting: Java EE 6 SDK uninstal 'Could not find the required version of the Java(TM) 2 Runtime Environment')
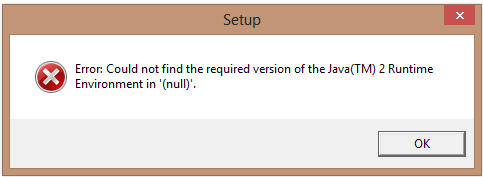
To install the 32-bit JRE, go to
http://www.java.com and install Java from this site, which will install the
32-bit JRE. The proper JRE for your system will be automatically
selected. The Java EE installer should run fine after that.
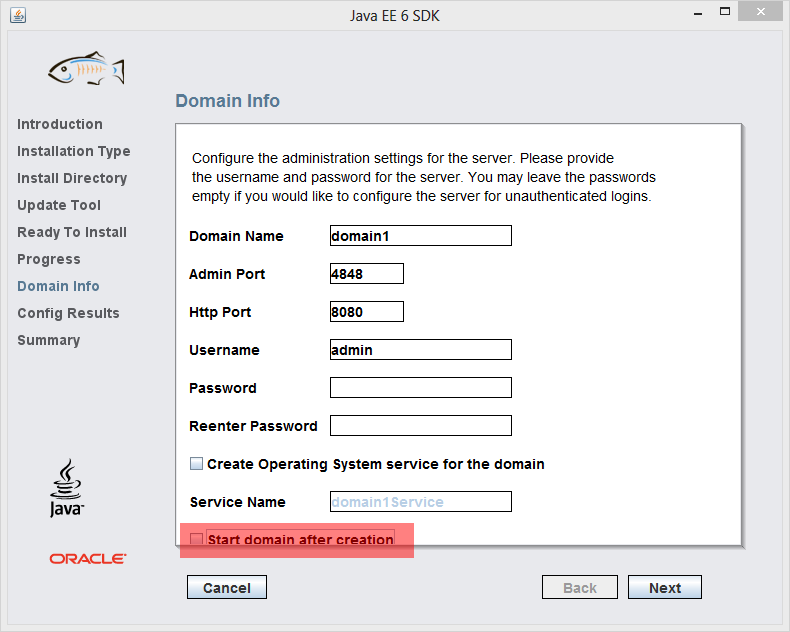
The Java EE installation will install the Glassfish web application server.
We will not be using the Glassfish server, so when the following screen is
shown, be sure to uncheck the "Start domain after creation" box.
Be sure to install any updates to Java EE!!
Step 2: Install the Eclipse IDE for Java EE Developers
- Go to http://eclipse.org and download
the "Eclipse IDE for Java EE Developers"
- IMPORTANT: If you already have Eclipse installed, you may have a problem
where both the old and new Eclipse installations are in a folder called "eclipse".
The solution is to create a folder called "eclipse_jee"
at the desired install location, e.g. Program Files, and copy the
contents of the
eclipse folder in the download to the
eclipse_jee folder.
- Likewise any shortcut you create to the Eclipse Java EE program will
have the same name as the existing Eclipse shortcut.
Rename the new shortcut to "Eclipse EE" to distinguish it from the other
Eclipse install.
- Install Subclipse and UML Lab as normal.
Note that WindowBuilder does not come with the Eclipse Java EE version.
This is because web-based GUIs are not Swing or SWT-based interfaces, so
WindowBuilder is not usually needed. If you do need it for
some reason, see the manual WindowBuilder install instructions in the above
Eclipse Resources site.
Step 3: Install the Google Plugin for Eclipse (GPE):
To make it easier to develop Google App Engine applications in Eclipse, you
will want to install the Google Plugin for Eclipse.
Reference:
Using the Google Plugin for Eclipse
- Under Help/Install New Software..., use this appropriate update URL
for your version of Eclipse, e.g. for Juno use
a href="https://dl.google.com/eclipse/plugin/4.2">https://dl.google.com/eclipse/plugin/4.2
- Select only the following options for installation:
- Google Plugin for Eclipse
- GWT Designer for GPE
- SDKs (all), i.e. Google App Engine Jaa SDK and Google Web Toolkit SDK
- Be sure the "Contact all update sites during install to find
required software." box is checked and click "Next".
- Accept any license agreements and click Next and/or Finish until the
installation completes.
Step 4: Configure Eclipse
In addition to any normal configurations of Eclipse, e.g. for WindowBuilder,
perform these additional configurations:
- Configure the GWT Designer
- Go to Eclipse's Preference/Google/Web Toolkit/Designer/Code Style
- Use the same configuration as WindowBuilder:
- Method name for new statements: initGUI
- Init. Field:
checked, with "private" fields.
© 2013 by Stephen Wong