Step 2 - Standardize Image Size and Thickness
The standardization of each image is very important in making a correct
identification. Each image is taken from its original parsing and can be
a wide variety of sizes and thicknesses. This portion of our algorithm
accounts for variations in size and thickness of the original image in an
attempt to make individual numbers universal, independant of the font or
handwriting sample.
Pre-format
Initially, the scanned images are typically larger than the standard size
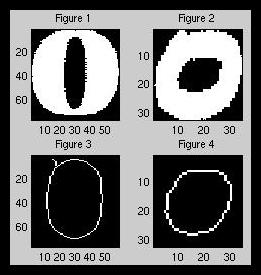 (25x25 pixel) array. In addition, they contain varying line thicknesses,
even within individual numbers. To begin, we use Matlab's thinning
algorithm, bwmorpth(img,'thin',Inf), to thin each line in the image down to
1 or 2 pixels. At this point, all images have the same line thicknesses.
Figures 1 and 3 show the thinning of a font with uneven thicknesses and for
comparison, figures 2 and 4 show a handwritten sample getting thinned to
the same thickness. Once the images are at the same thinned thickness (~1
pixel), we thicken the thinned image so that in the scale reduction process, the
image does not fall apart or disappear. The number of dilations, using Matlab's
bwmorph(img,'dilate',1), is proportional to the size of the initial
image.
If the image is small in terms of pixels, the image is thickened less
than an image with a large number of pixels. This is to prevent a small
image dilating so much as to close holes or alter other properties.
(25x25 pixel) array. In addition, they contain varying line thicknesses,
even within individual numbers. To begin, we use Matlab's thinning
algorithm, bwmorpth(img,'thin',Inf), to thin each line in the image down to
1 or 2 pixels. At this point, all images have the same line thicknesses.
Figures 1 and 3 show the thinning of a font with uneven thicknesses and for
comparison, figures 2 and 4 show a handwritten sample getting thinned to
the same thickness. Once the images are at the same thinned thickness (~1
pixel), we thicken the thinned image so that in the scale reduction process, the
image does not fall apart or disappear. The number of dilations, using Matlab's
bwmorph(img,'dilate',1), is proportional to the size of the initial
image.
If the image is small in terms of pixels, the image is thickened less
than an image with a large number of pixels. This is to prevent a small
image dilating so much as to close holes or alter other properties.
Aspect Ratio Fix
Handwritten 1's can cause problems with cropping and resizing if they
are not written very clearly. For this reason, we do an aspect ratio test
to attempt to correct the problem. If the 1 is at an angle, then after
resizing and cropping it will appear as a diagonal line going from one
corner to another, rather than
a vertical line. The ratio of height to width of the
original scanned image of a 1 is typically a good bit larger than all the
other numbers. This allows us to separate this image and pad it with blank
space so as to avoid the 1 streching across the entire image.
Initial Resize and Thin
Now that the image has been standardly thickened, we resize the image to a
25x25 pixel image using Matlab's imresize(img,[25 25],'nearest'). Since
the resizing process can cause inconsistent thickness changes in the image,
we again thin the image to get rid of these inconsistencies. With the
standard sized, thinned image, we crop the image so as to remove
all non-data from the outside of the number.

Check Aspect Ratio Again
Since we have just cropped the image, we again run into problems with the
1. If we were to restandardize it at this point, it would often turn into
a big block, rather than the thin 1 we would expect. For this reason, we
again check the aspect ratio and pad if the height to width ratio is large.
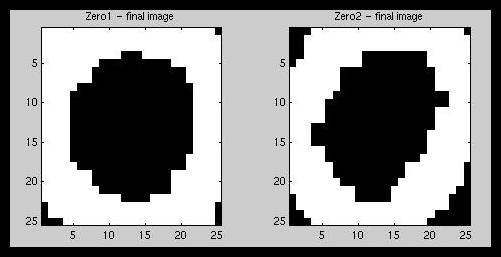
Final Resize and Thicken
With the image basically in its final stage, we do the final rescale to
25x25 using the same Matlab command and then thicken it twice to allow the
features of the object to be more easily analyzed. As can be seen, the
similarities between the standardized images are much more apparant than in
the original images of figures 1 and 2.
Matlab Code -- parse2std.m

 Previous