COMP 310
|
Using the Eclipse
Integrated Development Environment
|


 |
Quick Links:
-
Graphical User Interface (GUI) Building Tools
-
Using WindowBuilder --
Using the
graphical user interface builder ("GUI") plug-in that comes with
Eclipse.
UML Diagramming Tools - Create UML diagrams and auto-generate the
associated code and vice-versa.
-
Source Control Tools
-
Remote Collaboration Tools
Old Tools No Longer Used in Courses
Set these preferences BEFORE creating any projects!
- Javadocs:
- Go to Preferences/Java/Compiler/Javadoc and change the following sections to "Warning" (not "Ignore"):
- Malformed Javadoc comments
- Missing Javadoc tags
- Missing Javadoc comments
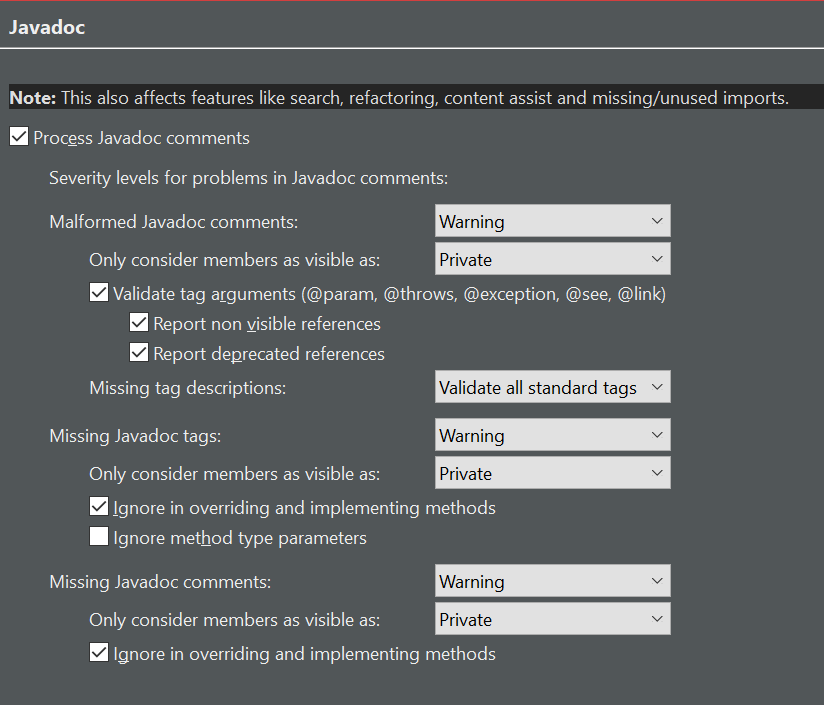
- When generating Javadocs, ALWAYS generate docs for ALL visibility levels, including PRIVATE!
- Package Explorer
- Set "Hierarchical package presentation": To the right of the "Package Explorer" tab in the Java perspective, pull down the "View menu" arrow and select "Package Presentation". Select "Hierarchical" to show the package and sub-packages as a more intuitive tree structure rather than as a flat list.
- Ctrl-/ (or Ctrl-7)
will toggle the commenting of a highlighted block of code. This
is the same as right-clicking the highlighted block and selecting
Source/Toggle Comment.
- Ctrl-F will bring up a dialog to enable you
to search and optionally to replace text found in the current file.
- Ctrl-H will bring up a more general search
that allows you to search across the entire project or workspace.
- From Luna Documentation:
Perspectives
Eclipse has a notion of "perspectives" which are collections
of panels and tabs that form a graphical user interface specifically geared
towards a particular type of task. There are perspectives for
editing and compiling Java programs ("Java"
perspective), for working with source control ("SVN
Respository Exploring" and "Team Synchronization"
perspectives), for debugging and a variety of other tasks.
To open a particular perspective you can go to either
Window/Open Perspective on the main Eclipse menu
bar, or click the "Open Perspective" icon at the
upper right corner of the Eclipse window. In that same upper
right corner will be icons to quickly switch from one perspective to another.
The most common perspectives to use will be "Java"
and "SVN Repository Exploring".
Always make sure you are in the proper perspective
for the task you are atempting!
Workspaces and Projects
A workspace is a directory that holds one or more Eclipse
projects. Workspaces can be used to organize multiple projects.
It is highly recommended that one at least have a workspace for Comp310 and
possibly individual workspaces for sets of projects, such as the Ballworld
series.
An Eclipse project holds all files associated with a
particular Java application. All work should be done as part of a
project. The source and compiled (class) files in a project should be
always be separated into "src" and "bin"
folders.
Creating a New Project
- Be sure that the perspective is set to "Java".
- On the main Eclipse menu, click on
File/New/Java Project.
- Be sure the following options are selected (they should be the
defaults):
- "Use default location"
- Use execution environment JRE = JavaSE-1.7 (or latest
installed version)
- "Create separate fodler sfor sources and class files"
- "Add project to working sets" NOT selected
By default a project directory will be created in the
workspace and separate "src" and "bin"
folders created below it to hold the source code and class files respectively.
Creating a New Project from Existing Code
-
Create folder in the desired workspace folder to hold the
project. It is recommended that you name of the folder should be the
same as you wish for the project itself.
-
Create a sub-folder called "src"
in the project folder and copy all the Java code into it such that
src is the default package directory for the
code. Thus all packages defined in the code should be
sub-folders of src.
-
In Eclipse, be sure that you are in the desired
workpace, then go to File/New/Java Project.
-
In the New Java Project dialog window, select
Create project from existing source and then select the
Directory by browsing to the project directory you made above.
-
Be sure that Create separate folders for sources
and class files is selected (should be the default) and then click
Next.
-
In the Java Settings dialog, under the "Source" tab,
select the "src"
directory that you created above. Be sure that "Default
output folder" is set to something like "[project name]\classes". Click
Finish.
Creating a New Package, Class or Interface
To create a new package:
- In the Package Explorer pane on the left side of the
Java perspective, right-click on the location
where you want your new package, typically the src
folder or an existing package folder, OR highlight the desired package
location and then click the New Package icon on
the top icon bar.
- On the pop-up menu, select New/Package.
- Complete the fully-qualified name of the new package, e.g
mySuperPackage.mySubPackage1.subSubPackage., and
click Finish.
To create a new class or interface:
- In the Package Explorer pane, right-click on the package where you want
your new class or interface OR highlight the desired package location and
then click the New Class or
New Interface icon on the top icon bar. You may need to
pull a drop menu down to see the desired icon.
- In the pop-up dialog, fill out the desired name and other properties of
the new class. Eclipse can auto-generate method stubs of
inherited abstract methods for you, saving you some error-prone typing.
- Click on Finish when you are ready to create
the class file.
The "Enclosing type" option
is for when you wish to create a named inner or nested (static) class inside an
existing class.
WARNING! Eclipse and
Subclipse do not properly interact when moving and renaming packages and
folders! Follow the these directions
carefully.
Renaming or Moving Files
To rename or move a file in Eclipse, use the built-in
refactoring tool:
- Right-click the desired file and select
Refactor...
- To rename the file, select Rename
- An edit box will appear around the filename, simply type in the new
name.
- Note: If you are simply trying to change the capitalization of
the name, first rename the file to some other name with a different
spelling, then rename it back to the name you desire with the desired
capitalization. This prevents problems in
operating systems that are case-insensitive, e.g. Windows, but is
recommended for all operating systems.
- To move the file, select Move
- Browse to or type in the desired location of the file.
NEVER use the straight "Rename"
option in Eclipse or move a file by drag-and-dropping it as this may break
references to the file. ALWAYS USE
REFACTOR! Refactoring will preserve most
references to the file and thus is much safer.
NEVER manipulate files
directly in the source control repository!
This will almost definitely generate "file out of date" errors.
Deleting a File
To delete a file, be sure you are in the Java Perspective.
NEVER delete a file from the
SVN Exploring Perspective! This will cause
"file out of date" errors.
- If you are under source-control, do a commit to ensure that the local
copies are in sync with the repository.
- Right-click the desired file and select "Delete".
- If under source control, perform another commit to re-sync with the
repository.
Compiling and Running a Program
When you attempt to run your program, Eclipse will
automatically compile the code first.
To run your program for the first time:
- In the Package Explorer, highlight the class that contains the
main() method that you wish to use to start your
application.
- Click the green VCR-like "Run" button on the
top icon bar.
Running your application using the above procedure will
automatically create a "launch configuration" that Eclipse will use in the
future to run your application. You can edit the specifics of a launch
configuration (see below).
To run your application once a launch configuration
has been created:
- Simply clicking the green "Run" button will
run the application using last launch configuration used. No
need to highlight any specific class file.
- If more than one launch configuration exists, click on the drop menu
next to the Run button and select the desired
launch configuration to use.
Compiling Without Running:
Sometime you want to compile the code without running it,
just to check for errors. There are a number of options, all
available under the main Eclipse "Project" menu:
- Build All -- Compiles everything
in the current workspace.
- Build Project -- Available when a project is
highlighted in the Package Explorer. Compiles just that
highlighted project.
- Clean -- Deletes the class files of the
selected project. Very useful when you are getting strange error
messages!
- Build Automatically -- When selected,
Eclipse will try to continuously compile your code as you edit it.
This is what most people prefer, though it can slow your system down if your
project is very large. You will need to deselect this to perform
a manual recompile.
Working with Compilation Errors and Warnings
Alas, compilation errors and warnings are a fact of life.
Eclipse makes life a little easier by enabling one to more quickly track down
and fix compiler errors and warnings.
Compiler errors and warnings appear in the "Problems"
tab at the bottom of the Java perspective. If the
Problems tab is not visible, go to "Windows/Show
View/Problems" on the main Eclipse menu. Note that
errors and warnings may not appear in the
Problems tab until the file has been saved.
- Double-clicking on an error or warning will take you to the line of code
that generated it.
- "Quick Fix": Sometimes for some simple
warnings, Eclipse knows how to fix the problem, e.g. by deleting an unused
import statement.
- Right-click either the warning in the
Problems tab or the yellow lightbulb marker in the
code itself and select "Quick Fix".
Eclipse will suggest one or more possible solutions. Select
the desired solution.
- If Eclipse has detected that the same warning has appeared multiple
times, it may offer to fix all the warnings at once. This
will save you a lot of work!
- For "The serializable class XXX does not
declare a static final serialVersionUID field of type long"
warnings, always select "Add generated serial
version ID". This will create a new, unique, randomly
generated value instead of using the same value for everything.
- Never start coding somewhere else in your
system before fixing ALL the errors (and warnings too) in the previous place
you were working. Otherwise you will never be able to tell if
your new code is correct or not.
- Always fix just the first few errors before
recompiling (auto-recompile is nice for this). The rest
of the errors may just be artifacts produced by the initial errors.
- Minimizing the number of warnings will
minimize the number of potential problem areas in your code!
Eclipse and Java are warning you for a reason!
Including a JAR file
Java ARchive files are special zip files
that the Java system uses to bundle up entire code directory hierarchies into an
single file for easy deployment. JAR files are very useful for
adding libraries of code to your project without having to add a huge package
directory structure to your system. Instead, the packages for a
library are putinside of a JAR file, which is simply included in your project.
Conceptually, what Java (and Eclipse) will do is to unzip the
JAR file and attach it to the default package of the project. Thus, any packages
in the JAR are available for use as if you had manually unzipped to JAR and put
all the internal packages in their respective locations in your project.
If you have a JAR file with a library of packages that
you wish to include with and be able to access from your project, you need to
include it in the Java "Build Path":
- Rick-click the project and select
Properties (at the bottom of the menu).
- Select "Java Build Path"
- Select the "Libraries" tab
- Click "Add JARs..."
- Browse to the JAR file you wish to include.
- Click OK to confirm your
selection and close the Add JAR dialog.
- Click OK to close the
Properties dialog.
Exporting Javadocs
JAVA DOCuments are web pages (HTML files) that Java can
automatically generate from Javadoc-compliant code comments. The
ability to automatically generate easily readable documentation directly from
the code files was a major advancement in software development technology when
it came out.
Eclipse can easily create Javadoc web pages through its
"Export" capabilities:
- Highlight the project for which you wish to generate documentation web
pages.
- On the main Eclipse menu, select
File/Export...
- In the Export dialog that comes up, select
Java/Javadoc then click Next.
- In the Javadoc Generation dialog that comes
up, set the following options:
-
Javadoc command: If this is your first time to export Javadocs, this field may
be blank.
- Click the Configure...
button
- Browse to the location of the javadoc executable which is
generally located in the bin
subdirectory of the Java JDK installation directory. Here are some typical locations for the javadoc executable on different systems:
- Windows: C:\Program Files\Java\jdk1.6.0_21\bin\javadoc.exe (exact directory name depends on the version of the
JDK installed)
- Mac: Separately, open a command
window and type "which javadoc".
This will tell you the location of the javadoc executable.
- Linux: Separately, open a command window
and type "which javadoc". This
will tell you the location of the javadoc executable.
On Ubuntu, a typical executable is /usr/bin/javadoc.
- Highlight the javadoc executable and click
Open.
- Select types for which Javadoc will be
generated: Be sure that the project that you want
to generate documentation for is checked, and only that project.
- Generate Javadoc for memebers with
visibility: Select
Private.
- Use standard doclet:
Checked -- generate standard HTML documentation files.
- Destination: Click
Browse... and navigate to
your project directory. Just below your project directory,
create a "doc"
directory (same level as "src"
and "bin"), highlight the
doc directory and click
OK.
- WARNING: If the path name to your
javadoc output location includes spaces anywhere in the path,
Eclipse may automatically replace the spaces with the
URL-friendly "%20". The symptom is that your
javadocs will not appear in your desired location even though
Eclipse indicates a successful generation process. This
is because the computer's operating system interpreted this new
pathname as a different location than you intended and write your
javadocs there.
- Solution: Check the full path that Eclipse sets for
the ouput location and revert the auto-generated "%20"'s
back to spaces. You can also just simply copy the
incorrectly placed javadocs back to the desired location.
- Click Next to go to the
next configuration window.
- In the next Javadoc Generation configuration
window, set the following options:
- Document title: Enter a
meaningful title that is pertinent to your project.
- Basic Options:
All boxes should be checked (default).
- Document these tags:
All boxes should be checked (default).
- Select referenced archives and project
to which links should be generated: No boxes need
to be checked (default).
- Style sheet:
Unchecked (default).
- Click Finish as all the
options in the next configuration window should be set to their
defaults.
- An Update Javadoc Location dialog
may pop up. Check that the location described is indeed where
you want the javadocs to be located and click "Yes
To All".
- A new tab will open in Eclipse showing the top level Javadoc web that
was generated (doc\index.html).
Browse through the Javadocs to make sure that what was generated matches
what you thought you were generating!
- Commit your project to source control, being sure to include the
doc directory.
Exporting JAR Files
Java ARchive files are special zip files
that the Java system uses to bundle up entire code directory hierarchies into an
single file for easy deployment. Instead of a whole messy and complex directory
structure of files, all you need is a single file to run your application or
applet. Code and any required resource files, such as images or sound
clips can all be bundled into JAR files. The compiled class files are
required to run the program but the source files can be optionally included as
well.
To create a JAR file of your project from Eclipse, you need to
"export" it.
-
Click on File/Export...
-
In the pop-up dialog window, select Java/JAR file
as the export destination. Click Next.
-
Select the files you want to be in your JAR file. Be
sure that only the project you want is selected if you have multiple
projects in your workspace. You probably do NOT want any above the
source directory, so be sure those files are unchecked.
-
Slecte or type in the name and destination of the JAR file
you wish to create.
-
Be sure that "Export generated class files and
resources" is checked off and optionally, "compress the contents of
the JAR file". Click Next.
-
The default "JAR Packaging Options" are fine. Click
Next.
-
Be sure that "Generate the manifest file"
is checked. Either option for sealing the JAR file is fine.
-
Specify the Main class by typing in or
browsing to find the class with the main()
method. This is typically the controller in your MVC
architecture. This will enable you to run the application by
using just the JAR file (double-clicking it or "java -jar MyJar.jar" for you
command-line afficianados). Click Finish to create
the JAR file.
Problems Running Eclipse
"Out of Memory" or "GC Overhead Limit Exceeded"
Errors
This sort error occurs when Eclipse is doing a memory
intensive operation such as updating or creating a UML diagram and uses all of
the memory the Java system has allocated for it. 64-bit
versions of Eclipse seem to be particularly memory hungry, especially the newer
versions such as "Luna". To fix this error, one must modify Eclipse's
start-up configuration:
- Close Eclipse if it is open.
- Go to Eclipse's installation folder, e.g. on a Windows machine, "c:\Program
Files\eclipse"
- Using a text editor, open the eclipse.ini
file. Windows uses must start their text editor "as
administrator" in order to re-save the file.
- Modify or add the "Xms" and "Xmx"
parameters in the eclipse.ini file, by changing
adding or modifying the values to be at least those below:
-Xms1024m
-Xmx2048m
- Save the eclipse.ini file and restart
Eclipse.
Ref:
http://wiki.eclipse.org/FAQ_How_do_I_increase_the_heap_size_available_to_Eclipse%3F
Unable to Type Certain Characters
Sometimes, Eclipse gets into a weird state where you cannot
type certain characters into one's code, seemingly as if that key was broken on
one's keyboard. For instance, a common occurance is that one
can't type an asterisk (*) into one's code. The odd part is
that one can type those same characters into other parts of Eclipse and in other
programs on one's computer so clearly the key on the keyboard is working just
fine.
What has happened is that somehow a "key binding" has been set
for that key. This is a "hot key" setting which is supposed to be a
shortcut for a common Eclipse operation. Typically, this
is being set by a plugin when it installs but it seems that there must be some
strange combination of key strokes that changes key bindings.
Solution:
- In Eclipse, go to
Preferences/General/Keys. You
should see a big table of key bindings that maps Eclipse commands to
particular key combinations.
- Click the "
Binding" heading to sort the
table by key bindings.
- Scroll down the table looking for key bindings (there may be more than
one!) that start with the
problematic key. For instance, if you cannot type an asterisk,
look for "
Shift+8". Note that the ky in
question might be used in conjunction with another key, e.g. "Shift+8,
I".
- Highlight the row with the key binding involving the key in question and
click the "
Unbind Command" button.
The binding value should be cleared out.
- Click "
Apply" or "OK"
to save the changes.
- Restart Eclipse to reset the key bindings to their new values (
File/Restart).
© 2017 by Stephen Wong