COMP 405
Spring 2014
|
Getting Started with Google App Engine
|


 |
Pick a Team Name
Pick a short name for your team that does NOT use spaces, hyphens,
underscores or other special characters. The name will become part of
a URL, so consider how it looks in all lower case letters.
Install Java EE, Eclipse for Java EE Developers and the Google Plugin for
Eclipse
To develop a Google App Engine ("GAE") in Eclipse, follow the directions for
installing Java EE, Eclipse for Java EE Developers and the Google Plugin for
Eclipse.
Create a GAE application
You must also create an application in Google App Engine:
- Log into
https://appengine.google.com/ with your Rice/Google account
- Under My Applications, click "Create
Application".
- Application Identifier:
Use "comp405s13-[team
name][-xxx]" substituting your team name for "[team name]"
and, optionally, any ancillary identification to distinguish supporting
projects-- this is a highly recommended practice; test out ideas and
techniques in a separate project!. For instance, you may
want to create separate test projects for each team member. Click the "Check Availability" button
to be sure that you have a globally unique name.
- Application Title:
The name of your application.
- Authentication Options:
Select "Open to all Google Accounts users"
- Click Create Application.
- After you new app is created, go to its
Dashboard.
- Under "Application Settings", make
a note of the "Application Identifier".
This should be the same as you set up above. You will need this
when you set up your GAE project in Eclipse.
- Also note the "Application Identifier
Alias". This is the base URL that will used to access
your app.
Create a GAE project in Eclipse
Now you are ready to create a GAE project in Eclipse for Java EE
Developers ("Eclipse EE"):
- The Google Plugin for Eclipse ("GPE") should have created a circular
blue Google toolbar icon in Eclipse. Expand the droplist below
that icon and select "New Web Application Project".
This can also be found under
File/New/Other.../Google/Web Application Project.
- Project name:
It is highly recommended that you make your Eclipse project name the same as
your Application Identifier above.
- Package: Use
proper naming convention here, which is that the root of all your packages
should be the inverse of the URL of your institution/company. For this
class, this would be "edu.rice.comp405.[term].[team
name]" where term is the current
course year, e.g. "s13" . Using
proper naming conventions will help prevent name clashes.
- The rest of the options should be the defaults:
- Location = "Create
new project in workspace"
- Use Google Web Toolkit
= checked and "Use default SDK"
selected.
- Use Google App Engine
= checked and "Use default SDK"
selected.
- "Add support for listing on Google
Apps Marketplace" = unchecked
- Generate project sample code
= checked. This will help you get started and you can delete
the code later when you are confident that your code works properly.
- Click "Finish". A new
project should be created with fully operational sample code.
Test and deploy the sample code
Run on local test GAE server
The first thing to do is to test that sample code runs correctly on the
local, simulated GAE test server:
- Highlight the project in the Navigator pane in Eclipse and click the
Run button.
- Be sure to allow any requests for firewall access by the application.
- A new tab called "Development Mode"
will created (probably at the bottom of the Eclipse window). This is
the local GAE test server.:
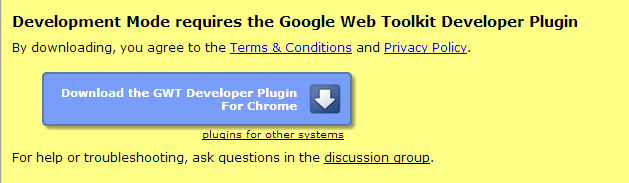
- The first time you try to test a GAE project, you must copy the URL
that you see in this tab into your desired browser. The
browser will say that you need to download the GWT Developer Plugin for
that browser. You should get a message that looks like this:
- Known bug in Chrome on Win8 as of 3/10/2013:
The plugin will not install properly. You will get an error
saying "This application is not supported on this computer.
Installation has been disabled.". There is
a work-around, dated 12/6/2012 (see the #5 response), that is
supposed to bypass the plugin loading bug in Chrome.
However, unless you can verify that version of the plugin is the latest
version, the recommendation is to use Firefox or IE instead.
- Install the plugin as above for all desired browsers.
- After the plugin in installed, right-click the URL in the
Development Mode tab and select you desired browser under "Open with".
- From now on, all you need to do is to double-click the URL and the
web app will open in your desired browser.
- When the sample web app is running correctly, you should see the
following screens (note: your port numbers may be different):

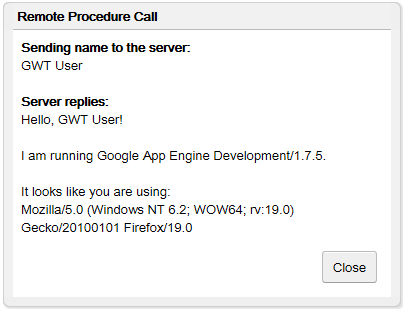
Clicking "Send" should pop up
the following, with the appropriate version numbers and browser information:
Click the red Stop button on the Development Mode tab to stop the GAE test
server.
Local Development Console
One can access the local Development Console, which is the local,
stripped-down version of the main GAE Administration Console site, at
http://localhost:port/_ah/admin where
port number is that which the GAE project is using. "localhost"
could also be the equivalent IP address of "127.0.0.1".
For instance, the local admin console might be at
http://127.0.0.1:8888/_ah/admin
which is just the base URL of the app plus /_ah/admin.
Note that Eclipse Console will print out the URL of the local Development
Console when the Development Mode server starts up with a line buried in all the
logs entries it spits out that looks like this:
INFO: The admin console is running at http://localhost:xxxx/_ah/admin.
Deploy to GAE
Set the Application ID of the GAE Eclipse project:
Before you deploy your app, you must set the GAE Application ID in the
project by opening the Properties of the project and going to the Google tab.
Enter the Application ID that you created when you set up the app in GAE
earlier.
Log Eclipse into GAE
In order for Eclipse to deploy to GAE, it must first be logged into it.
On the lower, probably right-hand, corner of the Eclipse window there ishould be
a Google logo, possibly with the words "Sign in to Google". Click the
button to sign into GAE. A "Sign in to Google Services" window
should pop up asking for your credentials. Allow the requested
access by Google plugin.
If you are juggling multiple GAE accounts for different projects, when the
access request pop window is still open, expand the drop list below your login
name on the upper right corner and add the additional account(s). To
swith to another account, continue logging in, but immediately log out and log
back in. The system will now ask you to choose which account you want to
use.
Deploy
Next, deploy the sample code to the real Google App Engine:
- Highlight the project in the Navigation pane and expand the droplist
below the Google icon on the Eclipse toolbar and click "Deploy
to App Engine..." or right-click the project and select "Google/Deploy
to App Engine..."
- Take the default deployment options and allow any requests for firewall
access.
- On the Console tab in Eclipse, you should see the system cloning,
compiling and deploying your project. It will then check to make sure
that it is being served by the GAE.
- Once deployment is complete, you should now be able to use your browser
to go to the URL specified by the Application Identifier
Alias from above (should be
http://[Application ID].appspot.com) and run your samply
application.
© 2013 by Stephen Wong