|
|
|
Interactive CInteractive C (IC for short) is a C language dialect consisting of a compiler (with interactive command-line compilation and debugging) and a run-time machine language module. IC implements a subset of C including control structures (for, while, if, else), local and global variables, arrays, pointers, 16-bit and 32-bit integers, and 32-bit floating point numbers. IC does not implement some of C's more complex features, including structures and unions. IC works by compiling into pseudo-code for a custom stack machine, rather than compiling directly into native code for a particular processor. This pseudo-code (or p-code) is then interpreted by the run-time machine language program. This unusual approach to compiler design allows IC to offer the following design tradeoffs:
Since IC's ultimate performance is limited by the fact that its output p-code is interpreted, its advantages are taken at the expense of raw execution speed. Getting Started (on Windows NT/95/98)This section describes how to boot IC on the RoboBoard using the Windows NT machines located in the ELEC 201 laboratory. These instructions also apply to any computer running Windows 95, Windows 98, or Windows 2000.
At this point you are ready to load a C program or evaluate expressions typed in the command window. For more information on "getting started with Macintosh, Sun, or Owlnet computers", click here or see the bottom of this page. Using ICWhen running and attached to the RoboBoard, C expressions, function calls, and IC commands may be typed at the IC> prompt. All C expressions must be ended with a semicolon. For example, to evaluate the arithmetic expression 1 2, type the following:
When this expression is typed, it is compiled by the console computer and then downloaded to the RoboBoard for evaluation. The 68HC11 on the RoboBoard then evaluates the compiled form and returns the result, which is printed on the console computer's screen. To evaluate a series of expressions, create a C block
by beginning with an open curly brace ``
IC CommandsIC responds to the following commands:
Line EditingIC has a built-in line editor and command history, allowing editing and re-use of previously typed statements and commands. The mnemonics for these functions are based on the control key assignments employed in the Emacs editor (NOTE: This functionality is not currently available on the Windows NT machines): To scan forward and backward in the command history, type CTRL-P
or An earlier line in the command history can be retrieved by typing the exclamation point followed by the first few characters of the line to retrieve, and then the space bar. IC does parenthesis-balance-highlighting as expressions are typed. (This feature is currently disabled in the Win32 version). Figure 10.1
shows the keystroke mappings understood by IC.
In addition to the built-in line editor, IC on the Macintoshes supports standard Macintosh editing features using the mouse. These include copy and paste. Anywhere within the IC window, you can highlight text within that window, and can "copy" it with the key-sequence Command-C. Copying adds the text to the clipboard, which allows you to paste it on a subsequent IC command line with Command-V. The main() FunctionAfter functions have been downloaded to the RoboBoard, they can be invoked from the IC prompt. If one of the functions is named main(), it will automatically be run when the RoboBoard is reset. To reset the RoboBoard without running the main() function (for instance, when hooking the RoboBoard back to the computer), hold down the CHOOSE button on the RoboBoard while pressing reset. Creating a C programTo create your C program, you need to use an editor to enter your program into a file. On the Macintosh, the editor currently installed is called Alpha. In Unix, you can use vi, emacs, xedit, or any other editor with which you are comfortable. Windows machines also have a plethora of editors; use the one with which you are most comfortable (and remember to save your files as text-only files!). A Quick C TutorialMost C programs consist of function definitions and data structures. Here is a simple C program that defines a single function, called main.
void main()
{
    printf("Hello, world!\n");
}
All functions must have a return value; that is, the value that they return when they finish execution. main has a return value type of void, which is the "null" type. Other types include integers (int) and floating point numbers (float). This function declaration information must precede each function definition. Immediately following the function declaration is the function's name (in this case, main). Next, in parentheses, are any arguments (or inputs) to the function. main has none, but an empty set of parentheses is still required. After the function arguments is an open curly-brace "{", marking the start of the actual function code. Curly-braces signify program blocks, or chunks of code. Next comes a series of C statements. Statements demand that some action be taken. The demonstration program has a single statement, a printf (formatted print). This will print the message Hello, world! to the LCD display. The \n indicates an end-of-line character. The printf statement ends with a semicolon (;). All C statements must end with a semicolon. Beginning C programmers commonly make the error of forgetting the semicolon required at the end of each statement. The main function is ended by the close curly-brace "}". Here is another example demonstrating a few more features of C. The following code defines the function square, which returns the mathematical square of a number.
int square(int n)
{
    return n * n;
}
The function is declared as type int, meaning it will return an integer value. Next comes the function name square, followed by its argument list in parentheses. square has one argument, n, an integer. Notice how declaring the argument type is done similarly to declaring the function type. When a function has arguments declared, those argument variables are valid within the "scope" of the function (i.e., they only have meaning within the function's own code). Other functions may use the same variable names independently. The code for square is contained within the set of curly braces. In fact, it consists of a single statement: the return statement. The return statement exits the function and returns the value of the C expression that follows it (in this case "n * n"). A set of precedence rules governs the order in which expressions are evaluated (see the table in Section 10.7.8). Since this example has only one operation (multiplication), signified by the "*", precedence in this case is not an issue. The following is an example of a function that performs a function call to the square program.
float hypotenuse(int a, int b)
{
    float h;  /* creates h */

    h = sqrt((float)(square(a) + square(b)));  /* provides the formula for h */

    return h;
}
If a=3 and b=4, then h would equal the square root of 3 squared plus 4 squared, or 5.0 (because it is a floating point number, it will be represented in decimal notation). A few more features of C are demonstrated in this code. First, notice that the floating point variable h is defined at the beginning of the hypotenuse function. In general, whenever a new program block (indicated by a set of curly braces) is begun, new local variables may be defined. The value of h is set to the result of a call to the sqrt function. It turns out that sqrt is a built-in function that takes a floating point number as its argument. If the square function (defined earlier) were to be used inside the sqrt function, a type incompatibility problem would come up, since the square function sends an integer result, but the sqrt function requires a floating point argument. To get around the type incompatibility, the integer sum (square(a) + square(b)) can be coerced or cast into a float by preceding it with the desired type, in parentheses. The integer sum is made into a floating point number and then passed along to sqrt. The hypotenuse function finishes by returning the value of h. Commenting your code is very important. Throughout this manual, code will be explained in comments. A comment can be added by using /* to open your comment and by using */ to close your comment. Frequent comments will make it easier for you to understand what your program is doing. Also, it will make it much easier for your partners to follow code written while they were not there. This concludes the brief C tutorial. A much more detailed tutorial is available on-line. Data Types, Operations, and ExpressionsVariables and constants are the basic data objects in a C program. Declarations list the variables to be used, state what type they are, and may set their initial value. Operators determine what is to be done to them. Expressions combine variables and constants to create new values. Variable NamesVariable names are case-sensitive. The underscore character is allowed and is often used to enhance the readability of long variable names. C keywords like if, while, etc. may not be used as variable names. Global variables and functions cannot have the same name. In addition, local variables with the same name as functions prevent the use of that function within the scope of the local variable. Further, local variables with the same name as global variables prevent use of the global variables within the scope of the local variable. Data TypesIC supports the following data types: 16-bit Integers16-bit integers are signified by the type indicator int. They are signed integers, and may be valued from 32,768 to 32,767 decimal. 32-bit Integers32-bit integers are signified by the type indicator long. They are signed integers, and may be valued from 2,147,483,648 to 2,147,483,647 decimal. 32-bit Floating Point NumbersFloating point numbers are signified by the type indicator float. They have approximately seven decimal digits of precision and are valued from about 10to 10. 8-bit CharactersCharacters are an 8-bit number signified by the type indicator char. A character's value typically represents a printable symbol using the standard ASCII character code. Arrays of characters (character strings) are supported, but individual characters are not. Local and Global VariablesIf a variable is declared within a function, or as an argument to a function, its binding is local, meaning that the variable is recognized only within that function definition. Variables declared outside of a function are global variables. They are defined for all functions, including functions defined in other files (outside the file where it was declared). Variable InitializationLocal and global variables can be initialized when they are declared. If no initialization value is given, the variable is initialized to zero.
    int foo()
    {
      int x;        /* create local variable x
                       with the default initial value of 0 */

      int y = 7;     /* create local variable y
                       with initial value 7    */
      ...
    } /* end of foo */

    float z = 3.0;    /* create global variable z
                       with initial value 3.0  */
Local variables are initialized whenever the function containing them runs. Global variables are initialized whenever a reset condition occurs. Reset conditions occur when:
Persistent Global VariablesA special uninitialized form of global variable, called the ``persistent'' type, has been implemented in IC. A persistent global is not initialized upon the conditions listed for normal global variables. To declare a persistent global variable, prefix the type specifier with the key word persistent. For example, the statement
creates a global integer called i. The initial value for a persistent variable is arbitrary; it depends on the contents of RAM that were assigned to it. Initial values for persistent variables cannot be specified in their declaration statement. Persistent variables keep their value when the robot is turned off and on, when main is run, and when system reset occurs. Persistent variables, in general, will lose their value when a new program is downloaded. However, it is possible to prevent this from occurring. If persistent variables are declared at the beginning of the C program code, before any function or non-persistent globals, they will be re-assigned to the same location in memory when the code is re-compiled, and thus their values will be preserved over multiple downloads. If the program is divided into multiple files and it is desired to preserve the values of persistent variables, then all of the persistent variables should be declared in one particular file and that file should be placed first in the load ordering of the files.
ConstantsInteger ConstantsIntegers may be defined in decimal integer format (e.g., 4053 or -1), hexadecimal format using the ``0x'' prefix followed by hexadecimals a through f (e.g., 0x1fff), and a non-standard but useful assembly language binary format using the ``0b'' prefix (e.g., 0b1001001). Octal constants using the zero prefix are not supported. Long Integer ConstantsLong integer constants are created by appending the suffix ``l'' or ``L'' (upper- or lower-case alphabetic L) to a decimal integer. For example, 0L is the long zero. Either the upper or lower-case ``L'' may be used, but upper-case is the convention for readability. Floating Point ConstantsFloating point numbers may use exponential notation (e.g., `` 10e3'' or ``10E3'') or must contain the decimal period. For example, the floating point zero can be given as ``0.'', `` 0.0'', or ``0E1'', but not as just ``0''. Characters and Character StringsQuoted characters return their ASCII value (e.g., 'x'). Character strings are defined with quotation marks, e.g., "This is a character string.". OperatorsFor each data type (int, float, etc.), a particular set of operators determines the operations that can be performed on them. IntegersThe following operations are supported on integers:
Long IntegersA subset of the operations implemented for integers are implemented for long integers: arithmetic addition +, subtraction -, and multiplication *, and the integer comparison operations. Bitwise and boolean operations and division are not supported. Floating Point NumbersIC uses a package of public-domain floating point routines distributed by Motorola. This package includes arithmetic, trigonometric, and logarithmic functions. A word of caution: floating point functions are much slower than integer operations on the 68HC11 processor. The following operations are supported on floating point numbers:
CharactersCharacters are only allowed in character arrays. When a cell of the array is referenced, it is automatically coerced into a integer representation for manipulation by the integer operations. When a value is stored into a character array, its upper eight bits are truncated, forcing a standard 16-bit integer into an 8-bit character. Assignment Operators and ExpressionsThe basic assignment operator is =. The following statement adds 2 to the value of a.
a = a + 2;
The abbreviated form
a += 2;
could also be used to perform the same operation.
All of the following binary operators can be used in this fashion:
+ - * / % << >> & ^ |
Increment and Decrement OperatorsThe increment operator ``++'' increments the named variable. For example, the statement ``a++'' is equivalent to ``a = a+1'' or ``a += 1''. A statement that uses an increment operator has a value. If the increment operator comes after the named variable, then the value of the statement is calculated after the increment occurs. Otherwise, the value of the statement is calculated after the increment. The following example should clarify these differences:
int a = 3;     /* assign the initial value of the two variables */
int b = 5;

printf(``a=%d b=%d\n'', a, b);          /* a = 3, b = 5 */

b = a++;                                /* increments a after setting b = a */

printf(``a=%d b=%d\n'', a, b);          /* a = 4, b = 3 */

b = ++a                                 /* increments a before setting b = a */

printf(``a=%d b=%d\n'', a, b);          /* a = 5, b = 5 */
The first increment operator equalizes the two variables before increasing the value of a, while the second increments beforehand. The difference results from the placement of the ``a++'' operator. The decrement operator ``-'' is used in the same fashion as the increment operator. Precedence and Order of EvaluationThe following table summarizes the rules for precedence and associativity for the C operators. Operators listed earlier in the table have higher precedence; operators on the same line of the table have equal precedence.
Control FlowIC supports most of the standard C control structures. Notable exceptions are the case and switch statements, which are not supported. Statements and BlocksA single C statement is ended by a semicolon. A series of statements may be grouped together into a block using curly braces. Inside a block, each function must end with a semicolon (unless it has its own curly braces). Local variables may be also be defined inside a block. A semicolon is not required after a right curly brace ending a block. Also, a semicolon is not required on statements immediately preceding an open curly brace. If-ElseThe if else statements are used to make decisions. The syntax is:
expression is evaluated; if it is true (a non-zero answer if it is a numeric expression) then statement-1 is executed. The else statement-2 clause is optional. If the if part of the statement did not execute, and the else is present, then statement-2 is executed. The following example determines whether to move forward or in reverse based on the value measured for color:
/* CONSTANT DECLARATIONS */

    int COLOR_SENSOR_PORT = 6;       /* use input 6 for this sensor */
    int MOTOR_PORT = 2;       /* use motor port 2 */
    int BLACK = 0;
    int WHITE = 1;

/* GLOBAL VARIABLE DECLARATIONS */

    int color;                   /* this declares the integer 'color' */

/* PROGRAM CODE */

    main()
    {
    color = digital(COLOR_SENSOR_PORT);       /* read the value */

    if (color == WHITE)
      {
       forward(MOTOR_PORT);
      }
    else        /*if 'color' is not WHITE, the motor will reverse */
      {
       reverse(MOTOR_PORT);
      }
    } /* end of main */
WhileThe syntax of a while loop is the following:
while begins by evaluating expression. If it is false, then statement is skipped. If it is true, then statement is evaluated. Then expression is evaluated again, and the same check is performed. The loop exits when expression becomes false. An infinite loop in C is easily created by making the while statement always true, as is sown in the following code fragment:
/* CONSTANT DECLARATIONS */

      int TRUE = 0;
      int FALSE = 1;

/* PROGRAM CODE */

      ...

      while (TRUE) Check_Sensors();  /* check sensors forever */
Here is an example of a conditional while loop that will stop the robot when it hits a wall:
/* CONSTANT DECLARATIONS */

    int MOTOR_PORT = 2;             /* use motor port 2 */
    int FRONT_TOUCH_SENSOR = 1;       /* use digital input 1 */

/* PROGRAM CODE */

    main()
    {
    forward(MOTOR_PORT); /* motor on */

    while (!(digital(FRONT_TOUCH_SENSOR))); /* go until the sensor touches */
      /* note the use of the ";" as a null statement */

    alloff(); /* as soon as touch sensor reads 1, the while loop will
            exit and all motors stop */
    } /* end of main */
ForThe syntax of a for loop is the following:
This is equivalent to the following construct using while: expr-1
Typically, expr-1 is an assignment, expr-2 is a relational expression, and expr-3 is an increment or decrement of some variable. The following code counts from 0 to 99, printing each number along the way:
    int i;
    for (i= 0; i < 100; i++)
      printf("%d\n", i);
Using a while loop, the same sample program would be written like:
     int i=0;
     while (i < 100)
      {
        printf(``%d\n'', i);
        i = i + 1;
      }
BreakUse of the break provides an early exit from a while or a for loop, for example: while ( expr-1
In this example, the while loop would continue to execute until either expr-1 was false (normal termination), or expr-2 was true (the break statement is executed). If the loop is terminated because expr-2 was true, thereby executing the break statement, statement-3 would not be executed during the last loop iteration. The following example uses break:
/* CONSTANT DECLARATIONS */

    int TRUE = 1;
    int FALSE = 0;
    int RIGHT_MOTOR_PORT = 0;             /* use motor port 0 */
    int LEFT_MOTOR_PORT = 2;             /* use motor port 2 */
    int LEFT_FRONT_TOUCH_SENSOR = 2;       /* use digital input 2 */
    int RIGHT_FRONT_TOUCH_SENSOR = 3;       /* use digital input 3 */

/* PROGRAM CODE */

    main()
    {

    forward(RIGHT_MOTOR_PORT); /* right motor on */
    forward(LEFT_MOTOR_PORT); /* left motor on */

    while (TRUE)

    /* we want to go forward until we touch the wall, i.e.,
    as long as both front sensors are low;  we want to break out of
    the loop if either sensor reads 1 */

       {
        printf(``I'm moving forward!\n'');

        if (digital(LEFT_FRONT_TOUCH_SENSOR) ||
            digital(LEFT_FRONT_TOUCH_SENSOR))       break;

       } /* end of while */

    /* we have exited the while loop so one of the
       front sensors is touching */

    alloff();

    } /* end of main */
LCD Screen PrintingIC has a version of the C function printf for formatted printing to the LCD screen.
The syntax of printf is the following: printf(``format-string'' , [ arg-1 ] , ..., [ arg-N ] )
This is best illustrated by some examples. Printing ExamplesExample 1: Printing a message. The following statement prints a text string to the screen.
printf("Hello, world!\n");
The character `` Example 2: Printing a number. The following statement prints the value of the integer variable x with a brief message.
printf("Value is %d\n", x);
The special form %d is used to format the printing of an integer in decimal format. Example 3: Printing a number in binary. The following statement prints the value of the integer variable x as a binary number.
printf("Value is %b\n", x);
The special form %b is used to format the printing of an integer in binary format. Only the low byte (i.e., least significant byte) of the number is printed. Example 4: Printing a floating point number. The following statement prints the value of the floating point variable n as a floating point number.
printf("Value is %f\n", n);
The special form %f is used to format the printing of floating point number. Example 5: Printing two numbers in hexadecimal format.
printf("A=%x B=%x\n", a, b);
The form %x formats an integer to print in hexadecimal. Formatting Command Summary
Special Notes
Arrays and PointersIC supports one-dimensional arrays of characters, integers, long integers, and floating-point numbers. Pointers to data items and arrays are supported. Declaring and Initializing ArraysArrays are declared using square brackets. The following statement declares an array of ten integers:
int foo[10];
In this array, elements are numbered from 0 to 9. Each element holds a value. Elements are accessed by enclosing the element number within square brackets: foo[4] denotes the fifth element of the array foo (since counting begins at zero). Arrays are initialized by default to contain all zero values. Values contained in an array may also be initialized at declaration by specifying a value for each of the array elements, separated by commas, within curly braces. Using this syntax, the size of the array is not specified within the square brackets. Instead, it is determined by the number of values given in the declaration. For example,
int foo[] = {0, 4, 5, -8, 17, 301};
creates an array of six integers, with foo[0] equal to 0, foo[1] equal to 4, etc. Character arrays are typically text strings; to initialize character arrays, special syntax is used, and the character values of the array are enclosed in quotation marks:
char string[] = "Hello there";
This creates a character array called string with the ASCII values of the specified characters. In addition, the character array is terminated by a null character. Because of this zero-termination, the character array can be treated as a string for purposes of printing (for example). Character arrays can be initialized using the curly braces syntax, but they will not be automatically null-terminated in that case. In general, printing of character arrays that are not null-terminated will cause problems. Passing Arrays as ArgumentsWhen an array is passed to a function as an argument, the array's pointer is actually passed, rather than the values of the elements in the array. If the function modifies the array values, the array will be modified, since there is only one copy of the array in memory. For example:
     int foo[] = {0, 4, 5, -8,  17, 301}; /* this defines the array foo */
     change_value(foo[])
       {
         foo[] = foo[] + 5; /* this raises the value at each element by 5 */
       }
So, after the change_value function has run, the new values of the elements in foo[] will be 5, 9, 10, -3, 22, 306. In normal C, there are two ways of declaring an array argument: as an array or as a pointer. IC only allows declaring array arguments as arrays. As an example, the following function takes an index and an array, and returns the array element specified by the index:
    int index;
    int array[] = {0, 4, 12, 17, 34};
    int retrieve_element(int index, int array[])

      {
        return array[index]; /* This will return the value of the element in
                             the array at the position indicated by the value
                             of index. */
      }
Notice the use of the square brackets to declare the argument array as an array of integers. When passing an array variable to a function, use of the square brackets is not required:
    {
    int index;
    int array[] = {0, 4, 12, 17, 34};

    retrieve_element(3, array); /* Since index = 3, the value contained in
                           the third element of the array will be
                           retrieved (in this case, 12). */
    }
Declaring Pointer VariablesA pointer directs a function to look at the address of a variable rather than the value of the variable itself. Pointers can be passed to functions that then go on to modify the value of the variable being pointed to. This is useful because the same function can be called to modify different variables, just by giving it a different pointer. Pointers are declared with the use of the asterisk (*). In the example
    int *foo;
    float *bar;
foo is declared as a pointer to an integer, and bar is declared as a pointer to a floating point number. To make a pointer variable point at another variable, the ampersand operator & is used. The ampersand operator returns the address of a variable's value; that is, the place in memory where the variable's value is stored. Thus:
    int *foo; /* foo points to an integer value */
    int x= 5;

    foo= &x; /* foo points to the integer x, which has a value of 5. */
makes the pointer foo ``point to'' the value of x (which happens to be 5). This pointer can now be used to retrieve the value of x using the asterisk operator. This process is called de-referencing. The pointer, or reference to a value, is used to fetch the value being pointed at. Thus:
    int y;

    y= *foo; /* this sets the value of y equal to the value at the address
                pointed to by the pointer foo (which is 5 in this example) */
sets y equal to the value pointed at by foo. In the previous example, foo was set to point at x, which had the value 5. Thus, the result of dereferencing foo yields 5, and y will be set to 5. Passing Pointers as ArgumentsPointers can be passed to functions as arguments. This allows functions to change the values of the actual variables. This is a very powerful concept in computer science. If we just used the name of the variable as the argument, the called function only gets a copy of the variable (its value), as opposed to its address. Passing the pointer to a variable as the argument is termed call-by-reference; the pointer passed is the reference to (or address of) the variable. This is in contrast to call-by-value, the usual way that functions are called. With call-by-value only the value of a variable is passed to the function being called. Pointers can be used to perform tasks like sensor calibration. The following example defines an average_sensor function that takes a port number and a pointer to an integer variable. The function will average the sensor output values and store the result in the variable pointed at by result. The function argument is declared as a pointer by using the ``*'' operator:
/* The following function takes a hundred readings from the specified port,
   averages them, and updates the call-by-reference result argument with
   the result. */

    void average_sensor(int port, int *result)
    {
      long sum = 0;  /* use a long integer so that the sum does not overflow */
      int i;

      for (i= 0; i< 100; i++)
        sum += (long) analog(port); /* this adds the sensor values measured */

      *result = (int) (sum/100); /* this takes the average and records it in the
                                   location that result is pointing to */
    } /* end of average_sensor */
Notice that the function itself is declared as a void. It does not need to return anything, because it instead stores its answer in the pointer variable that is passed to it. The pointer variable is used in the last line of the function. In this statement, the answer sum/100 is stored at the location pointed at by result. Notice that the asterisk is used to get the location pointed by result. By having the result pointer storing the sum / 100 in different locations (by using different calling arguments), you can call the same function to calibrate each of the sensors plugged into analog ports. Finally, notice the use of the two casts in this example. Where we add the value of the analog port to sum, we see a (long) in front of the call to analog(port). This causes the analog port value (which is an integer) to be converted to a long integer before the addition takes place. The (int) in front of (sum / 100) serves a similar purpose. Casts are used to ensure that operands and results are of the same numerical type. Depending on your C compiler, casts are not always required, but they rarely hurt (the only danger is a possible loss of precision by casting too soon). It is best to just always use one whenever you are performing arithmetic with different numerical types. Omitting a cast when required can cause hard to find errors in your code. The IC Library FileLibrary files provide standard C functions for interfacing with hardware on the ELEC 201 RoboBoard. These functions are written either in C, or as assembly language drivers. Library files provide functions to do things like control motors, make tones, and input sensor values. The standard library files for the Rice RoboBoard are listed in the file robo.lis and should be loaded automatically when IC is invoked. On the Power Macintoshes and Windows machines, all IC library files are
located in the lib folder in your project folder. In the UNIX
environment, IC files are located in ~elec201/lib/ic. To understand
better how the library functions work, study of the library file source
code is recommended. This code is contained in your project folder in
the folder Library Source Code. The following pages summarize
the Elec 201 library functions. An IC quick reference chart is provided
on page Output ControlDC MotorsMotor ports are numbered from 0 to 5. Motors may be set in a ``forward'' direction (corresponding to the green motor LED being lit) and a ``reverse'' direction (corresponding to the red motor LED being lit). The functions forward(m) and reverse(m) turn motor m on to full speed in the respective direction. The function off(m) turns motor m off. The power level of motors may also be controlled. This is done in software by turning the motor on for varying periods of time (a technique called pulse-width modulation). The motor(m, p) function allows control of a motor's power level. Powers range from 8 (full on in the forward direction) to -8 (full on in the reverse direction). void forward(int m)
     int RIGHT_MOTOR_PORT = 1;  /* use motor port 1 */
     forward(RIGHT_MOTOR_PORT); /*This turns the motor connected to motor
                                  port one on to full speed forward */
Or, if you didn't define your port with a name, you can just use the port number as the argument, like this:
forward(1); /* This turns on motor 1 to full speed forward */
Note: This code fragment is an example of bad programming practice. Always try to use names for things like motor and sensor ports. This will make your code much easier to debug (and read!). void reverse(int m)
     int RIGHT_MOTOR_PORT = 0;
     reverse(RIGHT_MOTOR_PORT); /*This turns the motor connected to motor
                                  port zero on to full speed reverse */
void brake(int m)
     int RIGHT_MOTOR_PORT = 1;
     brake(RIGHT_MOTOR_PORT); /* This will stop the port one motor */
void off(int m)
     int RIGHT_MOTOR_PORT = 1;
     off(RIGHT_MOTOR_PORT); /* This will stop the port one motor */
void alloff()
void ao()
ao(); /* This turns off all motors at once. */
void motor(int m, int p)
     int LEFT_MOTOR_PORT = 2;
     int HALF_SPEED_FORWARD = 5;

     /* Turn the motor in port 2 on to speed 5 */
     motor(LEFT_MOTOR_PORT, HALF_SPEED_FORWARD);
Stepper MotorsA stepper motor may be attached to one port for unidirectional control or two ports for bidirectional control. Special software functions are used to control stepper motors. When a stepper motor is connected to a motor port, use only the following functions to control the stepper motor. The regular motor control functions do not work with stepper motors and in some situations could damage either the motor of the RoboBoard. void stepper(int port, int steps)
     int LEFT_MOTOR_PORT = 0;

     stepper(LEFT_MOTOR_PORT, 10); /* This will turn the stepper motor in
                                    port 0 ten steps */
void onestep(int port)
     int LEFT_MOTOR_PORT = 2;
     onestep(LEFT_MOTOR_PORT); /* This turns the motor in port 2 one step */
By connecting a stepper motor to two different ports, bi-directional control can be achieved. For example, the following function will turn the stepper motor ten steps in one direction and ten steps back two times in sequence.
/* CONSTANT DECLARATIONS */

     int CW_STEP_PORT = 2;
     int CCW_STEP_PORT = 3;

/* PROGRAM CODE */

     void rotate()
      {
       int i;
       stepper (CW_STEP_PORT, 10); /* ten steps one direction */
       stepper (CCW_STEP_PORT, 10); /* ten steps in the other direction */

       for (i=0; i<10; i++)
         onestep (CW_STEP_PORT); /* This turns the motor one step for each
                              value of i from 1 to 10 */
       for (i=0; i<10; i++)
         onestep (CCW_STEP_PORT); /* This turns the motor one step for each
                              value of i from 1 to 10, but in
                              the opposite direction */
       } /* end of rotate */
Unidirectional DriversLED DriversThere are two high-current output ports located on the RoboBoard that are suitable for driving LEDs, lamps, or other small loads. Both the ports and the small LEDs used to show their status are labeled. The following commands are used to control the LED ports: void led_out0(int s)
     int LED_ON = 1;
     int LED_OFF = 0;

     led_out0(LED_ON); /* turn in on */
     sleep(0.5);      /* wait one half second */
     led_out0(LED_OFF); /* turn in off */
void led_out1(int s)
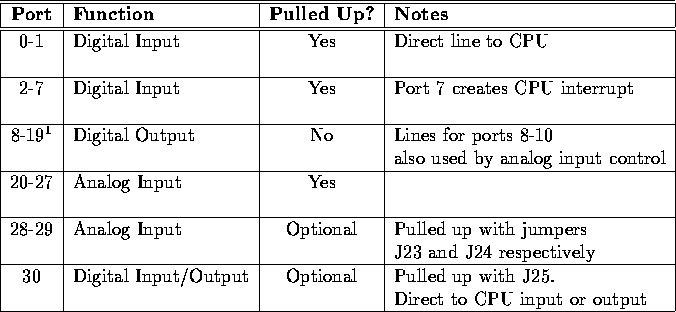
Digital Output DriversPorts 8 through 15 and port 30 on the RoboBoard can be utilized as digital outputs. Using the following function, these ports can be used to drive externally mounted low-current digital devices. Note: Ports 8 through 10 are also used as selection lines for the analog multiplexers. Therefore, any use of an analog input function will alter (potentially in an undesired manner) the values present on ports 8 through 10. Be aware of this fact when connecting devices to these ports. The best plan is to ensure that analog input and digital output are never used simulataneosly. int digital_out(int p, int v)
     int LOGIC_HIGH = 1;
     int LOGIC_LOW = 0;
     int DIG_OUT_PORTA = 11;

     digital_out (DIG_OUT_PORTA, LOGIC_HIGH); /* make it high */
     sleep(0.5);      /* wait one half second */
     digital_out (DIG_OUT_PORTA, LOGIC_LOW); /* make it low */
Sensor Input
int digital(int p)
If the digital() function is applied to an analog input (one of ports 20-29), the result is TRUE if the analog measurement is less than 127, and FALSE if the reading is greater than or equal to 127. Ports are numbered as marked on the RoboBoard. Example:
while (1) printf ("DigitalPort 2 reads %d\n", digital(2));
int analog(int p)
Example:
while (1) printf ("Analog Port 22 reads %d\n", analog(22));
int motor_force(int m)
     int HOIST_MOTOR = 5;
     int STALLED_FORCE = 80;      /* just a guess - should be measured */

    /* if we are stalled, turn off the motor before we break something */
    if (motor_force(HOIST_MOTOR) >= STALLED_FORCE) off(HOIST_MOTOR);
The force-sensing circuitry functions properly only when motors are operated at full speed. The circuit returns unreliable results when motors are pulse-width modulated, because of noise spikes that occur in the sensing circuitry. The force-sensing circuitry is implemented for all six motors, 0 through 5. int dip_switch(int sw)
if (dipswitch(2)) beep();
int dip_switches()
if (dip_switches() == 7) Execute_Plan_7();
int choose_button()
    int LEFT_MOTOR = 0;
    int RIGHT_MOTOR = 1;

    /*  wait until choose button pressed  */

    while (!choose_button());

    /* When the program falls through the loop (i.e. when the
    choose button is pressed, the left and right motors
    will turn on to full speed in the forward direction. */

    forward(LEFT_MOTOR);
    forward(RIGHT_MOTOR);
int escape_button()
    int LEFT_MOTOR = 0;
    int RIGHT_MOTOR = 1;

    /*  wait for button to be pressed; then
        wait for it to be released so that
        button press is "debounced" */

    while (!escape_button());

    /* it's pressed, now wait for the release */

    while (escape_button());

    forward(LEFT_MOTOR);
    forward(RIGHT_MOTOR);
The above example ``debounces'' the button so that just one button press is detected for each actual press. This is necessary in many situations because pushing a switch often produces more than just one transition in the output waveform, as the contact bounces a few times before finally settling at its final value. int robo_knob()
Example:
/* CONSTANT DECLARATIONS */

    int TRUE = 1;
    int FALSE = 0;

/* GLOBAL VARIABLE DECLARATIONS */

    int Use_Strategy_1 = FALSE;
    int Use_Strategy_2 = FALSE;
    int Use_Strategy_3 = FALSE;
    int Use_Strategy_4 = FALSE;

/* LOCAL VARIABLE DECLARATIONS */

    int roboknob_temp;

/* PROGRAM CODE */

    roboknob_temp = roboknob();  /* use a temporary variable so we
                              only have to read it once */

    /* We probably don't need to redundantly set the non-active
       strategies to false, but this avoids any ambiguity if we
       change the code later. */

    if (roboknob_temp <= 64) {
                Use_Strategy_1 = TRUE;
                Use_Strategy_2 = FALSE;
                Use_Strategy_3 = FALSE;
                Use_Strategy_4 = FALSE;
    }
    else if ((roboknob_temp) > 64) && (roboknob_temp <= 128)) {
                Use_Strategy_1 = FALSE;
                Use_Strategy_2 = TRUE;
                Use_Strategy_3 = FALSE;
                Use_Strategy_4 = FALSE;
         }
         else if ((roboknob_temp) > 128) && (roboknob_temp <= 192)) {
                Use_Strategy_1 = FALSE;
                Use_Strategy_2 = FALSE;
                Use_Strategy_3 = TRUE;
                Use_Strategy_4 = FALSE;
              }
              else {  /* we must be > 192 and < = 255 */
                Use_Strategy_1 = FALSE;
                Use_Strategy_2 = FALSE;
                Use_Strategy_3 = FALSE;
                Use_Strategy_4 = TRUE;
              }
float voltage()
This function can be used to determined if your battery needs charging. For example, if voltage() returns less than 11.0, your battery is in need of charging. The voltage() function can also be used to vary the parameterization of open-loop control algorithms. For example, if your robot uses time to measure distance (e.g., ``go forward for four seconds'') the distance traveled is proportional to the battery voltage. By measuring the battery voltage and using this value to adjust the time, you can more accurately move a fixed distance. Infrared SubsystemThe infrared subsystem is composed of two parts: an infrared transmitter, and infrared receivers. Software is provided to control transmission frequency and detection of infrared light at two frequencies. Infrared Transmissionvoid ir_transmit_on()
ir_transmit_on();
void ir_transmit_off()
ir_transmit_off();
void set_ir_transmit_frequency(int freq) Example:
if (dipswitch(1) set_ir_transmit_frequency(125);
Infrared ReceptionIn a typical application, one robot will be broadcasting infrared at 100 Hertz (Hz), and will set its detection system for 125 Hz. The other robot will do the opposite. Each robot must physically shield its IR sensors from its own light; then each robot can detect the emissions of the other. The infrared reception software employs a software phase-locked loop to detect infrared signals modulated at a particular frequency. This software generates an internal square wave at the expected reception frequency and attempts to ``lock'' this square wave into synchronization with a waveform received by an infrared sensor. If the error between the internal wave and the external wave is below some threshold, the external wave is considered ``detected.'' The software returns, as a result, the number of consecutive detections for each of the infrared sensor inputs. Up to four infrared sensors may be used. These are plugged into positions 2 through 5 of the digital input port. The unused remainder of the digital input port may be used without conflict for standard digital input while the infrared detection software is operating. The following library functions control the infrared detection system: void ir_receive_on()
void ir_receive_off()
void set_ir_receive_frequency(int f)
int ir_counts(int p)
Using the UNIX simulator, this function always returns 0, unless an invalid port is entered, which will result in a return value of -1. Shaft EncodersShaft encoders provide a convenient means to accurately measure rotational speed and distance. For example, shaft encoders on your robot's left and right axles provides a means to measure both distance travelled and direction. If the left axle turns more in a given time than the right axle, the robot is probably veering right. Assembly language drivers are provided to keep count of rapid transitions, as might occur on a shaft encoder sensor. Two types of shaft encoders are optical, in which a slotted wheel or black-and-white disk provides visual cues to an optosensor, and magnetic, in which a small magnet rotates past a magnetic sensor. In either case, the task of the software consists of counting pulses. To count accurately, the software uses different thresholds for the rising and falling edge of a pulse. Hence the signal must rise above an upper threshold before being detecting as a valid ``logic high'' of the pulse, and must fall beneath a lower threshold before being detected as a logic low. This method reduces the possibility that the signal might oscillate rapidly about a single threshold point. The software returns a total count of pulses, which may be reset by the user. The software does not keep track of the direction of rotation of the shaft. The software samples the sensor at the rate of 1000 Hz. Therefore the software cannot detect pulses more rapid than about half that frequency. Software Driver FilesThe library functions for shaft encoders differ from most other library functions discussed in that they are not automatically loaded with the system library. These functions are stored in distinct files and must be explicitly loaded by the user when needed. These functions are stored in the files encoders.c and encoders.icb, which are included in the file encoders.lis. These files must be loaded at the IC command line or from within a C program's lis file (as explained in Section 10.17) when needed. The UNIX simulator does not support shaft encoders. Shaft Encoder RoutinesIn order to use encoders, plug a digital shaft encoder into digital input 0, 1, 2, or 3 and call enable_encoder(p) with the port number. Digital ports 0 or 1 are best because they require the least processing time. Ports 2 and 3 take a bit longer to be processed. Now call read_encoder(p) with the port number to read the number of shaft counter ticks since the last reset. reset_encoder(p) will reset that number to zero. The counter overflows after around 32000 ticks. void enable_encoder(int p)
void disable_encoder(int p)
int read_encoder(int p)
void reset_encoder(int p)
The following code fragment demonstrates how one might go about using the shaft encoder functions.
    /* This code fragment continuously computes a value "Rate", which
    is the number of shaft encoder ticks per second.  This number is
    updated about every fourth of a second.  To obtain RPS, Rate should
    be divided by the number of holes in the shaft encoder wheel.
    To obtain distance traveled, RPS should be
    multiplied by the circumference of the wheel (this assumes that the
    shaft encoder is mounted on the same axle as the wheel, which is the
    recommended configuration) and the result should be multiplied by
    the elapsed time. */

/* CONSTANT DECLARATIONS */

    int TRUE = 1;
    int MOTOR_PORT = 0;
    int SHAFT_ENCODER_PORT = 6;   /* use input 6 for this sensor */
    int HOLES_IN_WHEEL = 6;
    float WHEEL_CIRCUMFERENCE = 4.5;  /* in inches */

/* LOCAL VARIABLE DECLARATIONS */

    float Rate;       /* shaft encoder ticks per second */
    int Count;
    long Start_Time;    /* in milliseconds */
    long End_Time;      /* in milliseconds */
    int Rev_Per_Sec;
    float Distance;     /* in inches */
    long Elapsed_Time;  /* in seconds */

    ...

    forward(MOTOR_PORT); /* the robot is moving forward */

    while (TRUE)
      {
        enable_encoder(SHAFT_ENCODER_PORT); /* resets the no. of shaft ticks */
        Start_Time = mseconds();
        sleep(0.5);              /* wait about 1/2 sec */
        disable_encoder(SHAFT_ENCODER_PORT);
        End_Time = mseconds();
        Count = read_encoder(SHAFT_ENCODER_PORT);  /* get the number of ticks
                                                      detected in the time
                                                      period measured */
        Elapsed_Time = (End_Time - Start_Time) * 1000);
        Rate = ((float) Count) / ((float) Elapsed_Time);

        Rev_Per_Sec = ((int) Rate / HOLES_IN_WHEEL);

        Distance = ((float) Rev_Per_Sec *
                                WHEEL_CIRCUMFERENCE * (float) Elapsed_Time);
      }
Time CommandsSystem code keeps track of time passage in milliseconds. The time variables are implemented using the long integer data type. Standard functions allow the use of floating point variables when using the timing functions. void reset_system_time()
long mseconds()
float seconds()
void sleep(float sec)
Example:
    /*  wait for 1.5 seconds  */
    sleep(1.5);
void msleep(long msec)
Example:
    /*  wait for 1.5 seconds  */
    msleep(1500L);
Tone FunctionsThere are several commands for producing tones on the RoboBoard piezo ``beeper''. void beep()
Example:
beep();
void tone(float frequency, float length)
Example:
tone(2000, 0.5); /* produce a 2000 Hz tone for one half second */
void set_beeper_pitch(float frequency)
void beeper_on()
void beeper_off()Music FunctionsThe file music.c contains functions which can play rudimentary music on the RoboBoard's piezo buzzer. Music is read from a character string and played via the function play(). A note is represented in the character string by a number corresponding to the duration and a letter corresponding to the note name. The following is an example of a character string containing RoboBoard music information:
char charge[]= ``1c1e1g2c1e1g4c'';
The characters within the double quotes comprise the notes and rests of the song. charge[] contains the music for the 'Charge' theme common at sporting events. Notes are specified as follows: <# of ``units''><optional accidental><note name> The duration of a ``unit'' is described by the tempo variable. tempo is defined as the number of milliseconds per unit, divided by eight. The default value is 12, corresponding to 96ms per unit. Take, for example, a song written with the sixteenth note as 1 unit. In such a song, an eighth note is 2 units, a quarter note is 4, etc. This means that in a time signature where quarter notes are one beat (i.e., 4/4), a tempo of 12 corresponds to about 156 beats per minute (60000msec / (12msec*8*4)). Since tempo is a global variable, its value can be changed on the fly with a simple variable assignment, such as tempo = 24;. The accidental symbols are # for sharp and & for flat. The note names are a-g, corresponding to standard Western musical notation. Therefore, the 1c at the beginning of charge[] indicates that a C should be played for a duration of 1 unit. A 2#c would be a C-sharp played for two units. Placing a U or a D before the duration number will force the note up or down an octave. Therefore, 1cU1c would play a C for one unit and then a C an octave up for another unit. To play a song, simply pass the name of the character string (or the string itself) to the function play. To play the song above, either play(charge); or play(``1c1e1g2c1e1g4c''); would suffice. void play(char song[])
Interrupt FunctionsThis section contains material for advanced programmers on the installation of assembly language interrupt handlers within an IC program. You will not need this to program your robot; however, if you want to learn about this, please see the instructor. Additional details of assembly language programming are contained in Chapter 12. Interrupt functions are not loaded by default, but are included in the file ints.c. They affect certain ports on the RoboBoard that are connected directly to the 68HC11 microprocessor and, along with an assembly language file, can be used to force the RoboBoard to execute certain code at the time that an external or internal event occurs. These events could include a particular digital input being high or low (level triggered), or going low (negative edge triggered) or going high (positive edge triggered), or the expiration of a particular period of time. By default, all interrupts except pwrfail are set to do nothing. Pwrfail sends low-power notices via the LCD display and beeper when low power conditions occur. These functions are not supported on the Unix simulator. void port30_edge()
void port30_level()
void pwrfail_int_on()
void pwrfail_int_off()
void port0_int_on()
void port0_int_off()
void port1_int_on()
void port1_int_off()
Figure 10.3: IC Library Quick Reference
Multi-TaskingOverviewOne of the most powerful features of IC is its multi-tasking capability. Processes can be created and destroyed dynamically during run-time. Any C function can be spawned as a separate task. Multiple tasks can be created that run the same code but have their own local variables. Processes communicate through global variables: one process can set a global to some value, and another process can read the value of that global. Each time a process runs, it executes for a certain number of ticks, (defined in milliseconds), which is determined for each process at the time it is created. The default number of ticks is five; therefore, a default process will run for 5 milliseconds until its ``turn'' ends and the next process is run. All processes are kept track of in a process table; each time through the table, each process runs once (for an amount of time equal to its number of ticks). Each process has its own program stack. The stack is used to pass arguments for function calls, store local variables, and store return addresses from function calls. The size of this stack is defined at the time a process is created. The default size of a process stack is 256 bytes. Processes that make extensive use of recursion or use large local arrays will probably require a stack size larger than the default. Each function call requires two stack bytes (for the return ) plus the number of argument bytes; if the function that is called creates local variables, then they also use up stack space. In addition, evaluating C expressions creates intermediate values that are stored on the stack. It is up to the programmer to determine if a particular process requires a stack size larger than the default. A process may also be created with a stack size smaller than the default, in order to save stack memory space, if it is known that the process will not require the full default amount. Creating New ProcessesWhen a process is created, it is assigned a unique process identification number or pid. This number can be used to kill a process. The function to create a new process is start_process. start_process takes one mandatory argument--the function call to be started as a process. There are two optional arguments: the process's number of ticks and stack size. (If only one optional argument is given, it is assumed to be the ticks number; default stack size is used.) start_process has the following syntax: int start_process( function-call( ...) , [TICKS] , [STACK-SIZE] ) start_process returns an integer, which is the process ID assigned to the new process. The function call may be any valid call of the function used. Example:
    int TRUE = 1;

    void check_sensor(int n)
    {
       while (TRUE) printf("Sensor %d reads %d\n", n, digital(n));
    } /* end of check_sensor */

    void main()
    {
       int chksenid;
       chksenid = start_process(check_sensor(2)); /* default stack and ticks */
    } /* end of main */
Normally when a C functions ends, it exits with a return value or the ``void'' value. If a function is invoked as a process ends, it ``dies,'' letting its return value (if there was one) disappear. (This is okay, because processes communicate results by storing them in globals, not by returning them as return values.) Hence in the above example, the check_sensor function is defined as an infinite loop, so it will run forever (until the RoboBoard is reset or a kill_process is executed). Creating a process with a non-default number of ticks or a non-default stack size is simply a matter of using start_process with optional arguments; e.g.
chksenid = start_process(check_sensor(2), 1, 50);
will create a check_sensor process that runs for 1 milliseconds per invocation and has a stack size of 50 bytes (for the definition of check_sensor in the example, a small stack space would be sufficient). Destroying ProcessesThe kill_process function is used to destroy processes. Processes are destroyed by passing their process ID number to kill_process, according to the following syntax: kill_process returns a value indicating if the operation succeeded. If the return value is 0, then the process was destroyed; if the return value is 1, then the process was not found. The following code shows the main process creating a check_sensor process, and then destroying it 30 seconds later:
    void main()
    {
      int chksenid;

      chksenid = start_process(check_sensor(2)); /* defines the process */

      sleep(30.0);  /* waits for 30 seconds */

      kill_process(chksenid);  /* this destroys the process indicated */
    }
Process Management Library FunctionsThe following functions are implemented in the standard C library. void defer()
Example:
    int TRUE = 1;

    void Check_Status()

    { /* this routine will execute the while loop once per time slice */
      while (TRUE) {
        Check_Sensors();
        Check_If_Stuck();

        defer();   /* give the rest of my time slice to the main program */

      } /* end while */

    } /* end of Check_Status */

    void main()
    {
       int chkstatid;
       int robmainid;

       robmainid = start_process(Robot_Main()); /* default stack and ticks */
       chkstatid = start_process(Check_Status()); /* default stack and ticks */
    } /* end of main */
void hog_processor()
Floating Point FunctionsIn addition to basic floating point arithmetic (addition, subtraction, multiplication, and division) and floating point comparisons, a number of exponential and transcendental functions are built in to IC:
float sin(float angle) float cos(float angle) float tan(float angle) float atan(float tangent) float sqrt(float num) float log10(float num) float log(float num) float exp10(float num) float exp(float num) (float) a Memory Access FunctionsIC has primitives for directly examining and modifying memory contents. These should be used with care as it would be easy to corrupt memory and crash the system using these functions. There should be little need to use these functions in Elec 201. Most interaction with system memory should be done with arrays and global variables. int peek(int loc)
int peekword(int loc)
void poke(int loc, int byte)
void pokeword(int loc, int word)
void bit_set(int loc, int mask)
void bit_clear(int loc, int mask)
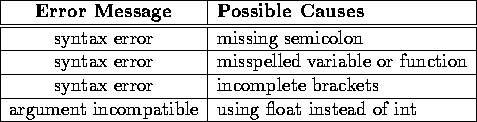
Error HandlingWhen working with IC, two types of errors can occur: compile-time errors and run-time errors. Compile-time errors occur during the compilation of the source file, indicating mistakes in the C source code. Typical compile-time errors result from incorrect syntax or mismatching of data types. Run-time errors occur while a program is running on the RoboBoard, A simple example would be a divide-by-zero error. Another example might be running out of stack space if a recursive procedure goes too deep in recursion. Compile and runtime errors are handled differently, as explained below. Compile-Time ErrorsWhen compiler errors occur, an error message is printed to the host computer screen. All compile-time errors must be fixed before a file can be downloaded to the RoboBoard. The following table lists some of the more common compile-time errors.
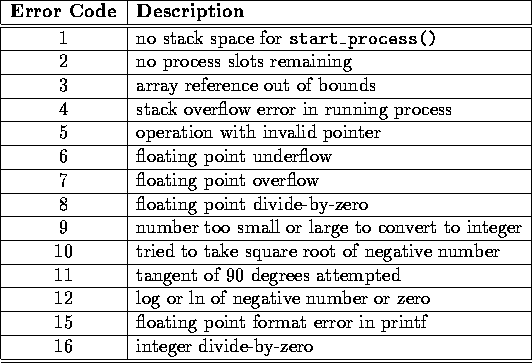
Run-Time ErrorsWhen a run-time error occurs, an error message is displayed on the LCD screen indicating the error number. If the RoboBoard is connected to a host running IC when the error occurs, a longer error message is printed on the terminal. Figure 10.5 contains a
list of the run-time error codes.
Sample ProgramsWall Encounter
/*This program makes the robot move forward until it hits a wall,
wait one second, reverse for 3 seconds, then turn off. */

/* CONSTANT DECLARATIONS */

    int WALL_SENSOR_PORT = 2;       /* use input 6 for this sensor */
    int LEFT_MOTOR_PORT = 0;       /* use motor port 2 */
    int RIGHT_MOTOR_PORT = 1;       /* use motor port 2 */
    int TRUE = 1;
    int FALSE = 0;

/* PROGRAM CODE */

void main()
    {
       forward(LEFT_MOTOR_PORT);
       forward(RIGHT_MOTOR_PORT);

       while (!digital(WALL_SENSOR_PORT)); /* This will check to see if
                                            sensor switch is depressed.
                                            When it's not pressed, the
                                            robot will continue forward. */
       ao(); /* turn motors off */

       sleep(1.0); /* motors off for 1 second before reversing */

       reverse(LEFT_MOTOR_PORT);
       reverse(RIGHT_MOTOR_PORT);

       sleep(3.0); /* motors go in reverse for 3 seconds */

       ao(); /* turn both motors off */
    } /* end of main */
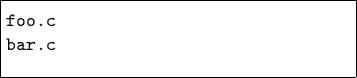
IC File Formats and ManagementThis section explains how IC deals with multiple source files. C ProgramsAll files containing C code must be named with the .c suffix. Loading functions from more than one C file can be done by issuing commands at the IC prompt to load each of the files. For example, to load the C files named foo.c and bar.c:
Alternatively, the files could be loaded with a single command:
If the files to be loaded contain dependencies (for example, if one file has a function that references a variable or function defined in the other file), then the second method (multiple file names to one load command) or the following approach must be used. List FilesIf the program is separated into multiple files that are always loaded together, a ``list file'' may be created. This file tells IC to load a set of named files. Continuing the previous example, a file called myprogram.lis can be created:
Listing of myprogram.lis:
File and Function ManagementUnloading FilesWhen files are loaded into IC, they stay loaded until they are explicitly unloaded. This is usually the functionality that is desired. If one of the program files is being worked on, the other ones will remain in memory so that they don't have to be explicitly re-loaded each time the one undergoing development is reloaded. However, suppose the file foo.c is loaded, which contains a definition for the function main. Then the file bar.c is loaded, which happens also to contain a definition for main. There will be an error message, because both files contain a main. IC will unload bar.c, due to the error, and re-download foo.c and any other files that are presently loaded. The solution is to first unload the file containing the main that is not desired, and then load the file that contains the new main:
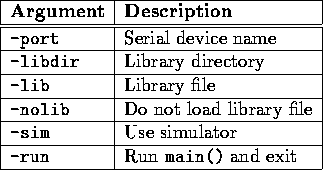
IC Command Line switchesIC has a multitude of command-line switches that allow control of a number of options. Explanations for these switches can be displayed by issuing the command ic -help at a Unix prompt. To change command line arguments on the Macintosh, hold down shift while IC is loading. The program will present a command line and a list of valid command line arguments. Two examples are: IC has two commands to help with process management, usable only at the IC command line. They cannot be used in code. kill_all
ps
Figure 10.6 contains the most commonly used arguments.
Assembly Language ProgramsWith a customized 68HC11 assembler, IC allows the use of assembly language programs within the C environment. Assembly language programs may be incorporated in two ways:
When operating as a function, the interface between C and an assembly language program is limited: an assembly language program must be given one integer as an argument, and will return an integer as its return value. However, programs in an assembly language file can declare any number of global integer variables in the C environment. Also, the assembly language program can use as its argument a pointer to a C data structure. The Assembly Language Source FileSpecial keywords in the source assembly language file (or module) are used to establish the following features of the assembly language program:
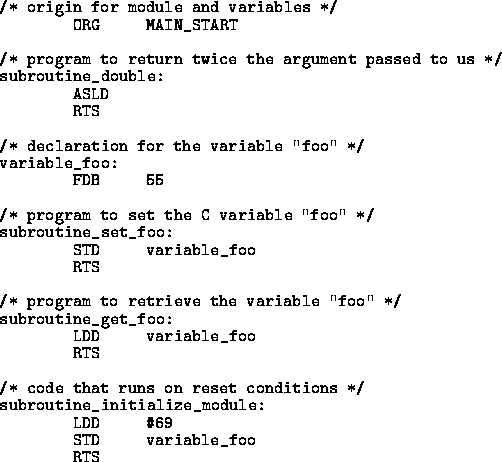
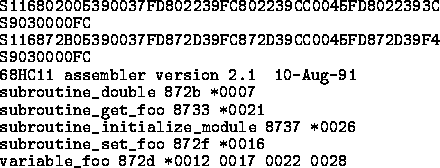
To explain how these features work, consider the sample IC assembly language source program, listed in Figure 10.7.
The first statement of the file (ORG MAIN_START) declares the start of the assembly language programs. This line must precede the code itself. A special form beginning with the text subroutine_ declares the entry point for a program to be called from C. In this case, the name of the assembly language program is double, so the label is named subroutine_double. As the name suggests, this program doubles the value of the argument passed to it. One integer argument is passed when the assembly language program is called from C, which is placed in the 68HC11's D register (also known as the ``Double Accumulator'') before the assembly language code is called. Then the program's ASLD instruction ( ``Arithmetic Shift Left Double [Accumulator]'') multiplies the argument in the D register by 2. The RTS instruction, meaning ``Return from Subroutine,'' makes all assembly language programs exit. When an assembly language program exits, the final value in the D register is the return value to C. Thus, the double program doubles its C argument and returns it to C. Declaring Variables in Assembly Language FilesThe label variable_foo is an example of a special form to declare the name and location of a variable accessible from C. The special label prefix ``variable_'' is followed by the variable name, in this case, ``foo.'' This label must be immediately followed by the statement FDB number, which is an assembler directive that creates a two-byte value (the initial value of the variable). For example, to initialize the variable ``foo'' to the value 55, the following line is required: variable_foo FDB 55 Variables used by assembly language programs must be declared in the assembly language file. These variables then become C globals when the assembly language file is loaded into C. ``set_foo'' is the next assembly language program in the file. Its function is to set the value of the variable foo, which is defined earlier in testicb.asm. It does this by storing the D register into the memory contents reserved for foo, and then returning. The next assembly language program is named ``get_foo.'' It loads the D register from the memory reserved for foo and then returns. Declaring an Initialization ProgramThe label subroutine_initialize_module is a special form used to indicate the entry point for code that initializes the assembly language programs. The code is run upon standard reset conditions: program download, hardware reset, or running of the main() function. In the example shown, the initialization code stores the value 69 into the location reserved for the variable foo, overwriting the 55 that would otherwise be the variable's default value.
Initializing globals defined in an assembly language module differs from initializing globals defined in C. In an assembly language module, the globals are initialized to the value declared by the FDB statement, but unlike normal globals, whose values are reinitialized upon reset or running of main, this initialization occurs only when the code is downloaded to the RoboBoard. However, the initialization routine is run upon standard reset conditions, and can be used to initialize globals on reset, as this example has illustrated. Interrupt-Driven Assembly Language Programs
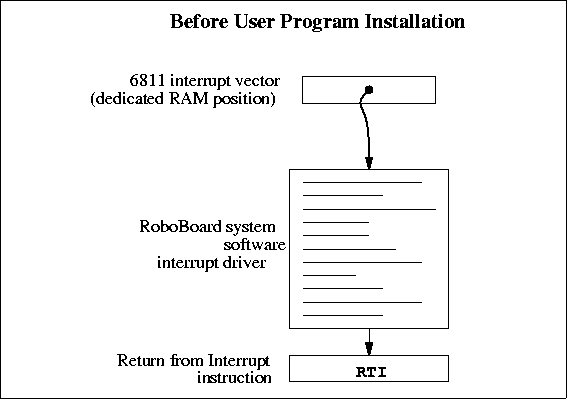
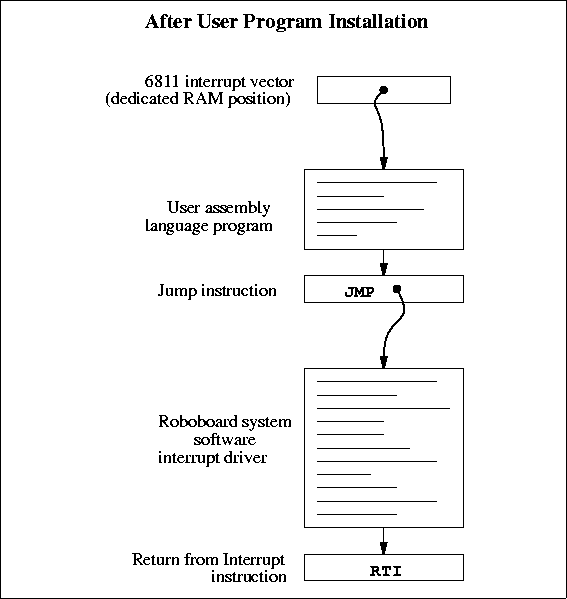
Interrupt-driven assembly language programs use the initialization sequence of the assembly language module to install a piece of code into the 68HC11's interrupt structure. The 68HC11 has a number of different interrupts, mostly dealing with its on-chip hardware such as timers and counters. One of these interrupts is used by the ELEC 201 software to implement time-keeping and other periodic functions (such as LCD screen management). This interrupt, dubbed the ``System Interrupt,'' runs at 1000 Hertz. Instead of using another 68HC11 interrupt to run user assembly language programs, additional programs (that need to run at 1000 Hz. or less) may install themselves into the System Interrupt. User programs then become part of the 1000 Hz interrupt sequence. To accomplish this, the user program ``intercepts'' the original 68HC11 interrupt vector that points to RoboBoard interrupt code. This vector is then made to point at the user program. When user program finishes, it jumps to the start of the RoboBoard interrupt code.
Figure 10.8 depicts the interrupt structure before user program installation. The 68HC11 vector location points to system software code, which terminates in a ``return from interrupt'' (RTI) instruction. Figure 10.9 illustrates the result after the user program is installed. The 68HC11 vector points to the user program, which exits by jumping to the system software driver. This driver exits as before, with the RTI instruction. Multiple user programs could be installed in this fashion; each one would install itself ahead of the previous one. Some standard ELEC 201 library functions, such as the shaft encoder software, are implemented in this fashion.
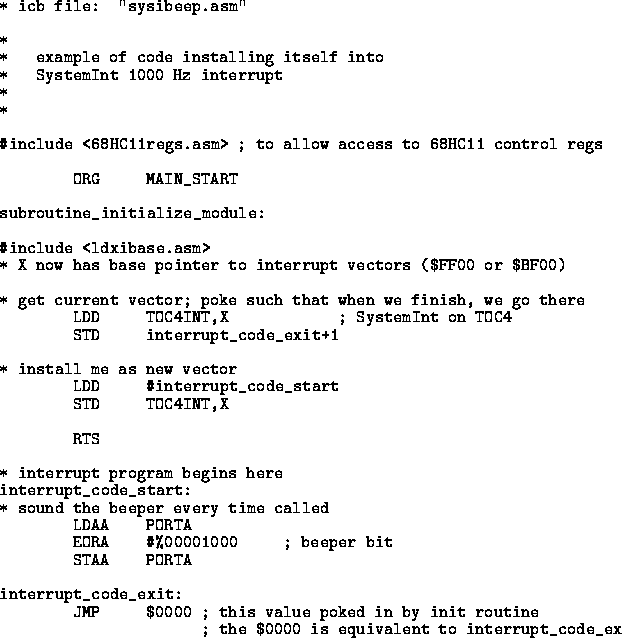
Figure 10.10 depicts an example program that installs itself into the System Interrupt. This program toggles the signal line controlling the piezo beeper every time it is run; since the System Interrupt runs at 1000 Hz., this program will create a continuous tone of 500 Hz. The first line after the comment header includes a file named 6811regs.asm. This file contains equates for all 68HC11 registers and interrupt vectors; most assembly language programs will use at least a few of these equates. It is simplest to keep them all in one file that can be easily included. (This and other files included by the as11 assembler are located in the assembler's default library directory, which is ~elec201/lib/as11 on Rice Unix systems.) The subroutine_initialize_module declaration begins the initialization portion of the program. The file ldxibase.asm is then included. This file contains a few lines of 68HC11 assembler code that perform the function of determining the base pointer to the 68HC11 interrupt vector area, and then loading this pointer into the 68HC11 X register. The following four lines of code install the interrupt program (beginning with the label interrupt_code_start) according to the method that was illustrated in Figure 10.9. First, the existing interrupt pointer is fetched. As indicated by the comment, the 68HC11's TOC4 timer is used to invoke the System Interrupt. The vector is poked into the JMP instruction that will conclude the interrupt code itself. Next, the 68HC11 interrupt pointer is replaced with a pointer to the new code. These two steps complete the initialization sequence. The actual interrupt code is quite short. It toggles bit 3 of the 68HC11's PORTA register. The PORTA register controls the eight pins of Port A that connect to external hardware; bit 3 is connected to the piezo beeper. The interrupt code exits with a jump instruction. The argument for this jump is poked in by the initialization program.
This method allows any number of programs located in separate files to attach themselves to the System Interrupt. Because these files can be loaded from the C environment, this system affords maximal flexibility to the user, with small overhead in terms of code efficiency. The Assembly Language Object FileThe source file for an assembly language program must be named with the .asm suffix. Once the .asm file is created, a special version of the 68HC11 assembler program is used to construct the assembly language object code. (The main thing ``special'' about this version of the 68HC11 assembler is that it invokes the C preprocessor ``cpp'', so that C style comments and include files can be used. It causes variables to be initialized and includes information about the location of subroutines and variables.) This program creates a file containing the assembled machine code plus label definitions of entry points and C variables.
The program as11_ic is used to assemble the source code and create an object file. This program is currently only available on the Unix machines. as11_ic is given the filename of the source file as an argument. The resulting object file is automatically given the suffix .icb (for IC ``binary''). Figure 10.11 shows the assembler object file that is created from the testicb.asm example file. Loading an icb FileOnce the .icb file is created, it can be loaded into IC just like any other C file. If there are C functions that are to be used in conjunction with the assembly language programs, it is customary to put them into a file with the same name as the .icb file, and then use a .lis file to load the two files together. Passing Array Pointers to an Assembly Language ProgramA pointer to an array is a 16-bit integer . To coerce an array pointer to an integer, use the following form:
where array_ptr is an integer and array is an array. When compiling code that performs this type of pointer conversion, IC must be used in a special mode. Normally, IC does not allow certain types of pointer manipulation that may crash the system. To compile this type of code on the Macintosh, use the following flag when IC prompts for command line arguments:
To compile the code on a Unix system, use the following invocation:
Arrays are internally represented with a two-byte length value followed by the array contents.
Getting Started on the Apple MacintoshThis section describes how to boot IC on the RoboBoard using the Apple Macintosh computer. Most commands are initiated using the mouse button. If you are unfamiliar with the use of the Macintosh, work through the Apple tutorial "Getting Started with the Power Macintosh" before you try anything else. Commands typed to the computer are shown underlined for visibility.
At this point, IC will boot, ready to load a C program or evaluate expressions typed to the IC prompt.
|
![\begin{figure}
\centerline{
\framebox [3.4in]{\parbox{3in}{
\begin{tabbing}
{\b...
...sc esc} \fbox{\sc del} \\ gt backward-kill-word \\ \end{tabbing}}}
}\end{figure}](images/img160.gif)