 |
 |
Syllabus
Lab Resources
- Agarose Gel Electrophoresis
- Bacterial Streak Plate
- Bacterial Transformation
- DNA Ligation
- PCR
- Pipettors
- Plasmid DNA Isolation and Restriction Enzyme Digests
- Preparation of Agar Plates
Pre-lab Preparation
- Pre-lab preparation
- Laboratory Citizenship & Performance
- BIOC 111/112 Honor Code
- Molecular Biology Tips
- Writing Up Methodology
Additional Resources
BIOC 111 Day 1
Plasmid DNA Isolation and Restriction Enzyme Digests
OWL-Space Resources
|
Class Videos |
|
Day 1 |
|
07: DNA Labs Overview |
| |
|
08: Interpreting a Plasmid Map |
| |
|
09: Plasmid DNA Mini Prep |
|
plasmid_map.pdf |
|
10: Restriction Enzymes |
|
Introduction
Plasmid DNA mini preps and restriction enzyme digests are "staples" in a laboratory that works with DNA. Your experience with these methods will be greatly appreciated if you take on a project in such an environment. The challenge is to conduct each procedure exactly as instructed. Molecular biology requires faithful attention to details. Deviation from an established protocol almost always result in failed preparations.
Background
PLASMID DNA
| Plasmids are small circles (usually less than 15 kb)
of double stranded DNA maintained in some bacteria because they confer
an advantage to the cells such as resistance to an antibiotic. The
ease with which this DNA can be isolated and manipulated accounts
for the widespread use of plasmids in molecular biology for a variety
of tasks (e.g., protein expression). Although plasmids occur naturally,
the ones used in research have been engineered to prevent natural
transfer between bacteria to reduce the spread of antibiotic resistance.
Plasmids used for protein expression in E.coli need to have:
|
 |
|---|
RESTRICTION ENZYMES
Restriction enzymes cleave the phosphodiester bonds in each strand of double-stranded DNA. The cleavage may be at adjacent sites leaving a “blunt end,” or the cut may be offset by 1 to 4 bases, leaving either a 3' overhang or a 5' overhang of a single strand. The offset cleavage yields "sticky end" cuts.
Restriction enzymes are obtained from many prokaryotes and about 1500 enzymes with known sequence recognition sites have been isolated. Naming these endonucleases follows a system proposed by Nathans and Smith. Each name contains at least one capital letter and two small letters followed by a Roman numeral. The letters are initials of the genus and species of origin and the number represents the number of enzymes discovered in the organism. (Historically the numeral identified the protein peak in which the enzyme eluted during chromatography.) Additional information may be added as a letter. For EcoRI, the R indicates the particular strain of E. coli.
A few buffer conditions suit nearly all the restriction enzymes but no single buffer allows activity of every enzyme. Suppliers of enzymes always provide a reaction buffer (10x concentrate) that is optimum for the enzyme. Components of the 1x buffer usually are 10-100 mM Tris at pH 7.3 to 8.5, various levels of salts like KCl and NaCl (10 to 150 mM), 10 mM Mg(2+), 2 mM beta-mercaptoethanol. Sometimes 0.01% Triton- X100 (a detergent) and bovine serum albumin are included as a stabilizers. (Alternatively, swine skin gelatin can be used and offers the advantages that it is stable to autoclaving and costs about 1/15 as much as BSA.)
Since restriction enzymes can require different buffer conditions, some strategy must be used to do double digests. The preferred method is to simultaneously digest with both enzymes in a compatible buffer. This method can be used even if one enzyme is not fully active (e.g., 75% active). More of one enzyme can be added (e.g., 1 U of enzyme A + 1.33 U enzyme B) for equal cutting efficiency. There are limits to the excess enzyme due to increased glycerol in the reaction that can reduce specificity of some enzymes. An alternative method is to digest with the "low salt" enzyme then add more buffer and the "high salt" enzyme to complete the digest. This obviously doubles the time required for digestion. In extreme cases the DNA can be precipitated after one digest and dissolved in the second digest buffer. Digests are carried out at 37 degrees C unless otherwise noted for the enzyme.
Miscellaneous information on restriction enzymes
- By definition, a unit of restriction enzyme will completely cleave 1µg of Lambda DNA (or other substrate DNA) in one hour in the recommended buffer and temperature.
- Reaction volumes should be 25-50 µl and the amount of enzyme added should not exceed 10% of the volume due to the glycerol content. The amount of DNA in a digest should not exceed 250 µg/ml because the increase in ionic compounds in the DNA preparations will decrease the efficiency of cleavage.
- Restriction enzymes are most stable when stored in a non-cycling -20 degrees C freezer. (Frost-free freezers are not recommended.) Most enzymes are stored in 50% glycerol and therefore are not frozen solid, allowing removal of the enzyme without thawing. Always keep the enzyme solution in a freezer block (e.g., a “Stratacooler”) and return it to the freezer as quickly as possible.
- Catalogues from suppliers represent an accessible (and free) source of valuable information on restriction enzymes. A wealth of information is usually found in table form in appendices in the back of the catalogue or near the pages listing the restriction enzymes. These tables give buffer concentrations, recognition sequences, E. coli strains and genotype tables, and more. New England Biolabs and Promega are exceptionally efficient at providing information; additionally, both companies provide several useful web-based resources.
Experimental overview
Today’s procedures involve isolating plasmid DNA and digesting DNA with restriction enzymes. Perform the procedures in the order given below. Make sure that you use the appropriate pipettor and set the volume correctly—if you’re unsure, then ask. Record all procedures and data in your lab notebook, indicating “who” performed a procedure step when you work as pairs; turn in copies of notebook pages at the end of the laboratory session.
- Plasmid DNA mini prep (individual)
- Restriction enzyme digests of plasmid DNA (individual)
- Evaluation of streak plates from pre-lab (individual)
SPECIAL NOTE: Record enough procedure details in your notebook during lab today so that you can repeat these procedures using your notebook as the ONLY resource. Write the methods in your own words (i.e., do not just “copy” the steps from the web pages or handouts).
ADDITIONAL DETAILS: for each centrifugation, record time, rcf (# x g), and temperature in your lab NB; ALL centrifugations performed in the microcentrifuges are at “room temperature” (indicate as such but don't need to report in degrees C)
A) Plasmid DNA mini prep
We're using a Zyppy™ Plasmid Miniprep Kit (Zymo Research Corp., Irvine, CA) to isolate plasmid DNA from an overnight (O/N) bacterial culture in Luria-Bertani (LB) broth with kanamycin (50 µg/ml).- Disposal of Waste: Discard bacterial supernatant and collect contaminated tips in a small beaker; we will add bleach to 10% for 10 minutes before dumping into the trash and sewer
- Place culture tubes in the clear Biohazards bag; these bags will be autoclaved prior to placement in the household trash
- After the bacteria are lysed, tips, vials, and other materials should be discarded in the regular trash
PROTOCOL (from the Zyppy™ Plasmid Miniprep Kit Instruction Manual)
-
BEFORE beginning this procedure, use a Sharpie to label a 1.5 ml tube with your initials
- Pipette 1.5 ml of bacterial culture (record the ID on the culture tube in your NB) into a sterile 1.5 ml microcentrifuge tube and centrifuge for 30 seconds at 16,000 x g (in a microcentrifuge); carefully pour the supernatant (liquid) into small waste beaker (a small amount of liquid can remain in the tube)
- REPEAT step 1 (use the SAME microcentrifuge tube); after pouring off waste, remove remaining liquid using your pipettor
- Add 600 µl nuclease-free (NF) water to
the cell pellet and resuspend completely by gently
pipetting up and down
- make sure there are no "clumps" of bacterial pellet visible
- Add 100 µl of 7X Lysis Buffer (Blue) and mix by inverting tube until the sample turns blue (invert at least 6 times)
- You must proceed to step 5 within 2 minutes (excessive lysis can denature plasmid DNA!)
- Add 350 µl COLD Neutralization Buffer (Yellow), containing 100 µg/ml RNaseA, and mix thoroughly by inverting tube
- When neutralization is complete, sample turns yellow and a yellowish precipitate forms
- Invert sample 2-3 more times (to ensure complete neutralization)
- Centrifuge at 16,000 x g for 4 minutes
- Transfer supernatant to a Zymo-Spin™ II column (avoid disturbing pellet!)
- Put column in a 2 ml collection tube and centrifuge for 15 seconds (maximum speed, press and hold the "short" button)
- Discard flow-through (liquid waste) in sink and put column back into the collection tube
- Add 200 µl Endo-Wash Buffer to column and centrifuge for 15 seconds at 16,000 x g (press and hold the "short" button)
- Add 400 µl Zyppy™ Wash Buffer (containing ethanol) to the column and centrifuge for 30 seconds at 16,000 x g)
- Transfer column into a sterile 1.5 ml microcentrifuge tube
- Add 30 µl Zyppy™ Elution Buffer (10 mM Tris-HCl, pH 8.5, 0.1 mM EDTA) directly to the column matrix (white circle) and wait one minute (room temperature)
- Centrifuge 15 seconds at 16,000 x g (press and hold the "short" button) to elute plasmid DNA
- Label your sample -- include enough information so that you know the ID of the sample and can find your tube in a common storage area
- Proceed to B)
B) Restriction enzyme (RE) digests of plasmid DNA
Our restriction enzymes are from New England Biolabs (NEB) (Ipswich, MA); record the units/µl for each enzyme you use--this information as well as buffer components (1X) for each buffer can be found on the manufacturer’s inserts or online. As a group, you will set up four digest reactions; each person will prepare one of the following reactions:- uncut control (NO enzyme)
- single digest with BamHI-HF (Catalog # R3136S) or with PstI-HF (Catalog # R3140S)
- double digest with BamHI-HF and PstI-HF (set-up TWO of these digests)
PROTOCOL
- Label one sterile 1.5 ml tube -- include enough information so that you know the ID of the sample and can find your tube in a common storage area
- Put 15 µl plasmid DNA into the tube
NOTE: a TOTAL volume of 25 µl will be used for the digest reaction. You must take into account the volume of DNA, buffer, and enzymes used in the reaction to determine how much water to add; the volume of water added will differ for each of the reactions.
- Add the appropriate volume of nuclease-free (NF) water
- Add 2.5 µl NEB CutSmart™ Buffer (10X)
- Add 1 µl of enzyme (record units/µl)
- Gently flick tube to mix and "pulse spin" (press and hold the "short" button for ~ 10 sec) sample
- Incubate digest reaction at 37°C for at least 15 minutes in the "dry" heat block
- Pulse spin sample
- Store digest reactions and the rest of the plasmid DNA mini prep at -20°C in a “Stratacooler” (record the SC # in your lab NB)
C) Evaulation of streak plate
Examine your “streak” plates and record your observations in your notebook. Did you get single, well-isolated colonies? If not, how might you modify your technique next time to obtain single colonies?
Homework Assignments
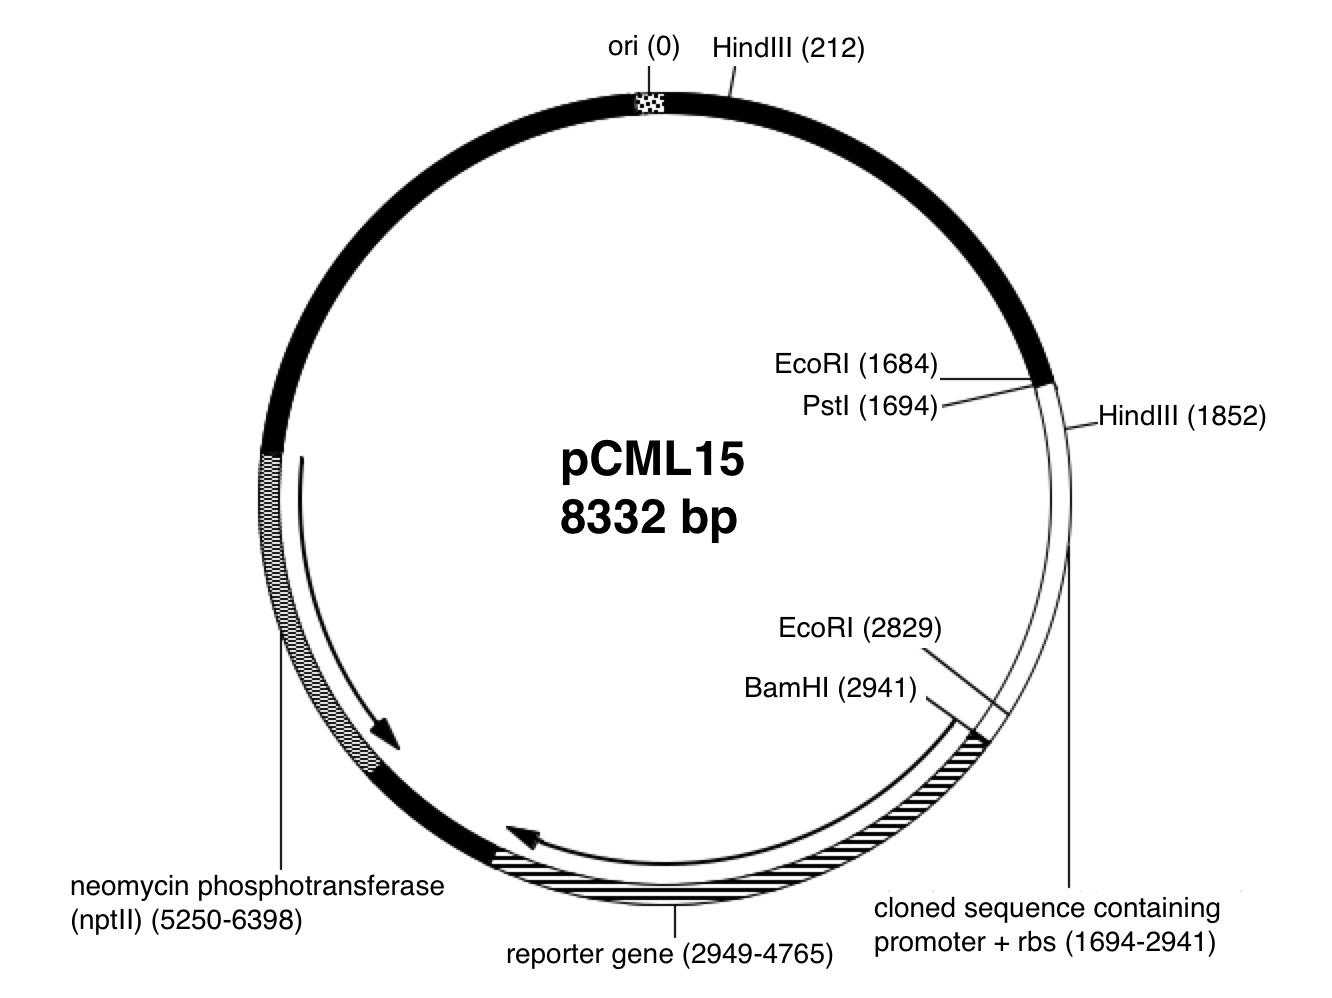
Prepare item 1 of the homework assignments in your laboratory notebook and turn in the duplicates at the beginning of the next laboratory session. Complete item 2 on Owlspace.1. Plasmid map prediction: Using the plasmid map of pCML15, predict the theoretical number and sizes of the restriction fragments for the single digest and for the double digest that you performed in lab today; give a brief rationale for your answer.
2. Graphing tutorial (Graphing 111): This laboratory course is about the "fundamentals." Among the most basic analytical skills you will need is the ability to produce an effective figure in the form of a graph. In fact, next week you will be introduced to the concept of a DNA standard curve. To hone your graphing skills, particularly with regard to plotting scientific data, we have designed a graphing tutorial ("Graphing 111" under Tests & Quizzes on Owlspace). The tutorial MUST be completed before your next lab day (Day 2) to be eligible for full credit.
An optional graphing pre-quiz will open the same time as the tutorial. You are encouraged to take the optional quiz on your own. You can submit multiple times, and feedback will be provided immediately. Both the tutorial and the optional quiz will remain available for you to review.
NOTE: A final quiz on graphing will become available on Day 2. This quiz must be submitted before your third lab day of lab. The tutorial and quiz together count for 6% of your final course grade.
Just for Fun
Check out Cut It Out, a strategy game about restriction enzymes from New England Biolabs.We would like to thank New England Biolabs for their generous support of this laboratory course
![]()
Visitors: to ensure that your message is not mistaken for SPAM, please include the acronym "Bios211" in the subject line of e-mail communications
Created by David R. Caprette (caprette@rice.edu), Rice University 14 Jul 08
Author: Beth Beason Abmayr, Ph.D., Rice University
Updated 4 February 2014