 |
 |
Syllabus
Lab Resources
- Agarose Gel Electrophoresis
- Bacterial Streak Plate
- Bacterial Transformation
- DNA Ligation
- PCR
- Pipettors
- Plasmid DNA Isolation and Restriction Enzyme Digests
- Preparation of Agar Plates
Pre-lab Preparation
- Pre-lab preparation
- Laboratory Citizenship & Performance
- BIOC 111/112 Honor Code
- Molecular Biology Tips
- Writing Up Methodology
Additional Resources
BIOC 111 Day 4
Confirmation of Bacterial Transformant
OWL-Space Resources
|
Class Videos |
|
Day 4 |
|
16: Agarose Gel: Pouring |
|
EcoRI-HF and HindIII-HF |
Introduction
Referring to your previous notes, you will conduct plasmid DNA mini preps of putative transformants, perform restriction enzyme digests of plasmid DNA, prepare and run agarose gels, and calculate an efficiency of transformation (EOT).
Background
Review the relevant background information for days 1-3.
Experimental Overview
Today you will use some of the experimental procedures that you performed in previous labs to determine whether the transformation was successful and to characterize the plasmid DNA. On some procedures you will work as an individual; on others you will work as a team or with your partner. For basic procedure steps, refer to your lab notebook; any new information you need is given below. NOTE: your lab notebook is the ONLY additional resource you may use for procedure details (i.e., you may NOT look at printed web pages or handouts from previous labs).- Plasmid DNA mini prep (individual)
- RE digest of plasmid DNA (individual)
- Agarose gel electrophoresis (team)
- Counting colonies to determine EOT (team)
A) Plasmid DNA mini prep
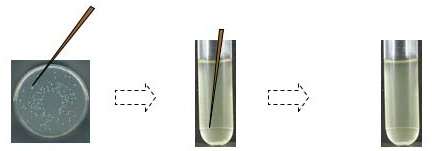
We're using a Zyppy™ Plasmid Miniprep Kit (Zymo Research Corp., Irvine, CA) to isolate plasmid DNA from a 3 ml overnight (O/N) bacterial culture. Each overnight culture arose from a single colony: a well-isolated colony on the LB-kan plate was lightly touched with a sterile toothpick or a sterile pipet tip; after twirling the tip in a 15 ml culture tube containing liquid LB plus kan, the tubes were incubated with shaking at 37°C overnight. NOTE: in a “real” lab situation, you would save some of the overnight culture for streaking a plate and making a glycerol stock.
* Disposal of Waste: Discard bacterial supernatant in a small beaker;
add bleach to 10% for 10 minutes before dumping into the sewer
* Collect contaminated tips and culture tubes in a beaker at your
desk then rinse the beaker with bleach after dumping the waste in the
clear Biohazards bag; these bags will be autoclaved prior to placement
in the household trash
* After the bacteria are lysed, tips, vials, and other materials should
be discarded in the regular trash
PROTOCOL (refer to your lab notebook)
B) Restriction enzyme (RE) digests of plasmid DNA
We are going to use a diagnostic RE digest to confirm the identity of the bacterial transformants. Discuss your strategy (i.e., your choice of enzyme) with your group and think about what else you might do to strengthen your conclusions about the identity of the plasmid DNA. Each person will set up a single digest reaction. ALL of the digest reaction will be loaded onto an agarose gel for analysis.
PROTOCOL (refer to your lab notebook)
- Put 15 µl plasmid DNA in a sterile 1.5 ml tube
- Add 2.5 µl NEB CutSmart™ Buffer (10X) to each tube
- Add NF water for a TOTAL reaction volume of 25 µl
- Remember to account for the volumes of plasmid DNA, 10X buffer, and enzyme
- Add 1 µl of enzyme (record units/µl)
- Mix and incubate as on lab day 1
C) Agarose gel electrophoresis (each team pours a gel during 4 min centrifugation in mini prep protocol)
PROTOCOL
 HEALTH HAZARD
- Ethidium bromide (EtBr) is a probable carcinogen and should be handled with care. Wear gloves when handling contaminated equipment or solutions containing ethidium bromide. Confine the compound to the restricted area. After running the gels, use paper towels and plastic wrap to protect equipment and surfaces from being contaminated.
- Dispose of the gels in the Biohazard Waste
Box. Do NOT put paper towels, plastic wrap,
or gloves in this waste box--ONLY the gels.
Remember: Wear gloves and DO NOT spread EtBr outside the designated area!!
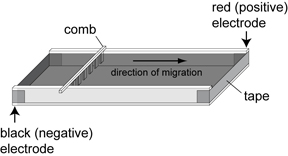
- Rinse the gel tray and comb(s) then prepare gel tray as diagrammed above. Tape the ends of the casting tray as indicated. Level the tray using a bubble level.
- Flasks of completely melted 0.8% agarose in 1X TBE have been prepared and the melted solution is incubating at 50-55°C. Hold the hot flask with a folded paper towel and carefully pour ~60 ml melted agarose into a beaker. Remember the solution is hot!!
- After the instructor adds EtBr to the agarose, gently swirl
the agarose.
EtBr stock solution = 0.625 mg/ml; we use 1 drop (~25 µl) EtBr/60 ml agarose so final concentration of EtBr = 0.3 µg/ml - Immediately, pour the melted agarose into the level casting tray. Use a pipet tip to push bubbles towards the bottom of the gel.
- Allow the tray to cool until gel is translucent. This will take at least 20 minutes. CLEAN UP ANY DRIPS ON THE BENCH AND RINSE THE FLASK!
- Prepare samples
- Digest reactions: add 5 µl 6X LB to each sample
- Carefully remove comb and tape and place casting tray into the electrophoresis box for running. Fill unit with 1X TBE buffer to ~ 1 mm above gel. Pour carefully onto the center of the gel to prevent the gel from sliding off the tray.
- Load ALL of each sample into the gel
- Instructor loads 10 µl Quick-Load 1 kb DNA Ladder (New England Biolabs)
- Run at 130 V for 45-50 minutes
- Obtain a picture of the gel as on lab day 2
ATTENTION: Avoid doing anything that would unintentionally contaminate the transilluminator or camera with EtBr. For instance, do NOT lay gels directly on the transilluminator, but always on plastic wrap. Do NOT contaminate the equipment (door knob, camera, printer, etc.)--REMOVE your gloves BEFORE working with the camera and gel documentation system.
D) Efficiency of transformation (EOT) = # colonies / per µg DNA
EOT is calculated by counting the number of colonies that grow on selective media following transformation and dividing by the total µg DNA used in the transformation. Dilutions must be calculated to determine the amount of DNA present in the volume of transformed culture placed on each plate.
Count the colonies present on the plasmid DNA plate and the negative control plate. If only a few colonies are present, count the entire plate. If many colonies are visible, place the plate on a grid such as a page of your notebook and count the number of colonies in four or five grids representing an average density across the plate. The rule in grid counting is to score any colonies in contact with the lines to the top and right side of the square but not those in contact with the other sides. Average the scores and multiply by the total area of the plate to calculate the total number of colonies. Record these values in your lab notebook and use the number of colonies on the uncut plasmid transformation plate to calculate the EOT (Homework question 2.); during lab today, you just need to record the number of colonies on each plate.Homework Assignments
Prepare all of the homework assignments in your laboratory notebook. Dr. Beason will collect homework items 1 and 2 at the beginning of the next laboratory session. Prepare item 3 on a NEW page in your laboratory notebook so that calculations and instructions for preparation of Biuret reagent are on different pages from the DNA homework; turn in the duplicates of these pages with your notebook pages from lab.
1. Analyze an agarose gel (attach either
an enlarged copy or the original picture of the gel to the
homework pages)
Identify the restriction enzyme you used for the diagnostic
digest. Use the plasmid map and the picture of your gel
from today to obtain the following information:
- Look at the location of the digested DNA fragments on the picture of the gel. What are the apparent sizes of these bands for each single digest in comparison to the standards on the gel?
- Use the picture of your gel from day 4 to hand draw a DNA standard curve in your notebook. A computer-generated plot is not appropriate for this application. Plot log10 (# base pairs) versus distance migrated from the well (i.e., top of the gel) and use the graph to estimate the sizes of the restriction fragments for each digest reaction. Construct a table for the standards containing #bp, log10(#bp), and distance migrated (cm or mm); construct a second table that contains the restriction enzyme(s) used in each digest reaction and the distance migrated for each resulting DNA fragment. Show all measurements and calculations. Do these sizes agree with the apparent sizes that you observed on the gel?
- Compare the experimental results (from analysis of agarose gel) with the expected sizes (as predicted from plasmid map). Do they agree? If not, suggest possible reasons for the discrepancy.
2. Calculate Efficiency of Transformation (EOT)
- For the transformation with uncut plasmid DNA,
how many colonies were on the LB+kan agar plate? Calculate
the EOT for the transformation and report the EOT in scientific
notation. Show all work in your lab notebook.
- Assume 50 ng plasmid DNA (in 2 µl) was used for
the transformation
NOTE: Remember to account for dilution of the plasmid DNA during the transformation and plating of cells
- Assume 50 ng plasmid DNA (in 2 µl) was used for
the transformation
- Did you have any colonies on the plate of your negative control transformation? Give a brief explanation for why you might see colonies with a negative control using digested DNA.
3. Prepare for lab day 5
In addition to reviewing and printing off the Day 5 protocol, you have two short slide presentations and a video clip to observe. You will also need to finish planning part A of the Day 5 protocol. Please start on the calculations well ahead of Day 5 in case you run into difficulty.
- Review the Powerpoint presentation on mixtures, also available on Owlspace as a printable copy (111_mixtures.pdf) with notes
- Review the Powerpoint presentation on solutions, also available on Owlspace as a printable copy (111_solutions.pdf) with notes
- View the video clip on using the WPA S1200 Spectrawave spectrophotometer
- Write your own instructions for preparing 200 ml
biuret reagent as explained in steps 1-3 of part A
of the Day 5 protocol
NOTE: do this work on a NEW page in your lab notebook and turn in with your notebook pages for lab day 5
Reminder
The Materials and Methods section is due the last week of labs on your lab day. It is to be a complete write-up of the materials and methods for DNA labs 1-3. For full credit you must use your laboratory notebook as your sole source of information, NOT the protocol on the course web site. Please staple your graded Outline to the back of your Materials and Methods section.
-
Bring a typed document to the last day of lab:
- ONE page limit
- DOUBLE space
- 1 inch margins
- Cambria, Times, or Times New Roman font (12 point)
Remember, you are encouraged to use resources available at Rice's Center for Written Oral and Visual Communication (CWOVC); however, you are NOT permitted to meet with a CWOVC consultant for help with any writing assignments for this course. Please consult with Dr. Beason or Dr. Caprette if you have any questions.
We would like to thank New England Biolabs for their generous support of this laboratory course
![]()
Visitors: to ensure that your message is not mistaken for SPAM, please include the acronym "Bios211" in the subject line of e-mail communications
Created by David R. Caprette (caprette@rice.edu), Rice University 14 Jul 08
Author: Beth Beason Abmayr, Ph.D., Rice University
Updated 18 March 2014