
BIOE 451/452: Engineering and Communication Cycle 1
These materials were developed for BIOE 451-452 by Maria Oden, Deborah Ausman and the Cain Project in Engineering and Professsional Communication
Defining the problem and proposing an initial strategy
A pdf document containing this information can be found here.
This page provides an overview of the communication documents required for Cycle 1. Please refer to the Overview of Bioengineering Design and Communication page for background on the engineering and communication process in BIOE 451/452.
About engineering and communication cycle 1
In Cycle 1, you will begin working together as a team to plan your project and build a shared understanding of your design problem. Your documents will preserve the knowledge your group acquires. The documents will also report your initial work to your manager, sponsor, and other stakeholders, enabling you to set expectations, gain insights, and reach consensus on your project plans.
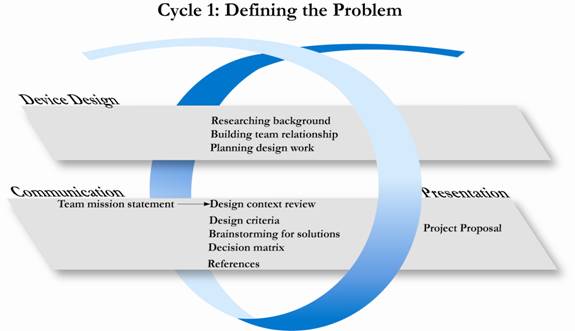
Graphical Representation of Cycle 1 in the Design Development and Documentation Process. Note that not all deliverables are listed- only the primary ones. See the table below for a complete lit of deliverables for Cycle 1.
All documents in Cycle 1 will be due at least twice. You will compile an initial draft that your manager will comment on and return to you. While considering this feedback, you will also begin using some of the initial documents created in Cycle 1 (e.g., the mission statement) to create other Cycle 1 documents (e.g., the design context review). A complete set of revised Cycle 1 documents will be due at the end of Cycle 1.
| Documentation Management |
During Cycle 1, you will begin maintaining a binder containing all of your bioengineering design documents. During Cycle 1, you will also begin producing two sets of documents that you will maintain throughout the course: a binder and weekly progress reports.
Why you do it
Properly documenting and preserving your desing documentation helps your team:
- Maintain a record of your work for your own use and for use by others who may, later, want to reproduce or build on your project
- Provide detailed updates to managers and others overseeing your work
Key Sections of Team Documentation
For the purposes of the Senior Design project you will maintain a team notebook, team document binder and a team Sharepoint site. Instructions for each are listed below.
How to prepare the team notebook
This notebook must be a bound notebook that the team uses to record ideas, brainstorming sessions, team meeting minutes, etc. All entries must be dated and labeled as in a laboratory notebook. Care should be taken to date and sign each new idea to serve as an invention record.
How to prepare the binder
You will receive a binder and a set of tabbed dividers at the beginning of the fall semester. You should start maintaining the binder during Cycle 1. You will receive a grade for your binder’s organization and format.
Consider the following tips as you organize your binder:
- Make it easy for evaluators (and your team) to find items in your binder. Include descriptive section titles on the tabs that clearly indicate the various documents that you will produce during the course.
- All documents due in the course should be given a separate section in the binder. You may use the binder to store other documents, notes, or work created during the course of your project. Simply label those items accordingly.
- Keep ALL old versions of documents AND the grading sheets used to evaluate them in the appropriate section of the binder in reverse chronological order (the most recent revision will be on top).
How to maintain the team sharepoint site
See this link for a complete description of the sharepoint site expectations: Sharepoint
Documentation Management Grading Rubric
Weekly progress reports (tag ups)
Why you do it
The weekly progress reports (or tag ups) help your team:
- Establish a productive, consistent working relationship with managers and mentors
- Alert managers and mentors to problems or successes achieved during the course of the project
- Develop a record of activities that can be consulted as the project progresses and used to plan future design projects
How to prepare weekly progress reports
Weekly progress reports should be emailed to Dr. Oden, your assigned teaching assistant, your mentor (if applicable and desired by mentor), and Design Class Coordinator. Reports are due every Tuesday night at midnight (except during winter break and spring break).
Your report will contain a short summary of activities completed since the last report, major successes or accomplishments, problems you have encountered or questions you have, and the number of hours the team has worked on the design project during the period covered by the report.
A copy of your weekly update email should also be stored in your team binder in reverse chronological order.
Access a template for creating reports by consulting Weekly Progress Report Accelerator #1.
See examples of poor and high quality reports by consulting Weekly Progress Report Accelerator #2.
Why you do it
The mission statement helps your team:
- Reach consensus on project aims
- Align objectives with those of manager and sponsors
- Focus initial planning on project
- Assure managers and sponsors that you understand your mandate
In your academic coursework, instructors discuss assignments in class, explain them in detailed handouts or on a website, and assign similar projects each year. In industry, however, sponsors or managers often charge teams to accomplish a certain task without such explicit instructions. Managers may not know enough to provide this detail, or the situation may depend on an array of complex factors. From the manager’s perspective, it is the team’s responsibility sort through these details and complexities.
In the mission statement, your team will rearticulate its assignment (or mission) in order to clarify expectations, both between team members and between your team and your manager and stakeholders.
View annotated mission statement examples by consulting Mission Statement Accelerator #1. NOTE: This document will appear as a word document with embedded comments.
How to prepare the mission statement
The mission statement is the first formal document that your team will write. Your goal is to summarize your task—your mission as a team. Mission statements focus on introducing your team and the problems or needs that you plan to address.
Your mission statement will have two parts. The first document will be a one-page mission statement document that includes background on
- The overall purpose of your project and the problems it will address
- A statement of the project scope and a list of constraints or issues that the team must address (at a minimum, include the timeframe and budget)
- A list of milestones or products with tentative completion dates. Note that these milestones should be project specific—course deadlines or documentation deliverables are not sufficient.
In addition to the one-page mission statement, draft a cover letter/email message to project mentors and sponsors that will accompany your mission statement. This message should be only 2-3 short paragraphs long and should explain who you are, what you are doing, and what you want them do. Within the cover letter and/or the mission statement itself, you should provide your team name, a list of team members, team contact information, and a list of team mentors/sponsors.
How to revise the mission statement
Remember that the purpose of the mission statement is to receive feedback and direction from your manager and sponsors. You should expect and welcome their insights. The more you can learn early in the project about what your stakeholders want you to achieve, the easier it will be to organize and plan your work. Do not simply incorporate what you perceive as wording changes or grammatical nitpicks. Think about the questions your manager raises about your document: How has your writing been perceived? Is it accurate? How can you better communicate your mission?
In addition to revising your mission statement for the final Cycle 1 deadline, you will also use the mission statement to help you formulate a specific problem statement while writing the design context review.
Team Mission Statement Grading Rubric
Why you do it
The team contract sets the “rules of work” for your team. You will use the team contract to define initial standards, expectations, and work practices for your group. The initial time spent discussing these issues and developing this contract will help your team work productively and enable you to resolve conflicts that arise.
How to prepare the team contract
Each team will have a unique way of working together. Some may prefer strict rules, a set hierarchy, and regular meeting times. Another team may adopt a flexible model that “outsources” responsibilities to individual team members, who report back their work to the group. Your contract will define your team’s culture.
Write the contract together as a team. You may need several meetings or online conversations to develop the document. All team members should sign and date the document and turn it in for the first deadline.
All contracts should state, at the top, the purpose of the contract (NOT the purpose of your project, but rather who it applies to, for what reasons, and for how long). It should then provide information on the following broad categories. The decisions you make within each category will be personal, but use the suggestions as a guide to the choices you need to make about how you will work together.
- Team leadership and member roles: When your team operates loosely and without clear roles, confusion can result. Members may find themselves working on the same things as other members, or discovering an important task was left undone. Assigning roles helps team members shoulder responsibility and capitalize on their individual strengths. Some teams assign static roles for the entire year; others opt to rotate roles so that team members can determine the task best suited to their interests and skills. Your contract should specify the roles your team will include, who is assigned them (or how and when assignments will be made), and whether roles will remain static or change. Some of the roles that can be helpful to a team are
- Team leader: Serves as the primary contact for the team. Keeps team on task.
- Secretary: Records team communications. Manages team paperwork and documents. May also serve as team “scribe” or editor depending upon how team chooses to organize document creation.
- Treasurer/purchasing agent: Manages budget. Places orders and tracks purchases. Maintains list of purchases/expenditures and parts list.
- Subject-matter experts: Specializes in key elements of project, from domain knowledge (biologist vs mechanical engineer) to specific tasks (“He’s our machinist.”)
- Liaisons: Some teams specify who will communicate with managers and advisors and prep the binder for delivery. Teams may also designate someone to be the primary liaison with sponsors or manage competition materials.
- Scribe: The documents in bioengineering design are created by the team, together, but you may want to designate someone to manage this process. Some teams designate a “scribe” who drafts all the documents for the team to edit. Other teams parcel out writing tasks and designate one person to edit the documents into a consistent style.
- Scheduler/evaluator: Compiles and updates Gantt chart. Tracks milestones. Analyzes team work process and suggests improvements.
- Communication: Discuss how your team will communicate, work together, and make decisions. Will you use email, IM, or Owlspace? Will you meet regularly? How will you capture and archive discussions? How will decisions be made and recorded?
- Participation: Set minimum expectations for team member participation in the project (attendance, responsibilities, use of laptops, cell phones during meetings, etc.). Consider how you will handle exam schedules or team member travel. Discuss how your team will resolve disputes should someone appear to not be “pulling their weight.”
- Work products: Begin listing the outputs your team will need to produce. How will you manage the production of course documents? Will you draft them as a group and pull them together as a team? Will you have a team scribe or editor responsible for maintaining stylistic integrity within documents and across different documents? Also think about actions that you will need to take to accomplish your project, such as obtaining parts, contacting vendors, participating in competitions or producing conference talks, etc. What rough time line do you plan to operate under? All of this thinking will help you in creating your Gantt chart.
- Conflict management and resolution: Discuss how you will manage disagreements (both personal ones and those related to team decisions). Does “majority rule”? How should disagreements or proposals be presented to the team? Also indicate how your team will respond if a team member is perceived to have been in breach of contract.
- Logistics: When will you meet? How will you disseminate information about meetings, due dates, or responsibilities? How should team members be contacted?
How to revise the team contract
You will receive feedback from your manager after handing in the team contract for the first deadline. Incorporate this feedback into the version handed in at the end of Cycle 1.
The rules set forth in the contract will help you plan the project and allocate time and resources. Later in Cycle 1, your Gantt chart will reflect the thinking that went into your contract.
Why you do it
Preparing the design context review helps your team
- Gather and study information relevant to its project
- Select a specific problem to solve
- Identify needs and constraints on the design
- Communicate to stakeholders the relevance and significance of your project
The design context review in Bioengineering Design serves two primary purposes. First, it ensures that your team has educated itself thoroughly about the problem your project will solve and the status of other currently used or proposed solutions. Senior bioengineering students must become familiar with the terminology, technology, physiology, and economics associated with their projects. In addition, they must often refine vague missions from sponsors into clear mandates that motivate projects. Writing a design context review requires your team to locate appropriate source material, sort through background information, and write a focused document that describes the specific problem you plan to solve.
Second, it improves your team’s ability to communicate with its audiences—managers, sponsors, advisors, and others standing to benefit from your project—who don’t need to know as much as you do. In academic and industry work, a design context review (also called a literature review) is an essential requirement in proposals. This review puts you—the student team—in the role of expert and educator. Your design context review will persuade your audience that a problem exists. The written review also demonstrates your team’s understanding of the problem and factors associated with solving it.
How to prepare the design context review
The design context review process consists of five steps:
- Educate yourself about your project
- Analyze your aims
- Determine your problem statement
- Develop a design context map
- Outline and write the design context review document
You will create the following documents as part of this process:
- Your Need to Know List (generated using the Accelerator for Analyzing Design Aims)
- A design context map
- Your team’s written design context review (3,000 words maximum)
A comprehensive guide to writing the design context review, including complete instructions for each step and accelerators to streamline the task, is available in A Guide to Writing a Design Context Review in Bioengineering Design.
Revising the design context review
You will receive feedback from your manager on both the design context map and the draft of the design context review. The final document submitted at the end of Cycle 1 should contain a clear problem statement and reflect your team’s assessment of the need for and significance of your project.
As you proceed with developing a design strategy, your understanding of the problem may change. You may make it more specific or modify the focus. You seek out new references to support directions you explore or choices you make in your design. In Cycle 2, you will modify your design context review to reflect the background and problem statement driving your proposed design strategy.
In Cycle 3, you will use the design context review as the basis for the Introduction to your final report. You can find more information on this assignment and the process of revision in the Cycle 3 overview resource.
Your references prove that your work is credible and provide resources for readers interested in exploring more about your work. You will cite all references that you consult for your design context review (books, articles, expert interviews, etc.) in the body of your documents and in a single list at the end of your binder. All references cited in your report should be from credible sources. Be wary of citing corporate websites or other resources that may contain biased, non-peer reviewed information. Only a small proportion of your reference list should come from solely websites. If you cite information from personal interviews or other communications, please reference them as such.
In addition to compiling your bibliography, note and list any additional general websites or other resources that were helpful to you and that might be useful to other bioengineering design students. Keep this list separate from your bibliography.
How to prepare references
Store full bibliographic information for each reference, following the referencing format used by Annals for Biomedical Engineering. The format is as follows:
- For journal articles: Last name of first author, followed by initials, initials and last names of each coauthor. Title of article (first word only capitalized). Name of journal (abbreviated as in Serial Sources for the BIOSIS Data Base, published by BioSciences Information Service). Volume:inclusive pages, year.

 Example: Haselton, F. R., R. E. Parker, R. J. Roselli, and T. R. Harris. Analysis of lung multiple indicator data with an effective diffusivity model of capillary exchange. J. Appl. Physiol. 57:98−109, 1984.
 - For book references: Author(s) as above. Title of book (main words capitalized). City of publication: Publisher; year, total number of pages.
Example: Thompson, D. A. W. On Growth and Form. ![]() Cambridge: Cambridge University Press, 1961, 346 pp.
Cambridge: Cambridge University Press, 1961, 346 pp.
- For a chapter in an edited book: Authors as above. “Title of chapter.” In: Name of book (main word capitalized), edited by initials and last names of editor(s). City of publication: Publisher, year, inclusive pages for chapter.
Example: Glass, L. and A. Shrier. "Low![]() dimensional chaos in the heart." In: Theory of Heart: Biomechanics, Biophysics, and Nonlinear Dynamics of Cardiac Function, edited by L. Glass, P. Hunter, and A. McCulloch. New York: Springer−Verlag, 1991, pp. 289−312.
dimensional chaos in the heart." In: Theory of Heart: Biomechanics, Biophysics, and Nonlinear Dynamics of Cardiac Function, edited by L. Glass, P. Hunter, and A. McCulloch. New York: Springer−Verlag, 1991, pp. 289−312.![]()
EndNote, a software program that manages references in conjunction with common word processing programs, can be exceedingly helpful in compiling bibliographies. The program stores bibliographic information and notes. Many references can be automatically downloaded directly into Endnote from search engines, including Web of Science and other sourcing systems available through Fondren Library. The software will also convert references automatically into any one of hundreds of predefined bibliographic and citation formats. You are encouraged to use this program to manage your references.
Citing references
Because your documents will initially be turned in separately and stored separately in your binder, you should employ the author date referencing system when citing references. Include your full list of references in your binder and when citing a reference, place the author’s last name and date in parentheses following the sentence you wish to reference.
Example: This apparatus is based on the discovery that applying tension to broken bones causes osteogenesis and soft tissue regeneration [Ilizarov, 1989].
When you compile your final report, you will employ the citation format of the Annals of Biomedical Engineering. When you cite a reference, you will assign it a number (the first reference cited is 1, the second reference cited is 2, and so on). Your references will appear in a sequentially numbered list at the end of your document. This is another reason to use Endnote; it manages the references and automatically reorganizes and renumbers them should you move text (and associated citations) around in your document.
When citing a reference, remember the following tips:
- A citation simply indicates where you gleaned the knowledge that is used to make a statement in your report. Think of it as evidence supporting your claim. How do you know how many people will die of heart disease this year? Who did the study that showed that the state-of-the-art device you are replacing fails to work under certain conditions? Citations tell readers where to look to find proof or more information on points in your report. They also show that you have done your homework and understand the context for your project.
- It is better to cite more than less. If an entire paragraph is about a study, a single citation when you mention the study may suffice. However, if there is any confusion about where a claim or piece of data came from, cite again.
- Do not place cited material in quotes unless it is an exact quote that must be written as such. You will have very little need to quote material in these documents. Paraphrase information in your own words and simply cite the reference to indicate the source of the information.
The design criteria document helps teams develop quantitative, measurable criteria that can be used to define a successful solution. Your design criteria link the needs, market forces, and constraints that you researched in the design context review to measurable objectives and specifications.
How to write the design criteria
Dr. Oden has lectured on procedures for developing quantifiable constraints from qualitative needs. Please refer to those notes for information on how to develop the criteria. Format your criteria as a bulleted list or as a table that maps objectives (for example, durability) to target criteria (for example, durable over 5 years of use) and outlining methods you will use to verify that the criteria have been met in your design (e.g., accelerated exposure test of device to equivalent years of use). Be sure to completely explain your criterion in a sentence rather than simply listing a concept such as ‘durability.’ (e.g. The device will survive a drop test from 5 feet without sustaining significant damage.) Include an introductory paragraph or two that justifies your choices of criteria and explains your rationale.
How to revise the design criteria
You will receive feedback on the initial draft of the design criteria document and will revise the criteria for submission at the final Cycle 1 deadline. The document will be further revised in Cycle 2 as you articulate your design strategy.
As you proceed with developing a design strategy, the specific criteria that underlie the strategy may change. Track these modifications and note any revisions or changes in the version you will submit in Cycle 2. You will also use the design criteria document to inform your decision matrix/Pugh analyses as you evaluate ideas for solutions generated during brainstorming sessions. Ultimately, the design criteria will appear either in the introduction to your report or as an introduction to your design strategy. For more information on these choices, please see the Cycle 3 overview resource.
Brainstorming/Ideas for solutions
Why you do it
Brainstorming is a process for developing creative solutions to problems. It is a wonderful way to develop a large list of options for solving your design problem. Brainstorming works by focusing on a problem or subset of a problem and deliberately coming up with as many solutions as possible. It is effective not just because team members come up with new ideas, but because it can enhance existing ideas as they are developed and refined in association with other ideas.
How to develop your brainstorming/ideas for solutions
Your course instructor has lectured about brainstorming; please refer to your lecture notes for further information and guidelines on brainstorming techniques. The rules are summarized here:
- Generate as many ideas as possible
- Quantity counts—the more ideas you generate, individually and collectively, the better the chance your team will come up with an innovative solution
- Don’t explain or justify ideas—shoot ideas rapidly and describe them with simple key words
- No discussion—brainstorming is for getting ideas recorded
- Wild ideas are welcome—be as creative as you can
- The more odd, weird, impossible, or crazy ideas that are generated, the better your chances of coming up with a truly original solution
- Try to avoid words and ideas that are offensive to your team, however, as these feelings will only squelch creative thinking
- “Hitchhiking” is encouraged—build on the ideas of others
- Ideas do not have to be completely new
- It is ok to expand and build on others ideas
- No criticism is allowed—defer judgment until later
- Don’t put down ideas—especially your own (“This is going to sound stupid, but…) In brainstorming, there are no “dumb” ideas or right or wrong answers
- Use laughter, humor, and applause to build team spirit and encourage participation
- Defer judgment to a later phase, when you can evaluate the ideas critically
Following these rules, work as a team to create a list and/or drawings of many different possible solutions to your team’s design problem. You can compile this list by hand, note ideas on a whiteboard or large piece of posterboard, or disseminate sheets for team members to scribble on separately. You should develop at least 15–20 concepts or ideas pertaining to your project. Drawings can be especially useful for this process. Save brainstorming tools/evidence. For items too large to put in your binder or notebook, photographs are sufficient.
Store the list and associated figures in the appropriate section of the team binder. If you have several brainstorming sessions, include all of these results in your team binder.
Revising the brainstorming/ideas for solutions
When you have completed enough brainstorming, your team will evaluate your list and select at least three or four candidate solutions to evaluate in greater depth. Your team will further develop these solutions into concrete (although still conceptual) design ideas by developing decision matrices and Pugh analyses to evaluate your ideas against the design objectives/criteria that you have developed Eventually, you will discuss the entire brainstorming and evaluation process in the design strategy section of your final report.
Why you do it
Once the team has a candidate list of ideas to solve their design problem, they must select from these ideas to finalize their design. A rigorous analysis helps the team make appropriate decisions about the overall design and the individual components.
How to prepare the decision matrix/Pugh analyses
The candidate solutions that were developed in your brainstorming sessions should be rigorously compared to one another using decision matrix analyses, cost analyses, engineering calculations, environmental analyses, and other factors to ultimately select the final design option. Examples of how you can complete this analysis were provided in lecture. The text of this section should help the reader understand the decisions you made and understand why you selected your final design option. All the comparisons, analyses, and calculations should be shown in the final decision matrix document.
Revising the decision matrix/Pugh analyses
Your decision matrix and Pugh analyses will ultimately be described in the design strategy section of your final report.
The Gantt chart helps your team
- Set milestones and allocate resources to ensure project proceeds productively
- Demonstrate responsibility and foresight to manager/sponsors
A Gantt chart is a common method used to track project progress. The chart shows every task relevant to a project with beginning and end dates, responsible parties, and time scales. You will initially populate the chart using estimates, but as project progresses, you will update the chart to show actual time spent on duties. The resulting visual representation of plans and actual work done by your team will help future sponsors and teams dedicate appropriate resources and time to subsequent projects.
View a sample Gantt chart by consulting the example in Gantt Chart Example.
How to prepare the Gantt chart
The definitive software for project management is Microsoft Project. If you have access to this software, consider learning it to manage your work in bioengineering design.
Most teams, however, create a Gantt chart using Microsoft Excel. Consult Gantt Chart Example to see how the tips below are used to create an actual chart. You can also use the excel template discussed in class- it is on the OEDK computers. You may need to modify it to track hours by person and task.
- List all tasks required to complete your project in the leftmost column of a spreadsheet. List project specific tasks (purchase parts, build condenser) as well as course specific deadlines (mission statement deadline). Consider including document deadlines in a separate category, or with associated design tasks (i.e., write the design context review as part of conducting background research).
- Tasks that require more than 6 hours work should be listed separately. Consider grouping tasks requiring less than 2 hours into units.
- Try to be realistic in your estimations. Most often, teams underestimate the work required
- Across the top, include the following columns
- Estimated time: How much total time you think the task will take.
- Time scale: Most teams use 1 week increments, as this aligns with the weekly progress report requirements.
- Consider using colors or shading to indicate tasks that are completed, tasks that are in process, and tasks still planned. You can also use color to indicate hours exceeding estimates.
- As you complete projects, fill in the actual time spent on a task under the appropriate week. Don’t forget to add tasks, subtract tasks, and adjusts estimates as you work through your project. Never provide an out of date Gantt chart!
- In addition to the Gantt chart, create a chart showing the actual hours worked by team members for each time period (team members on the left/time period across the top) and the actual hours worked by each team member on each task in the Gantt chart (tasks on the left/team members across the top).
Links to other Cycle Web Pages:
Cycle 3:Implementing and Testing
Cycle 4:Finalizing and Presenting the Solution
![]()
© Rice University 2006, 2007, 2008, 2009, 2010