
BIOE 451/452: Engineering and Communication Cycle 4
These materials were developed for BIOE 451-452 by Maria Oden, Deborah Ausman and the Cain Project in Engineering and Professsional Communication
Finalizing and presenting the solution
A pdf document containing this information can be found here.
This page provides an overview of the communication documents required for Cycle 4. Please refer to the Overview of Bioengineering Design and Communication page for background on the engineering and communication process in BIOE 451/452.
About engineering and communication cycle 4
Throughout bioengineering design, your team has created an archive of documents that track progress from the earliest conceptions of your mission to the results of prototype and functionality testing. You have also continually revisited and revised prior documents and used existing documents as the basis for other documents. In Cycle 4, you will finalize your documentation by creating a final report describing your design work. You will also create a user/safety manual so that others can implement your design.
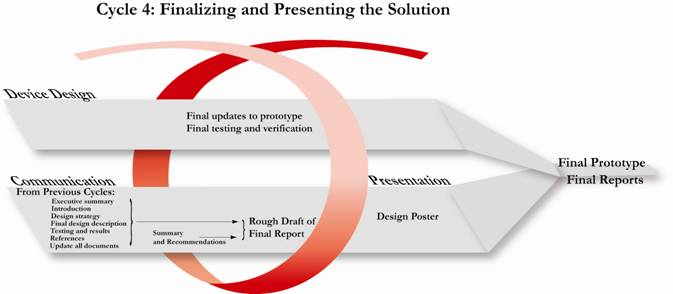
Graphical Representation of Cycle 4/5 in the Design Development and Documentation Process. Note that not all deliverables are listed- only the primary ones. See the table below for a complete lit of deliverables for Cycle 4/5.
Documents revised to be included in final report |
|
Final poster ** (in FINAL submission) |
|
Final report slides ** (in FINAL submission) |
|
|
Finalized binder (updated versions of all other documents to serve as appendices for final report) |
Why you do it
The cover sheet is the first thing a reader will look at when they review your work. It provides the first impression of your project and care should be used to provide adequate and high quality information on the cover sheet.
How to prepare the cover sheet
The cover sheet should include each of the following elements:
- A descriptive report title that specifies the name of your device and highlights a unique quality of your design
- A notation of the purpose of this report. You are submitting the report to your organization or company and you want to tell the reader who is submitting the document. This could be your team name or team member names. An example is:
Submitted to (organization)
by [team leader]
on behalf of
[TEAM NAME]
[List all team member names on separate lines]
- List team affiliation/ departments/ institution and contact information on separate lines. If students are in different departments their specific affiliations should be noted.
- Date of submission
- A nice addition to the cover of your report is to include a piece of art work/ logo that reflects your project.
Why you do it
Design reports are often quite long, particularly those that include extensive appendices. A table of contents will help readers skim your document to locate specific information of interest to them. The table of contents should summarize the main section titles of your report. This is another reason to think creatively about how your report organizes information and tells a story. Choose subheadings that forecast the content that will appear in the section they introduce. A subheading that reads, “The need for portable defibrillators” is more helpful than vague headers like “Introduction.” Don’t forget to list your figures and tables separately so that readers skimming your report can easily find them.
How to prepare the table of contents
You can create an accurate table of contents by using the table of contents feature in your word processing software. These features usually require you to simply mark the headings and subheadings that you want to in your table of contents; the software then formats the table. The feature also enables you to automatically update page numbers in the table as you make changes to the document. Please consult the help menu of your preferred word processing program for information on this feature.
Why you do it
The final report helps your team explain your project to stakeholders, potential customers or users, and peers. The report should explain in detail
- What problem you set out to solve
- Your design strategy and the process you followed to select it
- The methods you used to address the problem and how you selected those methods
- The final design you built
- How well the final design meets the design criteria for solving the problem
- Your recommendations to others seeking to build on your design, develop alternate solutions, or learn from your experience
How to prepare the final report
You will produce an initial draft of your final report several weeks prior to the end of the second semester and a final draft for submission at the conclusion of the course. Simply handing in your binder does not fulfill the final report requirement. However, the deliverables that you have produced in this course do contain the content readers expect in a report (with the exception of the summary and recommendations, which you will create in this cycle; see the section describing this assignment below). You will need to shape these documents into the sections typically associated with a report.
For details about the expectations of this report, see Final Report Accelerator #1. Accelerators from other assignments in this course may also help you, particularly Design Context Review Accelerators #6 and #7, which provide advice on streamlining your writing by leading with assertions and distinguishing between poor and high quality arguments.
Place your complete final report draft at the front of your binder. Past versions of items included in your final report along with the rest of the materials in your binder should remain in the appropriate binder sections.
The summary and recommendations help your team
- Align results to original project aims as expressed in the team mission and problem statements
- Draw conclusions
- Make recommendations to others that might build on or use the completed design
- Provide information to managers/sponsors so that they can decide how to continue, build on, or market and commercialize the design
In the course of your design work, your team will learn many things about how the design works that can be helpful to other teams attempting to build on project. The summary and recommendations will provide an analysis of your design and offer recommendations based on your experience. To your stakeholders, this section may be the important aspect of your report, as it succinctly describes what you did, whether it was successful, and what actions should happen next.
Writing the summary and recommendations
Try to limit this section to a maximum of three pages. Your readers can find details to support your conclusions in the paper itself. Focus on the main points you want readers to “take away” from your work. Consider the use of bullet lists to help readers skim the content. Consider the following questions as you develop your conclusions:
- What is the status of your design? Is it complete or does it need further work?
- What are the major features of your design? How well or to what extent does this design meet the design objectives specified for the project?
- How could your design be improved?
- What would you have done differently if you were to do it again? If someone else were to take up work on this project, where should they start?
- What new information or design constraints/parameters did your project reveal that influence how others should approach the work in the future?
Summary of conference presentations and awards
Why you do it
The summary of conference presentations and awards helps your team:
- Showcase your role as a member of a larger research and development community
- Highlight contributions made outside the scope of this course
How to prepare the summary of conference presentations and awards
During the semester, you may participate in competitions, present on your design, or secure additional funding or recognition from outside sources. Include a list of these experiences, if applicable, in your binder, with commentary to explain their significance. Your list should include the following items:
- The name, date, location of the conference you attended.
- The names of the team members who attended the presentation.
- A short summary of the experience including what you presented, the audience, and the format of your presentation (e.g. poster, oral report, length of presentation). Also include observations of your experience, what you learned, whether you received feedback on your project, and any other relevant notes.
- Names and details of awards you received, if any.
Why you do it
The user/safety manual helps your team
- Ensure the safe operation of your design by users, other teams or other project stakeholders
How to prepare the user/safety manual
Creating a user/safety manual is an integral and important part of the design process.
All new designs come with user/safety manuals. For the purposes of this documentation you may combine these. Try to make a manual that looks and feels like you would get if your device came packaged in a box. Look at users’ manuals and safety manuals for items that you own. Be creative and thorough—though for this assignment you will not need to create instructions in multiple languages. Be sure that your manual addresses the following issues:
- Safety reminders and warnings
- Instructions on how to assemble the device (if applicable)
- Instructions on how to use the device correctly and safely
- Instructions on what to do in case of trouble
- Troubleshooting instructions
Links to other Cycle Web Pages:
Cycle 3:Implementing and Testing
Cycle 4:Finalizing and Presenting the Solution
![]()
© Rice University 2006, 2007, 2008, 2009, 2010