


FINAL REPORT (Page 2 of 4) IntroductionInitial ExperimentationCard Detection Process OverviewRotationResultsMATLAB CodeDemosDivision of LaborAcknowledgementsConsulted Sources IntroductionInitial ExperimentationCard Detection Process OverviewRotationResultsMATLAB CodeDemosDivision of LaborAcknowledgementsConsulted Sources |
||||||||||
|
Card Detection Process Overview In order to make an effective image recognition system, the positioning of cards in the image must not be restricted. The project overcomes this limitation; the cards do not have to be located in a certain portion of the image. The process of card detection implemented in this project contains three steps:
 Sample Playing Card Image The purpose of edge detection is to reduce the image down to the prominent edges. Edges carry useful information about the object boundaries which can be used for image analysis, object identification and image filtering. Edges are defined as local variations of image intensity. On the image above, the prominent edges are easily found by locating a transition from black to white and vice versa. When a large change in intensity (think derivative), an edge has been located. In this project, Roberts' edge detection (1965) is used based on its performance with several playing card images. This technique calculates two differences in intensity: D(2) = P(x,y+1) - P(x+1,y) 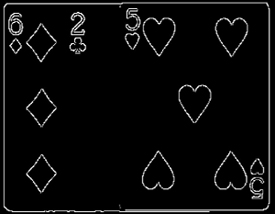 Image after edge detection The next step in the recognition process is the detection of corners. After generating a few ideas, the simplest approach worked with the greatest accuracy. The edge-detected image is scanned with a 35x65 window column by column/row by row in a two-dimensional convolution/rasterization pattern. At each pixel in the image, the number of white (edge) pixels contained in the 35x65 window are summed. If this amount is greater than a set threshold, the pixel coordinates are saved as a potential corner site. The graph below shows the potential detections of the corners. The process was implemented in the function scanit.m. 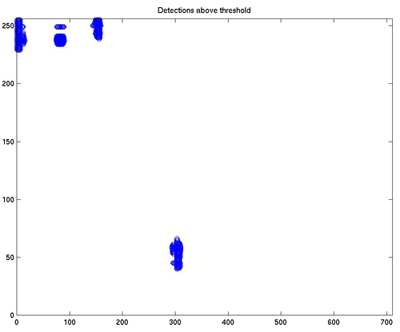 Graph of potential corner detections Overall, the first two steps to card recognition have been completed. The function findspot.m executes these steps by taking the original image as input and returning the valid corners in the picture. Step 3: Correlation Algorithm - "Matchmaker, Matchmaker, Make Me A Match" This is the third step, but it is really the point of control for the overall card recognition process. So far, the corner detection has been described. The correlation algorithm runs the show by first calling findspot.m to locate the corners and then running its own correlating algorithm. What follows is a CONFIDENTIAL excerpt from the technical whitesheet explaining the correlation process in meticulous detail. >>connecting to 128.42.165.64 >>decrypt tech.txt The function identifyMultipleCards.m is the manager function of the scanning and correlation process. It essentially takes the image of cards ( which can be a single card or multiple cards) and returns a string specifying the cards in the image. The image must be a matrix of grayscale values represented as 8-bit unsigned integers. First, a call is made to the function findspot.m on the input image. This returns the coordinates of the upper-left-hand points of all the windows the function identifySingleCard (described below) will scan through. These coordinates are stored as the matrix ulcCoords. For each upper-left-hand corner (ULC) ordered pair in the ulcCoords vector, a call is made to the function identifySingleCard.m, which takes the coordinates and returns a vector which contains the suit and value in integer form. These integer values will be translated into string values for user-friendly output. Each of identifySingleCard.m returns is stored in the matrix roughHandIndices. It is possible that the findspot.m function will return two ordered pairs for one card, so a check is made for duplicate entries in roughHandIndices. After any duplicates are removed, the indices are used to extract the appropriate value and suit names from library matrices containing these strings. The results are stacked together into an output matrix which lists all the cards found in the image as "(value) of (suit)." The real workhorse of this process is the identifySingleCard.m function. As described above, this function returns a vector specifying the indices of the suit and value of a playing card (for use in extracting the strings corresponding to suit and value from two vectors), given an image of the card (8-bit unsibned integer grayscale values) and coordinates for a starting point. A set of library images are loaded as a workspace (library.mat). These contain the reference images for the suits (named club, diamond, heart, and spade) and the value (named one, two, three, four, five, six, seven, eight, nine, ten, jack, queen, king, ace). The library images are represented as double floating-point matrices (needed for the correlation calculation). Since examination of either or both of the card's corners is possible, it is necessary to have upside-down versions of all these images as well. These are generated with simple matrix operations( flipud() and fliplr() ) on the rightside-up images loaded with the workspace. Here are four representative library images:
The area in the card's upper-left or lower-right corner which contains the information about the suit and value is extracted from the card image. A window of width 30 and height 65, with it's ULC in the same position as the starting coordinates, will take in the suit and value on any card. As an example, the process will be illustrated on the two of clubs: 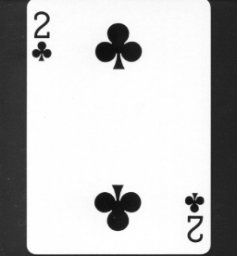 Two of Clubs This window defines the image which will be referred to as infoArea. The infoArea extracted for the two of clubs is:  InfoArea Note: The function findspot called in identifyMultipleCards (which calls this function with returns from findspot) sometimes returns ULC's for infoAreas in the lower right-hand of the card. Sometimes these coordinates make the infoArea exceed the matrix dimensions, so a check and fix for this is necessary. Next, the suit is identified via the following process: A window of area 23x23 is moved over the infoArea. At each windowing point, the correlation of the windowed image is taken with each of the four rightside-up library suit images. The results of these successive correlations are stored in four vectors (clubCorrValues, heartCorrValues, etc.). Then the correlation is taken with each of the four upside-down library suit images, and the results are again added to the four correlation vectors. When the windowing process is complete, the max of each of these four vectors is stored in the vector maxSuitCorrValues. The index of the max of this vector is found, and it is returned for later use in selecting the appropriate suit string from a matrix of strings in the identifyMultipleCards.m function. The correlation process is as follows: When two images are correlated, they are first reshaped as vectors and them normalized. The inner product of the resulting vectors is then taken to produce the correlation factor. The value of the card is determined in a similar way. Here more correlations are needed. With the 13 value images (and the 13 upside-down versions), 26 correlations are needed at each windowing point. An accounting procedure similar to that for the suits is used to determine the index of the card's value. This index is returned for later use in selecting the appropriate value string from a matrix of strings in the identifyMultipleCards.m function. The two returns (indices for suit and value matrices) allow identifyMultipleCards.m to build a matrix of strings for the names of all cards in an image via multiple calls to identifySingleCard.m. EOFile >>end of "decript tech.txt" >>Thank you for using EhWare's SuperDecript software. Rotation Rotation is an issue inherent to any real-life implementation of this sort of project. Most of the time, the cards will not be all aligned in an upright position. Being able to "unrotate" the images is crucial so that the later parts of the algorithm (corner-detection and matched filter) can process cards originally at any angle. Unrotation is performed in three basic steps. First, the "starting point" of the card must be calculated so that the image can be cropped down to the single card. Next, it is necessary to determine at which angle the card is situated. Then, the card must be rotated to the upright position so that it can be analyzed by the corner windowing function. Isolating the Card Before anything else, it is necessary to separate the subject card from the rest of the image, whether it contains other cards or just excess dark space. This must be done differently than for the plain upright card because the corner-finding algorithm previously used would find the upper left and lower right corners (with the value and suit) of the card, which, in the rotated case, is NOT necessarily the point needed to isolate the card. A recursive algorithm is needed to "slide" down the left edge of the card until the lower corner is reached. 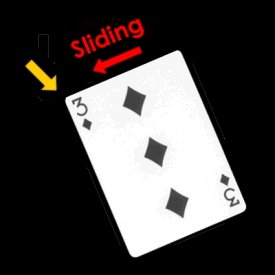 Sliding down Now we know the location of the lower corner and the uppermost corner, and we can identify the "starting point" of the card as the point having the same column as the lower corner and the same row as the uppermost corner. Even in a worst case scenario, a rotated card will take up no more than 320 pixels in one direction. (This worst case occurs when the card's diagonal is positioned vertically or horizontally - a rotation of approximately 37° or 63°.) The original image is cropped down to a 320 x 320 square with the upper left corner equal to the "starting point". In this manner the card is isolated, and analysis of the resulting image is faster because of the smaller size. Calculating the All-Important Angle of Rotation The next challenge is to calculate the angle at which the card is currently situated. After some consideration, the Radon transform was selected for this purpose. The Radon transform calculates image intensity projected along a radial line. This projection is iterated through 180° giving as output a matrix with one column for each angle. For this process to be effective, the image must first be edged using Roberts' Cross edging. 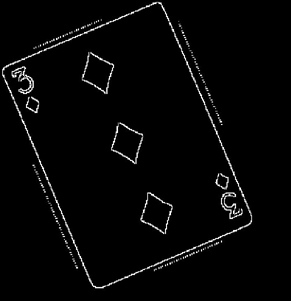 Running the image through edge detection Now, when the Radon transform is run on the image, the most "intense" angle will be the one with the two long sides of the card. This is, of course, the angle at which the card is situated, so the only challenge is defining "intense". Several formulas were tried, including taking the average of each column's elements and the sum of the squares of each column's elements, but the most successful method (and the one implemented) chooses the column containing the maximum single element value. 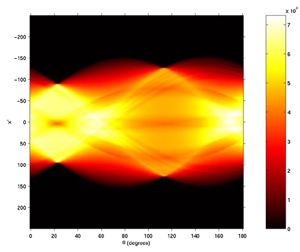 Radon transform of the rotated three of hearts 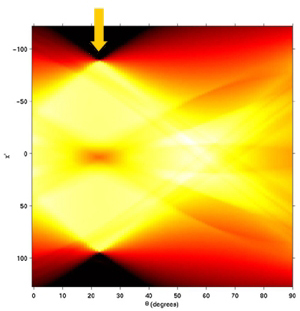 Zoomed in view Rotate the Card Already! With the critical angle of rotation calculated, a simple MATLAB image rotation function rotates our card image into the upright position so that it can at last be passed to the original code for card recognition. 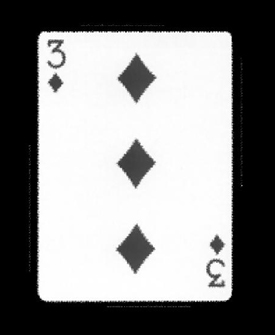 The final unrotated card The entire rotation code is controlled by rotcard.m. See the MATLAB code section for the breakdown of the sub-functions in rotating cards. Next: Page 3Previous: Page 1 |
||||||||||


